Saturday, May 31, 2008

Get those cherry pitters ready!

So, how did we make a dent in the bounty of fresh cherries we picked up the other day? We began by making this Dark Cherry Bundt Cake that Jeff brought into the office to share yesterday.

Swirled inside of this soft cake is a homemade cherry "filling" that is almost as thick as you might expect with a jam. Just a little granulated sugar to sweeten and cornstarch to thicken is added to a healthy three cups of the dark sweet fruit. A little kirch and lemon zest is stirred in to deepen the cake's flavor - if you don't use alcohol or don't care to buy a nip for a recipe, you can go ahead and use fresh orange juice. Since cherries and almond pair exquisitely well, the mixture is given a splash of almond extract once removed from the heat.

Soft in texture, the cake achieves this by mixing a combination of light cake flour and whole-wheat pastry flour. If you don't have the more nutritious pastry flour, you can get away with using all-purpose. To lend a buttery flavor, yet not require the use of a full stick, a few tablespoons are combined with a healthier canola oil. While the cake is still fairly low in the fat department, don't think that it will be dry by any means - just over a cup of vanilla yogurt added will keep the cake moist while adding an alluring tang.

To bulk up the vanilla flavor in the yogurt, a good dose of vanilla extract is added to the cake batter. And lest we forget about that splash of almond extract in the filling, we also added a bit to the batter to tie the two together. When you swirl the batters together, the jam will inevitably ooze out a bit, so be sure to prepare your baking pan well. For bundt cakes especially, I always use a baking spray that has flour added (like Baker's Joy or Pam with Flour) and have yet to have a cake stick on me. I didn't think that this cake needed any fancy drizzles of frosting or glazes, but I did dust the top with confectioners' sugar right before we sent it into the office which gave the cake a more finished look.


Friday, May 30, 2008

Finally, the season for this fruit has arrived!

One thing Jeff looks especially forward to each year around this time is when the markets are flooded with a certain fruit. Sweet, with a rich red color, these little guys finally arrived up here with a killer price... so I took full advantage and bought a bunch. Expect several recipes with this fresh fruit over the next few days - we'll start it off tomorrow with an end of the week Treat Day treat that Jeff brought in today!

Tonight's dinner, Bulgur with Roasted Chickpeas, Red Onion and Lemon, could easily swing either way as a side or main dish, depending on how hungry you may be. We used a coarser bulgur wheat for this dish, but I think it would be fun to try it with millet or even quinoa. As the bulgur was busy hanging out in some hot vegetable broth, we started working on the next portion of this recipe.

Into a skillet goes a lengthy combination of rinsed chickpeas, thinly sliced red onion, olive oil, fresh lemon juice, a couple bay leaves, cumin seeds, a dash of turmeric, smoked paprika and just a bit of cayenne for heat. To give the protein-rich chickpeas (also called garbanzo beans) a head start, they are first placed on the stove until they begin to sing and dance around as the heat warms up the oil. The skillet is then transferred into a heated oven to infuse the chickpeas with the tangy, yet smoky flavors from the tart juice and spices added. While I wouldn't say that the chickpeas were crispy, their trip in the oven seemed to transform their texture into a more firm and chewy bite that was very appealing. With quite a zesty flavor combination in the chickpea mixture, once it was combined with the mild chewy grain, the assembled dish balanced itself out well. While it is a meatless dish, I think you could easily toss in some cooked well-seasoned protein of your choice to bump up the filling factor of this recipe. It is pretty dull in the picture below as I didn't have any parsley in the refrigerator, but a few leaves chopped and scattered on top would help freshen up its appearance!


Thursday, May 29, 2008

Lightening up a mousse in the calorie department...

We have quite a few cookbooks, but I don't have nearly as many as I would like. I enjoy heading over to the library and browsing through their selection to see if they have any that I've been wanting. I'll either check them out or sit down with a basket full of them and start browsing to see if it either grabs my attention or I'm able to mark at least a few recipes to make it worth it. I noticed a recipe for Strawberry Mousse in one of those books I was looking through and after I made it today, I've already ordered the book from Amazon!

A mess of strawberries are pureed and poured into a saucepan to gently simmer until they reduce and intensify their glorious sweet flavor. To take their flavor up a level, fresh lemon juice and a dash of Kirsch (cherry brandy) are stirred into the slightly thick ruby mixture. Now, because this mousse is from a "lighter" book on dessert, there are a couple tricks used to get that familiar luscious, creamy texture, without the guilt!

To help add some support to the bright berry puree, yet not so much that you feel like you are eating Jell-O, a little melted gelatin is added to the mixture. To achieve a similar (but not quite the same) richness you get with cream, ricotta cheese is also added and the whole shebang goes into a food processor to smooth out and completely combine. A heated meringue is then prepared and gently folded in to give the mousse its light and very airy finished texture. While the egg whites are heated, they are not completely cooked - if you worry about this, you could certainly use pasteurized eggs to remove the concern. Transformed from a ruby red to a pale pink in color when combined, roughly half of the amount is divided between a few dessert glasses - for a fun surprise, sliced fresh strawberries are then placed on top and then covered up by the remaining berry mousse.

The assembled desserts are then covered and chilled until you are ready for them, making for a perfect make-ahead treat. Right before serving, additional sliced fresh strawberries are placed on top. After being chilled, the mousse ever-so-slightly firms up from the gelatin, however it remains very creamy and spoons out of the glass like a dream. Summer better not be too far away as I can't wait to go out and pick my own berries to make this dessert even more special.

Now, before we devoured that tasty mousse above, we were busy enjoying the Farfalle with Turkey Sausage, Leeks, and Broccoli Rabe I made for dinner tonight. You'll need about 1 bunch of broccoli rabe for this recipe - if you've never used or spotted this bitter vegetable before, you may also find it labeled as rapini in your market.

Once you have cleaned and chopped the greens, they are plunged into boiling water for a minute or two to allow some of the bitterness to leach out of the them. As soon as they start to wilt, they are shocked with cold water to stop the cooking process. You have a couple options to cook the bow ties for this dish - I went ahead and just dropped the pasta into the same liquid as we cooked the broccoli rabe. However, if you are nervous about any of that slight bitterness infusing into your pasta, you could dirty another pot to do this - neither of us found that it changed the flavor much though.

To softened leeks, a bit of crushed red pepper and a couple thinly sliced cloves of garlic are added. As soon as the garlic took on a light golden hue, a pound of lean hot Italian turkey sausage is added and crumbled as it cooked. To help ensure it doesn't dry out at all, a bit of the cooking liquid from the pasta/veggie liquid is added to the sausage mixture after it had a chance to brown. The cooled broccoli rabe, cooked pasta and just a touch of fresh lemon zest are stirred into the pan and allowed to warm back up. Ricotta cheese and a couple ounces of fresh grated Parmigiano-Reggiano are added to the full skillet for a creamy and sharp finish. While I'm finally starting to love the pungency of broccoli rabe, the slight bitter flavor remaining was balanced by the mildly sweet leeks and hearty sausage.


Wednesday, May 28, 2008

A note of thanks...

Max, Jeff and I wanted to start out this post by thanking you all for the many e-mails and comments about Spike's passing yesterday - it smoothed the edges of a very rough day.

I mentioned on Monday's post that the pizza we had was the last meal Jeff was going to be able to have for a couple days. If yesterday wasn't tough enough already, in the morning he had to begin a "clear liquid" diet in preparation for a colonoscopy (sorry if that is too much information!) test this afternoon. So, he has only been allowed to have broth (homemade at least!), water, apple juice, Gatorade and Jell-O. Fun huh? One of the other restrictions was that nothing could have the colors purple or red! The test was a little soon considering his age, but his father passed away quite suddenly a couple weeks ago from colon cancer. On the plus side, the test came back completely normal!

Anyway, let's move away from the sad news and get back to the food. So, on Monday, I did serve a salad along side of that pizza that we didn't get a chance to talk about. Like most salads, this Arugula, Grape, and Sunflower Seed Salad came together in a hurry. With a combination of red wine vinegar, honey, pure maple syrup, stone-ground mustard and a few drizzles of olive oil, this dressing was tangy and slightly sweet - however, if you like your salad well-coated, you may want to double the amounts. While we love the peppery bite from Arugula, we cut the amount with some baby spinach for a more mild experience. Tossed with the greens are some crisp halved grapes, toasted sunflower seeds and a small amount of fresh thyme for an herbal note. We never use grapes much in salads for some reason, but the sweet juicy bites were a pleasant textural compliment to the tender leaves and crunchy seeds. Light and delicious, this recipe went to the top of the salad recipe pile to get made again soon!


Tuesday, May 27, 2008

In remembrance of Spike...

Just about 18 and a half years ago, Jeff walked into an animal rescue center and came out with a spunky little guy who quickly took on the title of Spike. With a few types of breeds in him, no one could really figure out what exactly this lucky pup was, but most vets we have seen along the way say he had a feisty piece of Jack Russel Terrier in him.

I've only been graced with his presence for a little over 9 years now and I feel so lucky to have had that time to get to know him and his quirky ideas of fun. Spike loved to wander around in the yard, taking bites here and there from any long blades of grass that he walked past, or if he was feeling especially lazy, he enjoyed sprawling himself out to soak up the rays from the sun.

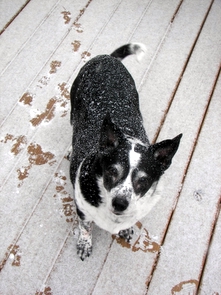
Even though he loved the sun, he had the best time in the snow - besides rolling around and getting completely soaked, you could always count on him to run up to a snow bank and take a big bite out of it.

One of the first things I noticed about him when he was romping around outside was that he wouldn't run like other dogs as his back legs seemed to work together and he would hop along like a bunny - so cute!

While Spike loved the outdoors, the time he had the most fun was when he and Jeff would curl up on the couch or bed and watch some TV or just take a little snooze.

Spike was the official pup tester of our many treats that we baked. Max did have a little input, but Spike being the older brother, he got first say on which treats were to be made again. Here are the boys before digging into one of their favorite goodies.

He was especially a fan of the Pupcakes with Cream Cheese Frosting - we cut them into quarters and they would last quite awhile.

While we were living in Phoenix, Spike and Max loved licking up some homemade peanut butter frosty paws (basically yogurt blended with peanut butter and frozen) that we made - Max would often to try sneak and steal a bite, but Spike would have no part in it.

Speaking of Phoenix, Spike put up with many moves and very long car rides over the years. He got to see quite a lot of the United States as he went from Maryland to New Jersey, Jersey to Minneapolis, Minneapolis to Phoenix, Phoenix back to Maryland and finally back to Minneapolis. He never complained about the car rides, but would occasionally get tired of Miss Kitty meowing and put his head on her cage to calm her down.

Unfortunately, Spike had developed a mass in a gland below his ear and around his jaw area within the past few months. He seemed to be doing okay, but the past couple of days proved otherwise and after a very emotional morning, we had come to the decision that it was time for us to release our hold on him today and let him be at peace without going through any suffering.

We spent some time outside with him this morning, playing and letting him roam around in his playground one last time.

Here is Spike with his favorite blanket in his comfortable bed that he slept in every night. He spent many, many hours lounging around in bed as he felt safe and content there.

We will never forget how wonderful you made our lives and you will be in our thoughts forever. We love you buddy and hope you meet some new friends to play with on the other side.

Monday, May 26, 2008

Pizza! Pizza!

So the market had a good deal on ground sirloin and we took full advantage - you know we used a bunch last night in that homey casserole and I also saved a bit for tonight's Hamburger and Grape-Tomato Pizza before freezing the rest to use at a later date.

I began this simple weeknight dinner by throwing together our favorite Whole Wheat Pizza Dough recipe - I know I talk about this recipe a lot, but we really love it and have stopped searching for anything else. Quickly done in the food processor, this dough consistently rolls and stretches well while having a wonderful taste.

Transform this dough into whatever shape you want, free-form, round, oval or rectangle - we went round as that is what our baking stone is. On top of the dough, a layer of marinara sauce is spread, followed by shreds of smooth provolone cheese, halved graped tomatoes and chunky pieces of raw ground sirloin. Yes, the meat is added raw - 20 minutes in the oven is more than enough time to thoroughly cook it. If you have any worries, you could pre-cook the meat and add it after the pizza has baked in the oven. However, if you add the cooked crumbles of beef on the uncooked pizza, they may turn into unappetizing dried out pieces and not taste so great. If you are a fan of red onion, a handful of thinly sliced pieces would be a nice way to round out pizza - since this was Jeff's last meal for the next couple of days though (more on this tomorrow...), he asked if we could just forgo them.

If you have a pizza stone, be sure to toss it in the oven and let it heat up a good 45 minutes to an hour so you get a crispy golden brown bottom on your crust. I use a peel, dusted with cornmeal, to transfer the prepared pizza to the stone, but if you are not comfortable with this or have sticking issues, you can stretch/roll the dough on a piece of parchment paper and then place that on the stone. After about 5 minutes in the oven, the dough will have cooked enough and you can easily remove the parchment so the crust has contact with the stone. Also, if you don't happen to have a stone (I really recommend using one), this recipe will be fine being baked on a baking sheet.


Sunday, May 25, 2008

Homey hamburger casserole...

We had quite a tasty week in the kitchen! 10 new recipes and it was a tough choice to choose our favorites... I think we'll pick those Caramel-Cinnamon Crunch Icebox Cookies, the fiery Patatas Bravas dish and the Semolina Lasagna with Spicy Amatriciana, which got bonus points for the fact we finally conquered making fresh pasta!

Similar to a tamale pie, our dinner tonight, Mexicali Hamburger Casserole with Fresh Tomato Toss, takes a slight turn and uses corn kernels instead of beans. The original recipe has you cook up ground beef and add Mexican-style diced tomatoes, however we did things a bit different. When our lean ground sirloin had browned, we seasoned the meat with a couple cloves of fresh garlic and tossed in some cumin to give us a smoky depth. As soon as we could smell that sweet pungent aroma from the garlic, we stirred in a can of fire-roasted diced tomatoes with green chilies for a bit of heat and a handful of thawed corn kernels (there was some fresh corn for sale in the market today, but it still looked a little sad after its long trip from Florida!). Once warmed through, the beefy mixture was scooped into a casserole dish, scattered with a shredded blend of Mexican cheeses and followed with a basic homemade cornbread batter spread over the top. For a little color contrast (and flavor!), the top of the batter also gets a sprinkling of the cheese blend before a trip into the oven.

It only needs to bake long enough to cook the cornbread topping - it should spring back if you lightly touch it in the center. Underneath the moist golden cornbread topping, the flavors melded together well and the fire-roasted tomatoes ensured the warm meat mixture stayed juicy, without being runny. To add a fresh burst to this homey casserole, a quick toss of halved grape tomatoes, a few corn kernels and bright chopped cilantro is combined and spooned on top of each piece to serve. If you are keen on olives, the fresh tomato toss on top would benefit from a few halved pieces for an added salty note.


Saturday, May 24, 2008

Cinnamon buns... in cookie form!

What better way to start out a holiday weekend than with a batch of freshly baked cookies? I woke up early and dove right in preparing these Caramel-Cinnamon Crunch Icebox Cookies as there are multiple steps that require resting time in between and because we also had plans to spend plenty of time outside in the fresh spring air today!

The dough for these spiral cookies took just a few minutes to prepare - if you don't have time to wait for the butter to soften, a quick way is to just slice it into thin pats and place it in your mixing bowl. It comes up to temperature pretty fast this way - just try not to let it get too soft! The dough is soft and slightly sticky - rather than placing it into the refrigerator to firm up before you can even roll it (or drying it out by adding flour as you roll), just toss it between two sheets of parchment paper (wax paper also works well here) and make it flat and square with your favorite pin. While you do need to chill it down anyway to finish working with it, a thin, flat pre-shaped dough will get firm enough to work with much faster than a thick blob!

On your tidy square piece of cookie dough, a drizzle of caramel-esque flavored golden syrup (I use Lyle's) is poured on top. Don't have golden syrup? That's fine, go for a different flavor and use pure maple syrup or even your favorite zesty honey! For that cinnamon bun flare, brown sugar and cinnamon are then sprinkled on top of the sticky syrup, followed by a couple tablespoons of crunchy toasted pecans. The dough is then rolled up ala cinnamon bun style - use the bottom piece of parchment to keep it moving while trying to keep the roll fairly tight. To get the best, clean and non-squished spirals, the dough at this point needs to be stashed in the freezer for a few hours to firm back up. To help keep the dough in a round log, cut a slit down the middle of a paper towel tube and slip the dough inside - this will give the dough just enough structure so it won't flatten out.

Bake these until the outer ring of the cookies take on a golden hue - once ready, remove them and be sure to leave them on the baking sheet to cool slightly as the sugary spirals inside will need a minute to solidify. You don't have to do this next step, but to make them even more "cinnamon roll" like, a sweet combination of confectioners' sugar, milk and a splash of vanilla are whisked together and drizzled over the top of each cookie.

There was no way not to be seduced by the sexy cinnamon aroma that swept through the house as these sat on the cooling rack, waiting to be nibbled on - I have a sneaking suspicion that these gems will not last long around here!


Friday, May 23, 2008

Lighter fried potatoes with a spicy sauce...

Today's post will be about a side we had this week that I just didn't get around to talking about. Roughly translated to "fierce potatoes", the recipe for this Patatas Bravas, is a lighter take on the classic Spanish tapas dish.

Russet potatoes, peeled or not (we typically leave the skins on), are cut into small cubes, covered with water and brought to a boil. Because they are only about 1" in size, the cubes bounce around in the bubbling water for just a few minutes, until they become crisp-tender. As they drained, we began the next part of the recipe by heating together a nob of butter with a drizzle of olive oil until the foam from the butter subsides. The potatoes are slid into the hot pan and left to develop a beautiful golden crust - to get the best results, only stir the potatoes a couple of times during this process. Let them sit first for a good 2 to 3 minutes and then stir, wait a couple more minutes and stir once again. The potatoes then get an extra bite with a dusting of ground red pepper and a couple cloves worth of minced garlic.

To minimize dishes, the potatoes are scooped out from the pan to make space to prepare the spicy sauce. This speedy dipping mixture is simply softened diced peppers and onions mixed with a small can of tomato sauce. Ground red pepper turns on the devilish heat in the sauce - adjust this to your taste... use as little as 1/8 teaspoon or as much as 1/2 teaspoon if you enjoy a slight burn. We went with a heaping 1/4 teaspoon and we both enjoyed the level of heat. As is, the sauce is kind of chunky from the vegetables, so for a more pleasant texture, process the sauce in a food processor or blender. The crispy potatoes were tasty enough by themselves, but dunked into the thick sauce brought them to a new height with an alluring bite.


Thursday, May 22, 2008

No need to fear that scary soufflé recipe...

Last Monday, we talked about those wicked brownie wedges that we made for the neighbors - I also mentioned that we made another treat to accompany them on the plates. While those wedges were dark, delicious and fudgy, I thought a choice would be nice - so we sent along these bright, sunny and tart Creamy Lemon Squares.

For a solid, but tender base to these squares, a basic shortbread dough is spread over the bottom and slightly up the sides of a baking pan. To make sure the dough cooks evenly and doesn't try to puff up, be sure to prick the dough all over with a fork. While the crust is in the oven, you have just enough time to prepare the racy filling.

Rich orange-tinted egg yolks, dangerous sweetened condensed milk (no, you're not the only one who eats it with just a spoon!), freshly squeezed lemon juice and a touch of the lemon's zest are the ingredients for the filling. I keep meaning to buy a reamer or even a juicer to make extracting the juice easier, but never get around to it. For the last couple of years, I've just been heating the lemons (or limes/oranges) in the microwave for about 15 seconds, slicing them in half and then using a sturdy pair of metal tongs to twirl around their insides, releasing their juices.

As soon as the above crust has lightly browned, the bright filling is poured over the hot crust and placed back in the oven just long enough until the filling has set. Before you divvy them out, you'll want to let them cool completely and stash them in the refrigerator to chill them down even more for very clean cuts. Aptly named, the buttery crust was a pleasant contrast to the creamy filling with just enough pucker power left to make us smile after each bite.

Sometimes just the mention of a soufflé can steer one away from giving a recipe a try. I know I've skipped a few that sounded good because it just seemed like a big hassle that would probably end in disaster, knowing my luck. However, if they truly are as easy as these Broccoli and Goat Cheese Soufflés I made tonight, I think I'll have to try and not be so skiddish about trying them!

Flavored with Dijon and fresh rosemary, a hot thickened milk mixture is whisked together with creamy goat cheese and a few egg yolks to begin the process. Once that mixture was smooth and combined, the leftover egg whites, plus a couple extra, are beaten until they reach the soft peak stage. For the best results, be sure to give the whites enough time out of the refrigerator to take the chill off. Since these soufflés are savory and not sweet, cream of tartar is used, insead of using sugar, to help stabilize the whites as they whip into stiff peaks. Half of the fluffy whites are then gently folded into the thickened cheesy mixture - once almost combined, crisp-tender finely chopped broccoli and the rest of the whites are added. While you still want to be gentle, don't be too afraid of this process - just fold them together long enough until no visible whites remain. This airy mixture is then split between four individual ramekins and just to be safe, you'll also want to set those filled ramekins on a baking sheet. This is just added insurance to prevent a mess in case your whites get extremely excited and puff up and over a bit too much!

These may be a little tricky to tell when they are done - each should be well risen, golden and firm to the touch. If you are nervous about the eggs cooking enough, you could check their temperature with an instant-read thermometer - it should read about 160 degrees. For the most dramatic presentation, be sure to serve these puffy individual soufflés within a couple minutes of coming out of the oven as they will soon fall. You could also make this family style too - just portion out the batter into a 2 to 2 1/2 quart dish and bake it about 10 minutes longer. Very light, the tang from the goat cheese was delicious and subtle enough to allow the flavors from the fresh rosemary and pungent mustard come through. So after all this I've learned my lesson - don't fear the soufflé, the results are well worth it and they are not nearly as scary to prepare as one thinks!


Wednesday, May 21, 2008

Pork Enchiladas with Green Sauce...

Have you ever used tomatillos? You know, those papery, husked-covered fruits that are sometimes confused with green tomatoes? Thankfully, there is no confusion in taste - the fruit is citrusy, fresh and tart! When you are choosing them at the market, you want them to be firm to the touch and the color underneath the husks to be a vibrant green.

We gathered up a hefty three pounds worth at the market so we could prepare tonight's dinner of Pork Enchiladas with Green Sauce. The simple sauce is a combination of softened onions, garlic, a bit of water and the coarsely chopped tomatillos. Once the chunky pieces had softened, the sauce is transferred to a food process or blender to be pureed. The filling for these enchiladas is a combination of shredded roasted pork tenderloin, that was seasoned with smoky cumin, a portion of the loose green sauce and a cup of corn kernels.

Assembly of this dish is fairly messy, so be prepared - we first softened a stack of white corn tortillas in the microwave. Be sure to wrap them well with a moist paper towel so they don't dry out. Working with one tortilla at a time, they are dipped into the tangy sauce, filled with the shredded pork filling, topped with shreds of sharp white cheddar and then rolled up. While the original recipe didn't call for it, I did spread a thin layer of the sauce over the bottom of the baking dish before arranging the filled rolls inside - I just find this helps prevent any sticking.

Now that you and your work surface are covered in pureed tomatillos, the remaining sauce you used as a pool for the tortillas is spooned over the rolls, followed by the leftover cheese. Bake them, covered, until the sauce is bubbly - then remove the cover and finish baking them just long enough to allow the cheese on top to turn golden and a little crispy. Before diving in, be sure to let them rest in the pan for 10 minutes - this will help them hold together as you dish them out. I wondered how well this was going to turn out as it went into the oven, as it looked quite wet, but the sauce thickened and also absorbed into the white corn tortillas, without turning them to mush. This would be an easy and fun way to introduce a new food if you've never had the chance to try out tomatillos before. With bright, garlicky and bold flavors, I know I can't wait get a hold of the leftovers for lunch tomorrow!


Tuesday, May 20, 2008

Milk Chocolate Chunk Toffee Bar Cookies and breakfast-for-dinner night...

We are big fans of bittersweet or dark chocolate... I rarely have anything else in the pantry, but I do like the occasional creamy smoothness of milk chocolate. So, I'm sure you already know that I got some baking done today for the Weekly Wednesday Treat Day and you guessed it, milk chocolate was one of the key ingredients!

This past weekend while we were out running errands, I picked up a block of Callebaut milk chocolate and chopped it into chunks today (with our handy Chocolate Chipper we got as a gift) to use for these Milk Chocolate Chunk Toffee Bar Cookies. While I was in the chopping mode, I also coarsely chopped up a few (I used 6) milk chocolate toffee bars (I used Heath) and some walnuts that I then toasted.

Those chunky ingredients are folded into a batter that includes just a couple tablespoons worth of Dutch-process cocoa powder in it to add a touch of chocolate flavor. Once scooped into a large baking pan, we smoothed over the top to make sure it was evenly covering the bottom of the pan. After these come out of the oven, set them on a wire rack and let them cool slightly... just about 30 minutes or so.

At this point, you'll want to gently, but with a firm hand, cut the baked slab into bars. Since the toffee candy bars soften and slightly melt into the bars, those uneven pieces will begin to solidify as they cool, so you'll save yourself any headache if you get them cut/scored now. Reminiscent of blondies with their moist, dense and chewy interiors, these bars are pretty sweet, but not tooth-achingly so, with rich toffee flavor infused into each bite.

I've been craving a breakfast-for-dinner night, so this evening I prepared a batch of these aromatic Cardamom Sour Cream Waffles. I used an equal combination of all-purpose and whole-wheat pastry flour for the dry ingredients, but as I often mention, don't let this scare you away from the recipe - you can just as well use completely all-purpose if you desire. You could get away with using white whole-wheat flour as well, but regular whole-wheat flour might be a bit too heavy for these waffles. Because we quite enjoy the spice, I buzzed up some green cardamom that I removed from their pods (I picked up a small supply at Penzey's a couple weeks ago) to push the strongest flavor into these waffles. If you already have pre-ground or it is a bit old, you may want to increase the amount slightly or leave it the same if you prefer a more faint flavor.

To ensure the waffles are tender and light, tangy sour cream and milk are combined with just a drizzle of honey to offer a mild sweetness. Besides adding flavor, the melted butter that is added will help give these waffles a classic crisp exterior that you expect. Jeff asked for "American-style" waffles, so that is the machine we used tonight. If you enjoy the deeply-pocketed Belgain waffles, just adjust the amount of batter/cooking time to your machine. We topped these off with a shower of confectioners' sugar, but I wouldn't shy away from letting loose with a river of warm pure maple syrup or even adding your favorite preserves on top.

Monday, May 19, 2008

Wicked brownie wedges and a hearty chicken stew...

This past weekend, Jeff and I were trying to figure out the last time we baked some goodies to share with the neighbors. We realized it had been too long, so in between errands and lawn work, I prepared two treats - I'll talk about one of them another day, but the first recipe I made was these Rocky Road Brownie Wedges.

Bittersweet chocolate chunks and butter are melted together into a rich, dark puddle of chocolate love. To sweeten the brownies, a combination of granulated sugar and brown sugar is used - besides adding depth, the moist brown sugar also brought a light chew to the finished product. A couple eggs and just enough flour to give the brownies structure are the last ingredients needed to create the batter for these decadent one-bowl treats.

Jeff wanted them to be a little more unique, so we went the route of baking them in a 9" springform pan to create the wedges. However, you can just as well make these square for bars - just use an 8" square baking pan and know they will probably be a bit thicker and take a couple minutes longer to bake. Test early for doneness - the toothpick should not have any raw batter, but you want a few moist crumbs clinging to it. At this point, the brownies are removed from the oven and the top is scattered with additional chocolate, bumpy marshmallows and crunchy chopped nuts. If you wanted some showy chocolate on top, save a handful of that additional chocolate and scatter it on top of the nuts. The brownies are returned to the oven just long enough to puff up the marshmallows and soften the chocolate - this allows all of those toppings to stick and not fall off when you slice into them. I actually doubled the recipe and just split them into two pans - we needed quite a few wedges and Jeff also wanted some to have walnuts and some with pecans.

For the cleanest cuts, you may want to chill these in the refrigerator for a short time to firm them up. Quite fudgy with an intense chocolate flavor, one bite of these extravagant wedges hand our taste buds dancing around, anticipating the next forkful. If you are keen on the combination of salty and sweet, Jeff and I thought about (and wished we did a small portion to test out) adding a sprinkling of coarsely crushed pretzels on top instead of the nuts.

We went from the glorious warm shine from the sun over the weekend, to a cloudy day with a slight chill in the air today (there was even some frost to the north of us) - depressing! I had something else planned for dinner, but swapped days with another recipe and made this Chicken, Corn, and Edamame Stew to warm us back up.

This stew had actually called for frozen lima beans, but Jeff has yet to warm up to the idea that they taste remotely good. I usually just replace them with Edamame, as I did tonight - however, I'm not giving up yet and I think they will make an appearance here as soon as when we can get some fresh from the farmers market. The base is a combination of diced onions and bell peppers that are softened and seasoned with fresh thyme. While the original recipe didn't call for it, once I added the two tablespoons of thick tomato paste, I stirred it around in the pot for a minute or two. I really recommend this when using tomato paste as the heat will start to caramelize the paste and ripen its flavor.

To the pot, boneless and skinless chicken meat is added, along with chopped plum tomatoes, vegetable broth and Worcestershire sauce. Feel free to use all thighs, all breast meat or even a combination as we did tonight. Once the chicken has cooked through, the pieces are picked out with corn and the edamame (or lima beans!) being stirred into the simmering liquid. While the vegetables heat through, the chicken meat is shredded into bite-sized pieces and placed back into the stew to warm through. Brimming with vegetables and chicken, this stew, with just enough broth to keep things movin' and groovin', was healthy, hearty and quite tasty!


Sunday, May 18, 2008

Homemade sauce and pasta transformed into individual lasagnas...

Ah yes, a full week of recipes now that we are back in the kitchen full time - 8 new recipes for us this time. Our top picks this round were those fun Chocolate Cupcakes with Cream Filling, the Italian Panini with Prosciutto and Fresh Mozzarella and Jeff's choice of that Lighter Pineapple Upside-Down Cake.

Looking for a relaxing way to spend a weekend evening in the kitchen? If so, you'll have to give this Semolina Lasagna with Spicy Amatriciana a try, made special by making your own homemade lasagna sheets! Homemade pasta may sound intimidating or complicated, especially if you have never made it before (this was our first time!), but this version is quickly prepared in the food processor with just 5 ingredients!

While the rich yellow dough was resting, I jumped a head a bit from the recipe and started preparing the sauce to keep busy. To give the sauce an intriguing smoky note, a couple slices worth of chopped bacon are rendered until crispy. To those crisp bits and drippings, a little extra oil, a mess of thinly sliced onions and a few crushed cloves of garlic are added. Fire-roasted diced tomatoes and a little water are stirred in as soon as the onions began to brown a bit - this mixture is then allowed to slowly bubble away until the flavors combine and the sauce thickens.

When you go to cook the pasta, be sure to use a large pot and season the water generously with salt (use about 1 tablespoon per 6 quarts - you could even go a little heavier I think). As you add the pasta, try to lower it slow enough that it has a chance to work its way in, but don't take your time as the rising steam from the water will start to make it sticky. Once it is done, transfer the long sheets to a damp towel and cover - you'll want to do these one at a time so they cook evenly and quickly. You'll need 6 individual serving dishes that are oven safe to prepare these in - these funky dishes that we picked up at Ikea worked perfectly (though maybe a touch big!).

The lasagna is assembled by simply laying the end of the cooked pasta sheet into the bottom of the baking dish, spooning a little of the homemade sauce on top, folding a piece of the sheet back over that sauce and repeating this process, ending with sauce on top to keep the pasta moist. Because the dough is rolled quite thin, it may tear on you (we actually only had this happen once though), but it is not a big deal as it patches together well as you layer. You of course need cheese, so as the last layer a sprinkling of freshly grated Parmigiano-Reggiano and a few chunky pieces of fresh mozzarella are added. This gives you just enough cheesy flavor, but still allows the clean flavors of the sauce and pasta be the star. If you are a cheese fiend though, you could get away with adding a bit to the layering process. Each dish is covered and baked just long enough to reheat the dish and allow the cheese to melt - if you are a "crusty edge" person, uncover the dishes and broil them for just a minute or two so the pasta edges crisp up.

While this dish gets extra points for fantastic flavor, I loved preparing and serving this as individual portions, allowing you to customize the flavor of each to suit you or your guests taste. We also can't get over just how much better the homemade lasagna sheets tasted - while we won't give up on the convenient prepared dry versions any time soon, I know I'll be making these sheets again when I have the time to do so.