As you can see from the 11 new recipes this week, we are getting back into the groove and settling in well. Highlights for us this week were the Frosted Apple Squares, Garlic Fries, and Baked Fish Sticks.
Well, geez... menu planning was not as fun as it usually is this weekend. Once or twice a year, I take a look at my stacks of to-try piles and cookbooks and get totally overwhelmed - I will sift through the recipes, think that nothing looks or sounds good and wish I could just toss them all out. Don't get me wrong, I love having a large selection of recipes to choose from, but sometimes it just seems like too much when you are constantly trying to keep things new and different in the kitchen.
I pulled out a few recipes, got the shopping done this morning and am hoping for the best - I'm already getting out of the funk, but it takes me a couple days. I think part of the problem is I've tried quite a few times to get the piles very organized, but give up halfway though and make the mess even worse! Oh well... let's move on to tonight's dinner!
We've been enjoying edamame (green soybeans) for quite a few years now and I still love it as much as the first time I tried it. Some of our more favorite edamame recipes were the Edamame Corn Chowder, Fresh Pea and Edamame Risotto with Fresh Mozzarella and Prosciutto, Edamame Dumplings and a twist on dip with this Soybean Hummus. Simply boiled with just a dash of salt and pepper is great for a snack, but working the little guys into recipes is much more fun. Tonight they served as a bed for thinly sliced meat in a recipe for
Flank Steak and Edamame with Wasabi Dressing.
Before being quickly cooked in a grill pan, a large piece of trimmed flank steak is seasoned with soy salt, salt and fresh ground pepper. Once it is done to your liking (we prefer medium-rare), you need to make sure you give it about a 10 minute rest so the juices have a chance to redistribute throughout the meat before slicing it against the grain (do double check to make sure you are slicing against the grain!) into thin strips. While the steak is resting, nutty toasted sesame oil is heated over medium to begin cooking some fresh minced garlic and snappy ginger. A couple tablespoons of salty soy and the bright green beans are tossed in with the garlic mixture to thoroughly heat through. For a punch of heat and pungent flavor, a couple teaspoons of wasabi paste (go light on this if you are not used to it) is mixed with rice vinegar to drizzle over the juicy steak and firm edamame as a light tangy dressing.
Sunday, September 30, 2007
Saturday, September 29, 2007
Raisin hater converted!
I remember a few years ago that if I even mentioned adding raisins to any baked goods I was planning to make, I would glance over to Jeff and know I would get the look of "ugh, I don't like raisins, do we have to add them?". However, I finally gave up leaving them out of recipes and decided to sneak them into something and make him try it... he was quite shocked (and I was happily amused) with how much he liked them! Go figure...
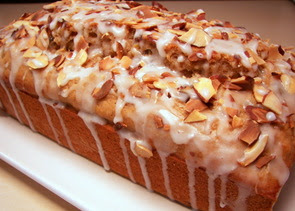
Ever since then, he has encourage the use of raisins, even going out of his way to make sure we have extras in the pantry just in case! Thankfully, I don't have to hesitate now and thought this Glazed Cinnamon-Raisin Tea Bread would be good for snacking on today.
To soften the combo of dark and golden raisins, they are juiced up in a bowl of hot water for a few minutes. To amp up the nutrition of this bread, without detracting from the taste, we mixed a combination of all-purpose flour, whole wheat pastry flour and ground flax seeds to inject some fiber and omega-3 fatty acids. To keep the healthy theme going, the fat used in the recipe is canola oil, instead of butter, to give the bread a rich texture without being greasy. The bread is quite tender and decidedly moist from the use of buttermilk in the batter - I always keep a can of the powdered version in the fridge for the times I don't have prepared buttermilk already on hand. If you don't already have either of those handy, you could also sour your own milk for this recipe by mixing a couple teaspoons of lemon juice with milk and letting it sit for a few minutes.
Once the well-risen loaf has completely cooled, the top is adorned with a sweet glaze combined from confectioners' sugar, milk and apple juice. Once drizzled, toasted sliced almonds are scattered all over the top for a nutty crunch. Be sure to add the almonds as soon as you drizzle - the glaze will begin to set quickly and will hold the almonds in place (handy for when you slice the bread!).
Friday, September 28, 2007
Pup treats to share...
Just a few days ago, we baked up a few treats to take over to the new neighbors. Since meeting them, we've found that quite a few of them have pups running around their house too! I carved out some time today to make a few of these Apple Peanut Butter Biscuits for Max and Spike to take over and share so their pups can partake in the fun!
We made sure that the biscuits passed the quality control group (Spike and Max were waiting at the oven for me to pull them out, but were not happy that they had it wait... they didn't understand that they still had to cool down!) and they quickly snarfed up their pieces once they had cooled enough.
With just a touch of honey to lure them in, the biscuits are made with creamy peanut butter, unsweetened applesauce, water, oil and of course a combination of all-purpose and whole wheat flours. The dough is a snap to throw together and rolled out well - you may need a little more or a little less flour depending on the consistency of the dough. You want it to be somewhat soft to roll out easily, but it should not be sticky at all. I use a variety of smallish cookie and bone cutters to divvy out the biscuits, but you could just use the top of a small glass if you don't have any. Since it makes quite a few and we only give the pups one or two a day, I like to keep the excess in the freezer just to make sure they don't go stale.
Okay... so these pups totally know how to work the camera - see how the are pretending to be patiently waiting? Um yea, with a bucketful of treats in front of them, this pose did not last long!
We had a pasta toss for dinner that made use of one of my favorite savory ingredients - prosciutto! In just about 20 minutes, I had plates of this Cavatappi with Prosciutto and Parmesan dished up and ready for us to enjoy tonight. A couple minutes before the curly pasta is finished cooking, a garlic clove is lightly sautéed in olive oil. When you drain the pasta, a few tablespoons of the starchy cooking water is added to the garlic followed by the al dente pasta. To season, fresh parsley, salt and pepper are tossed in, along with a couple tablespoons of extravirgin olive oil to loosen things up. To add some complex flavors to this clean dish, thinly sliced salty prosciutto is added to the mixture with a few thin shavings of nutty Parmigiano-Reggiano cheese to complete this meal. Very manageable and a little more elegant than your every day pasta toss, this recipe will definitely have a spot near the top of the recipe stack to be made again soon.
Thursday, September 27, 2007
Doesn't have to be deep fried to taste good...
Just because you don't deep fry does not mean that you have to give up that crisp texture or favorite comfort dishes. We cooked two recipes tonight for dinner that took a new look at classic fried foods and made them a bit healthier without feeling like you're missing out.
The first, which quickly shot up our list of favorites, was a snazzy recipe for Garlic Fries that are roasted in the oven. Slender sticks of russet potatoes are tossed in just enough olive oil to allow the salt to adhere and give them a wonderful color in the oven. Right before you take them out, a couple tablespoons of butter are melted and infused with a heavy dose of minced garlic. The crisp fries are then tossed into the skillet with a shower of sharp Parmesan cheese and bright fresh parsley quickly following behind. While the garlic is very present, it is tempered somewhat by the butter to let the potato flavor break through. I would not hesitate to reach for a cone of these over any greasy deep-fried potatoes any day!
I think the next recipe we tackled, Baked Fish Sticks, would be great to make for those picky eaters, while adding quite a healthy spin with lots of whole grains. You could use any firm white fish that you like, but we decided to use fillets of cod. For a little compromise, the strips of cod are first dusted with all-purpose flour instead of using whole wheat - you could certainly try whole wheat flour, but I think the finer texture of all-purpose clings better. The whole grains come in at this point - once the fish go for a dip in a couple egg whites, they are completely coated in a mixture of crunchy whole wheat panko breadcrumbs and whole-grain cereal flakes (we used Wheaties) that have been seasoned with lemon pepper, garlic, paprika and salt.
Because of the coarse nature of these ingredients, the breadcrumb mixture is first whirled in a food processor to create a finer coating that will stick better. Once all of the strips of cod have been coated, we lightly spritzed them with olive oil and baked them for a quick 10 minutes. The light spray of olive oil helps crisp up and give the breadcrumb coating a rich golden color. With a taste much fresher than you could ever get from a frozen boxed version, the textural difference between the moist tender inside and the crunchy exterior was very pleasing. We loved these on their own, but I bet these would make a killer filling for some fish tacos.
Wednesday, September 26, 2007
Have you see these ingredients yet?
One of the things I look forward to this time of the year is the flood of new baking products that seem to hit the shelves before the holidays. While I was browsing the aisles this weekend at the markets, I picked up a couple of them and then put them back... well after doing that a couple times, I went ahead and bought them anyway. I didn't and still don't have any plans for them yet, but I figure I will come up with/across a recipe where we can fit these two ingredients in!
The first are these caramel chips - really, I could just cut up a chunk of caramel if I needed to, but these just looked fun.
They are small and kind of squishy - I'm wondering how they will handle the heat in the oven. I have a feeling they are just going to melt into little puddles, unlike chocolate chips that keep their shape, but we will have to see. It does, of course, come with the obligatory sticks to make caramel apples if you so desire!
Next, this bag of Jet-Puffed Chocolate Marshmallows caught my attention.
Now, we have made homemade chocolate marshmallows before, so I highly doubt this will compete taste-wise, but I bet these will be fun to use in a recipe or tossed in a mug of hot cocoa. We tried the strawberry flavored ones when they came out a few months ago, however they were a little heavy on the artificially-flavored side and were just OK.
Has anyone else given these a try yet?
On the weekends, I will often cook up a big batch of brown rice, portion it out and keep it in the freezer to speed up weeknight dinners or if I happen to need a quick lunch. I was happy that I did this last Sunday as it greatly sped up the time it took to make tonight's dinner of Stuffed Poblano Peppers. We halved 4 big poblano peppers, stuck 'em under the broiler to char the skin and then removed said blackened skin (never wash it off, you don't want to wash the flavor right down the drain!) after they were cool enough to handle. We mixed the cooked nutty brown basmati rice with some gorgeous mid-summer sweet corn that I had previously blanched and frozen to use throughout the fall and winter season. Some red kidney beans are also tossed in and the mixture is quite simply dressing with extra-virgin olive oil, salt and fresh ground pepper. Each of the pepper halves are stuffed with a generous portion of the rice mixture and topped with a helping of creamy crumbled goat cheese. While this is suggested to be served at room temperature, when we've done stuffed peppers in the past, they are typically baked to finish them off. Don't get me wrong, this was hearty and pretty good for being so easy, but I thought it would have been a little better if they were served warm right out of the oven. We both happened to comment after finishing our plates that we especially liked the tang from the goat cheese and would use that again in other stuffed pepper recipes.
Recipes
Stuffed Poblano Peppers
Tuesday, September 25, 2007
Get your peelers armed and ready - don't let this apple season pass you by!
We are getting back on track this week for the Wednesday Treat Day and I thought it would be fitting to make an apple recipe to celebrate the beginning of fall. I've been anxious to give these Frosted Apple Squares a try because it has a very interesting method to make the pastry that encases a stack of apples.
It is kind of like a pie dough as you cut cold butter into flour, but it also has the addition of yeast which gives the crust a sturdy, yet delicate texture. Since the dough is very buttery, you will want to chill it for at least 30 minutes before rolling it out. To make your life easier, I would very much recommend that you roll the dough out on a piece of parchment paper - you won't have to add extra flour this way which will toughen the dough and all you need to do is flip the paper over to place it in the pan. You can roll it out on a floured surface, but you need to roll the dough quite thin - if you use the parchment paper, you can also trace the size you need on the backside so you know exactly how big to roll it.
Once the dough is fitted into a large half-sheet pan, several layers of thinly sliced apples are arranged on top. A sweet mixture of granulated sugar, cornstarch to thicken the juices, a pinch of salt and a healthy dose of fragrant cinnamon is scattered over the apples. The second piece of dough is finally rolled out in the same fashion and gently placed over the top. The next twist comes in as you cover the assembled pastry and let it rest for an hour to give the yeast a chance to work their magic. It is then baked until the crust is a rich golden brown and the apples hidden inside are tender, but not mushy. For a fun finishing touch, a light vanilla frosting is combined and drizzled over the cleanly cut bars.
Almost like a giant and flat apple pie, this delicious treat is very reminiscent of an apple Danish pastry, but without the labor that goes into them. The outer pastry was decadent and a perfect casing to hide the generous apple filling. I got a little chuckle when Jeff came home and his first out loud thought was "Woah! It looks like a giant apple pop tart!!" Now that I've tasted this, I'd love to throw a light layer of dried cranberries on top of the apples for a splash of color and to give a textural bite against the soft apples. Here is a quick snap of it before we frosted and cut the squares to give you an idea!
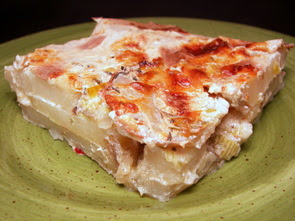
As the air chills outside, tonight's Potato-Leek Gratin I made for dinner was just the right comfort food dish to warm us up. To speed up the entire cooking time of the dish, sliced russet potatoes are first poached in milk that is spiced up by the additions of sliced leeks, salt, pepper, garlic, fresh thyme and a bay leaf. Once the potatoes are tender, half of the mixture is placed in a baking dish and topped with shreds of Gruyère cheese - the layers are repeated and the dish goes in the oven to bake until the infused milk sauce thickens and the top is a little crispy and golden brown. Not being overly cheesy, the distinctly nutty Gruyère cheese had enough power to stand up to the potatoes, yet it had enough restraint that it didn't completely take over the dish. We liked the use of leeks in this dish; it gave a mild onion flavor that lingered in the background and melded well with the other light flavors. I can't wait for lunch tomorrow - I love leftovers and think this will hold up well to reheating.
It is kind of like a pie dough as you cut cold butter into flour, but it also has the addition of yeast which gives the crust a sturdy, yet delicate texture. Since the dough is very buttery, you will want to chill it for at least 30 minutes before rolling it out. To make your life easier, I would very much recommend that you roll the dough out on a piece of parchment paper - you won't have to add extra flour this way which will toughen the dough and all you need to do is flip the paper over to place it in the pan. You can roll it out on a floured surface, but you need to roll the dough quite thin - if you use the parchment paper, you can also trace the size you need on the backside so you know exactly how big to roll it.
Once the dough is fitted into a large half-sheet pan, several layers of thinly sliced apples are arranged on top. A sweet mixture of granulated sugar, cornstarch to thicken the juices, a pinch of salt and a healthy dose of fragrant cinnamon is scattered over the apples. The second piece of dough is finally rolled out in the same fashion and gently placed over the top. The next twist comes in as you cover the assembled pastry and let it rest for an hour to give the yeast a chance to work their magic. It is then baked until the crust is a rich golden brown and the apples hidden inside are tender, but not mushy. For a fun finishing touch, a light vanilla frosting is combined and drizzled over the cleanly cut bars.
Almost like a giant and flat apple pie, this delicious treat is very reminiscent of an apple Danish pastry, but without the labor that goes into them. The outer pastry was decadent and a perfect casing to hide the generous apple filling. I got a little chuckle when Jeff came home and his first out loud thought was "Woah! It looks like a giant apple pop tart!!" Now that I've tasted this, I'd love to throw a light layer of dried cranberries on top of the apples for a splash of color and to give a textural bite against the soft apples. Here is a quick snap of it before we frosted and cut the squares to give you an idea!
As the air chills outside, tonight's Potato-Leek Gratin I made for dinner was just the right comfort food dish to warm us up. To speed up the entire cooking time of the dish, sliced russet potatoes are first poached in milk that is spiced up by the additions of sliced leeks, salt, pepper, garlic, fresh thyme and a bay leaf. Once the potatoes are tender, half of the mixture is placed in a baking dish and topped with shreds of Gruyère cheese - the layers are repeated and the dish goes in the oven to bake until the infused milk sauce thickens and the top is a little crispy and golden brown. Not being overly cheesy, the distinctly nutty Gruyère cheese had enough power to stand up to the potatoes, yet it had enough restraint that it didn't completely take over the dish. We liked the use of leeks in this dish; it gave a mild onion flavor that lingered in the background and melded well with the other light flavors. I can't wait for lunch tomorrow - I love leftovers and think this will hold up well to reheating.
Monday, September 24, 2007
It's almost time to bust out the pumpkins!
Now that everyone is back home, we're starting to get back into a good routine and I'm looking forward to fall-time cooking and baking. When I was menu planning for this week, I was trying to think of what type of cookie we have not made for awhile. I went to the website and started scrolling through the cookie list and noticed the last time we made Snickerdoodles was back in December 2005!
We had to rectify that and I found a recipe in my little (ha!) hill of to-try piles that sounded good. The first thing I noticed was this recipe did not call for cream of tartar... I mentioned in my other post that I thought this was a key ingredient to snickerdoodles. I thought about messing around with the leavening agents, but decided to give the cookies a try as is.
The dough came together well and was not too firm or soft - it was slightly sticky, but not so much that you couldn't easily roll them into balls. When I started tossing the dough balls into the intoxicating sugar and cinnamon coating, I noticed they were getting a better covering if I gently rolled them around, rather than shaking the dish all over. If I tried to rush coating them, the dough seemed to get a light coating of cinnamon and did not pick up much of the crunchy sugar. The cookies had a fantastic texture and that classic crackled finish - they had crispy edges with a slight bend in the middle that alluded to their chewiness. They didn't have that light ethereal texture that the cream of tarter tends to give, but nonetheless, I could not tell that much difference and am happy to know that they can be successful without the cream of tarter.
It was pouring outside tonight while I was making dinner and as I was tearing a few leaves of fresh basil for this Tri-Colore Orzo dish, I was hoping that it was going to bring back one last flash of that bright summer aroma to this dreary and stormy evening. A pound of rice-shaped orzo pasta is the only thing that needs to be cooked in this recipe. Once tender, yet still retaining a slight bite, the pasta is spread on a large baking sheet and tossed with a couple tablespoons of olive oil to keep it from sticking as it cools as it is best served at room temperature. The orzo is then given a face lift by tossing in peppery arugula, salty feta cheese, rosy dried cherries and fresh basil. For a buttery crunch, a quarter cup of toasted pine nuts is also tossed in to the mix. You don't even need to whisk together the dressing for this dish - fresh lemon juice and olive oil are just drizzled over to develop the tangy and clean-tasting coating. If you are so inclined, feel free to replace the pungent feta with ricotta salata for a more smooth and mild flavor.
Saturday, September 22, 2007
Is that a bark I hear?
Oy vey... what a past couple of days we've had! We went on a mission to retrieve the pups this weekend and it did not go as expected! We were originally going to drive back out to PA, but decided to just speed things up and fly out there. We were planning on flying out Thursday evening - well, about 45 minutes after we got to the gate, the sirens started to go off and they began to give commands over the speaker system. They said we were under a tornado warning and that there were two tornadoes on the ground and heading in the direction of the airport! We were to get to the "tunnels" as soon as possible and stay there until the all clear was given. So we did, the storm passed (with no tornadoes hitting the airport thankfully) and we went back to the gate. An hour or so later, our gate changed so we went to the new one.
10 minutes later it changed back to the gate we just came from, so we headed back. 5 minutes later our flight was delayed by 2 hours. 10 minutes later we heard "Sorry, your flight has been delayed until 6am tomorrow morning - we won't be giving any vouchers for hotels since this was caused by Mother Nature." Which was fine with us since we just drove home, but everyone else was not a happy camper!
We get home, check the status on-line and it now said we were leaving at 7am. So we go to bed, get up and check again - now we are leaving at 7:56. We get there early just in case and guess what? At 7:15 the time changed again on the status board and they announced "we are now boarding all passengers and will be pulling out from the gate at 7:35." Geez! I'm glad we were there early because several people missed their flight! But, I digress - we arrived in PA, spent the night with the pups and left yesterday morning at 6am for the drive home.
They did well... Max kept himself busy trying to work on his tan.
Spike just slept a lot and was fairly quiet, except for the couple of dream-induced little barks. He is over 17 years old now!
They did much better than I did though as I'm really feeling it today - I drove (again!!) the entire 15 and 1/2 hour drive - we had several stops mind you, so the pups could have a drink and do their business. Let the settling in finally commence!
I wonder if some of you are wondering about a certain black creature that has not been heard from?
Miss Kitty grew quite attached to Jeff's Mom and decided to protest about riding in the car for 15 hours with the dogs, so she gets to stay in her happy little quiet new home!
Needless to say, after that and then having to go to the market to replenish the pantry, I was not in the mood to do anything but veg out. However, I was also not interested in starving, so I did throw together this Winter Wheat Berry Salad for dinner tonight. Chewy and filling, the only thing you need to do with wheat berries is throw them in a pot with boiling water and leave 'em be until they are tender - woo!
While they were cooling down, I whisked together a snazzy fall-flavored dressing from bright lemon juice, canola oil, maple syrup and a pinch of our favorite Vietnamese cinnamon. For some lively color and crunchy texture, a shredded carrot and sliced Granny Smith apples are tossed with a couple sliced green onions and the cooked wheat berries. Once dressed, the salad is adorned on a bed of fresh tender baby spinach to serve followed by sprinkling of chopped dried apricots for a sweet finish. Light and fairly effortless, I was a little surprised by how much we both enjoyed the cinnamon and sweet maple syrup in the dressing - just different enough to get your taste buds jumping!
Friday, September 21, 2007
Meatball and pasta soup...
Chicken soup is a total comfort dish for us and I don't think I could ever get tired of eating it, but we wanted something just a bit different and ended up making this Chicken Meatball Soup with Pasta for dinner the other night.
The first order of business is to get down and dirty making a bunch of meatballs. Just an egg yolk, some bread crumbs to hold things together, Dijon mustard, a green onion and a couple dashes of cayenne pepper sauce are combined to pack the welcome flavor boost to ground chicken. Once you add the chicken to the base, do your best to use a light hand to mix the ingredients together - you do want it combined, but not overworked so they become tough. I used a tablespoon scoop to divvy out the meatballs into equal portions, but you can just use a spoon or your fingers - you want them to be about ping pong ball size. If you do use your hands, be sure to lightly wet them to help keep the mixture from sticking all over.
While the meatballs bake in the oven, the soup is started by softening an onion with garlic and spices in just a bit of olive oil. A large can of fire-roasted diced tomatoes, chicken broth, water and tomato paste are then added to the pot to bring a rich depth of flavor to the soup. To give the flavors a chance to intensify and marry, this mixture is left to simmer for a few minutes before adding the cooked meatballs and pasta. We decided to use orzo here, but feel free to use whatever small or tiny pasta you already have on hand. Right before serving, a cup of peas are added to heat through and the soup is ready to eat with a quick grating of Parmesan cheese for a sharp finish.
Wednesday, September 19, 2007
Very special treat day!
Yesterday, I alluded to baking for the Weekly Wednesday treat day, but I couldn't talk about it yet as I needed to wait until this morning to finish assembling it. Today is Jeff's birthday, which just happens to fall on a Wednesday this year, so we had to make this treat extra special for him to share!
For his past birthdays, I've always done some sort of an untraditional cake - here is one cake I made a couple years ago. This Mickey cake came about as Jeff is a Disney fanatic.
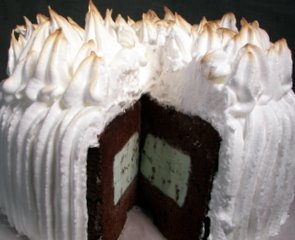
Last year's cake was really just an experiment of sorts - it was a rich Devil's Food Cake with a ring of homemade Mint Chocolate Chip Ice Cream hidden inside and then frosted with a peppermint spiked Swiss Meringue. I placed it under the broiler for a minute or so to brown the meringue spikes.
We kept with the untraditional theme this year and I made a Giant Chocolate Chip Cookie Cake! This cake is 5 souped-up cookies layered with a cream cheese mixture that has been very lightly sweetened with confectioners' sugar.
While I was gathering the ingredients yesterday, I was a little nervous as I was reading through the ingredient list as something didn't seem right. I read over this recipe a few times in the past couple of weeks, but it didn't hit me until then that the recipe only called for 6 tablespoons of softened butter to be creamed until "light and fluffy" with just over 2 cups of sugar. Good luck with that happening I thought! I sat down and read through the whole recipe again and figured that the missing fat from the butter would be added back in from heavy cream later on, but I still didn't get how the butter and sugar were suppose to cream together. Guess what, it doesn't! I went ahead anyway and it finally began to look like cookie dough as soon as I got the eggs in.
Once the cookie dough is ready, you smear 5 large rounds of dough onto parchment paper and bake one at a time until the disks are deeply golden around the edges and just slightly browned in the middle. You want to make sure they are cooked enough so they will hold together - they can be a little on the dry side if needed as the cookies will soften a bit from the filling. To make sure that the rounds are the correct size, you can trace an 8" circle on the other side of the parchment paper and use that as your guide when you spread out the dough. It should spread evenly while in the oven, but if it doesn't, you can gently reshape it with an off-set spatula halfway through baking. The dough bakes into thick and sturdy rounds that are covered with a generous amount of cream cheese whipped with confectioners' sugar.
I don't have pictures of it sliced since Jeff took it into work (and didn't save me any!), but from what I gather it went over very well! I was afraid that the whole thing might be a bit too sweet, however, the creamy richness from the filling was enough to cut the sweetness from the cookie layers. Impressive to look at, delicious from what I'm told and quite fun to make, this unique cake was just what I was looking for and I can't wait for another chance to make this again!
Tuesday, September 18, 2007
A wrap in a snap...
If you've been a reader for very long, you know Tuesdays are the day where we usually talk about what we made for the Weekly Wednesday Treat Day that we do for Jeff's co-workers. Tomorrow is an extra special day and I'm not quite done with what I'm making yet, so it will have to wait until tomorrow's post! Even so, I do have something sweet to share for today!
When my family came up last week to see the new house, I made them lunch and also baked them a snack to (hopefully!) enjoy afterwards. Jeff made a comment that we've not done any cupcakes for awhile, so I decided to make these Chocolate Mocha Cupcakes. I didn't tell Jeff before hand that this was a fairly light recipe and he was surprised with how moist and tender they were. Using a good amount of whole-wheat pastry flour to up the nutritional value, along side some all-purpose flour for structure, the batter also has just a few tablespoons of fat for the recipe coming from a mixture of melted butter and canola oil. To keep these cupcakes exceptionally moist, a heaping cup of plain yogurt is added to aide in their tenderness.
Dutch-processed cocoa, colliding with dissolved espresso powder, creates the rich mocha flavor in these dark individual cakes. Because you can't go wrong with more chocolate, a couple ounces of melted dark chocolate is swirled into the finished batter right before these are portioned out into the tins. You could get away with a dusting of confectioners' sugar and call them done, but what is a cupcake without frosting? Softened cream cheese, simply sweetened and flavored with confectioners' sugar, more dissolved espresso and a touch of coffee liqueur just because, creates the velvety frosting that is slathered on top. If you are a chocolate fiend and feeling especially indulgent, shave or grate more of that quality dark chocolate you added to the batter over the top of the cupcakes before digging in.
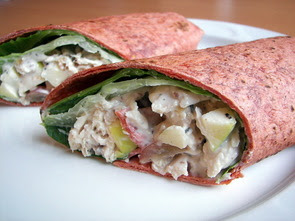
I've become a big fan of Greek-style yogurt over the last year or so and love the thick, tangy and full-bodied texture it has. I usually top it with blueberries and granola, but we used in a savory fashion with tonight's dinner of Waldorf Chicken Wraps. Inside these wraps is a hearty mixture of shredded chicken breast, crunchy toasted walnuts and crisp Granny Smith apple chunks. Those ingredients are coated in a slick mixture of the creamy yogurt, a couple tablespoons of mayonnaise for richness, fresh lemon juice, Dijon mustard and thyme. The innards are then placed on a leaf of romaine lettuce before adoring the wrap so the tortillas don't get soggy. I loved all of the textures in this wrap - a smooth sauce, chunky crisp filling and a nutty crunch from the walnuts - we put the leftover filling in separate containers and will fill and roll them right before polishing the rest off for lunch tomorrow! You may notice that our wraps have a reddish tinge to them - I used a sun-dried tomato and basil flavored one from a certain brand that we have been using for a few years now.
Monday, September 17, 2007
Re-discovering Jicama...
Do you ever forget that you really liked a certain food or ingredient and wonder why you don't use it more often? It happened to me today when I made this Jicama-Apple Slaw as a side for dinner tonight.
The first time we tried Jicama was a couple years ago when we made a Mexican Salad with Pomegranate-Lime Dressing and we loved its crisp texture and intriguing flavor. Jicama (also labeled or called Yam Bean) has a very homely appearance and kind of looks like a bulbous sweet potato on the outside, yet has a bright potato-like interior and is slightly sweet. The moist texture of the Jicama meat is very reminiscent of water-chestnuts if you've never eaten one. As you go to peel it, you may notice a light brown and very fibrous flesh that you will also want to remove when preparing it.
This recipe was a snap to throw together and most of the work happens in a food processor - however, it should be done close to the serving time as it may get a little soggy if it sits around too long. Dressing the shredded sweet jicama and tart Granny Smith apples is a mixture of fresh cilantro, mint, jalapeño for a bit of spice, a dash of sugar, salt, ground cumin, tangy lime juice and olive oil. A couple navel oranges are segmented over the work bowl with the slaw so their succulent juices drip down into the mixture to add a bit more sweetness to soften the tart lime flavor. Adding a buttery richness, chunky pieces of avocado are tossed into the crisp slaw and the dish is ready to serve. Light, clean and refreshing, the bright flavor from the cilantro and mint in the dressing was a delightful combination and helped us re-discover this vegetable.
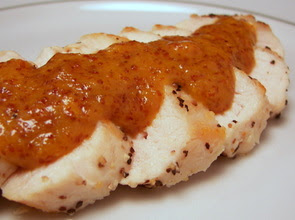
To go along with the slaw, I made a recipe for Chicken Breasts with Creole Mustard-Orange Sauce. The original recipe did call for chicken thighs, which I'm not opposed to using, but I had a ton of chicken breasts already in the freezer to use. This is a dead easy recipe - the chicken breasts are first browned on each side and then simmered in fresh squeezed orange juice and chicken broth to keep them juicy. Once the chicken is cooked through, a mixture of grainy Dijon mustard, sweet honey and cayenne pepper sauce are whisked into the remaining orange juice and broth mixture. This is brought to a rapid bubble and allowed to cook until it thickens - mine ended up being a tad thick as I got distracted, but it still worked out and left us with a generous amount of sauce. I probably should have served this over rice, but we had no problem taking care of any leftover sauce! (Yes, guilty of licking the plate clean!) In this dish for two, the grainy mustard's tang shined through the sweet, yet slightly spicy sauce and was a great way to change up plain 'ol chicken. Feel free to double the recipe if you are serving more.
Sunday, September 16, 2007
Our first week in...
It has certainly been an exciting week around here hasn't it? The house is coming together, things are going up on the walls and the movers came yesterday to remove the boxes and paper - we actually have space in the garage now! And next weekend the pups will be home - we're almost there! We made 9 recipes this week, although only 7 were new - our favorites this round were the Chocolate and Cinnamon Chip Blondies, Hamburger Buddy (Bingo! Hidden mushrooms and Jeff actually liked them!) and the Chipotle Chicken and Tomato Soup.
Tonight's dinner was interesting - I guess you could all it a take-off on chili, but vegetarian style. Starting us off in this Moroccan Chickpea Chili is a mixture of onions, celery and carrots sautéed in a couple teaspoons of olive oil. Next comes the spices - instead of using a prepared chili powder, the recipe calls for a blend of ingredients consisting of cumin, paprika, ginger turmeric, pepper, salt and red pepper. The blend also calls for a touch of cinnamon that adds an aromatic hint of sweetness, but does not leave any cinnamon flavor. The original recipe called for water as the primary liquid, but I added some vegetable broth, along with the fire-roasted diced tomatoes, to bring some depth to the mixture. The cilantro and lemon juice are left out until right before serving to make use of their ability to heighten flavors.
A couple tablespoons of tomato paste does give the dish some body, but it was more soup-y than I tend to like when it comes to chili. With a substantial amount of chickpeas and chunky vegetables, the dish was certainly filling and I enjoyed the smoky seasoning blend - but I think this would be better if it was made ahead of time and served later so the flavors would have a chance to intensify.
Recipes
Moroccan Chickpea Chili
Saturday, September 15, 2007
Chocolate and cinnamon studded blondies...
Um... we are still in September are we not? I rubbed my eyes a few times as I woke up this morning and schlepped myself over to the weather display on the wall to see it was a chilly 26 degrees this morning! Brrr! The weird thing about this though? It is suppose to be 80 again by Tuesday - ah yes, that's Minnesota weather for you!
So, what better way to warm up the house by kickin' the oven on and getting some baking done! I've had these Chocolate and Cinnamon Chip Blondies going through my head all week and decided this morning was the day to throw them together. Since moving back to Minnesota, we now have easy year round access to Cinnamon Chips again! We didn't have much luck tracking them down in the other states we lived for some reason. Jeff really loves these chips bursting with sweet cinnamon flavor and is always anxious to test them out in new recipes.
The batter for these blondies is not too unusual - a "few" tablespoons of creamy butter, rich brown sugar to give them a chewy butterscotch background, a bit of granulated sugar to give them some crispness and a dash of vanilla to round out the flavor. We used about half of the total amount of chocolate and cinnamon chips inside of the dough while the rest were scattered on top of the raw batter. The bars are baked until golden and a toothpick tests with some moist crumbs left attached - you don't want to over-bake as they might end up to be too dry. The cinnamon was more mellow than I thought it would be, but that was good as it didn't seem to compete against the chocolate. I do think these would benefit from being baked in a 7" x 11" baking dish - they were a little thin for my liking as we baked them in a 9" x 13" dish.
Friday, September 14, 2007
Mowing twice in a week is no fun...
The new backyard is uphill, which does not make for pleasant lawn mowing... and I've had to do it twice this week because the grass was so long when we moved in! The yard is not nearly big enough to have a rider like we had in Maryland and if it was, I'd be fearful of tipping over and rolling down since it is pretty steep! Needless to say, by the time I was finished, I did not have much energy to put into dinner tonight.
The dish I had planned for tonight called for cooked shredded turkey, which I had done earlier in the day, but had much more prep work than I was willing to put up with. After a quick jaunt through my to-try piles, I came across a recipe that looked easy enough and called for ingredients I already had on hand. The only real work for this Whole Wheat Couscous Salad with Turkey and Arugula was peeling and grating the carrots!
With a speedy 5 minute cook time, the whole wheat couscous was done in a flash and all I had to do was toast some walnuts and toss everything together! With the couscous, we tossed in a few plump golden raisins to add a sweet element, allowing them to soften a bit more and soak up a little of the broth and water mixture. With lots of contrasting textures, this salad is just tiny golden pearls of pasta, chewy raisins, crunchy walnuts, meaty shreds of turkey, shreds of bright orange carrots from the farmers market and chopped arugula to lend a bitter counterpoint. For the slick dressing, a mixture of tangy lemon juice, olive oil, salt and fresh ground pepper is whisked together and drizzled over the heaping mound of pasta - tough job huh?! But really, if you feel too tired to whip up something fancy or you require a fast, yet healthy dinner or lunch, think about giving this dish a try. Also, do feel free to change up the nuts, meat and greens to suit your taste.
Thursday, September 13, 2007
The bounty of fall should be coming soon!
As the weather cools, the one thing that I love the most about this time of the year is the crops of fresh apples that are slowly making their way into the markets. Now that we are back in Minnesota again, I can't wait to until I can sink my teeth into a local firm and juicy Honeycrisp or Ginger Gold apple. I think those two top the list as our most favorite apples for eating out of our hands. I've heard that they have started hitting the farmers markets and local stores, but I haven't had a chance to search them out yet!
As we wait for those apples, of course we still enjoy eating and cooking with other different varieties. Tonight's Apple Turkey Picadillo that we had for dinner used a kind of apple that we almost always have on hand - Granny Smiths! As I scanned through what we needed to make this, I was unsure if the flavor from the of mix of spices and ingredients would be something we would like or not. Once the typical combination of garlic and onions was taken care of, ground turkey (you could use all-breast meat, but I like to grind a combination of white and dark for a better texture) is added to cook and brown the meat. Smoky cumin, oregano, salt, pepper and a sweet twist with a dash of ground cloves is added to spice up the mixture. To lift up any bits of caramelized flavor-packed bits from the bottom of the skillet, tangy cider vinegar is added to loosen them up.
Tart chunks of Granny Smith apples, juicy chopped tomatoes, pungent green olives and savory Worcestershire sauce are then added to cook down and release some of their liquid to create a syrupy glaze to help keep the mixture moist. The smell that filled the kitchen was wonderful when the cumin and cloves hit the pan - the mixture of sweet, tart and savory made for a fragrant filling dinner that I'll be sure to make again during this apple season. You could serve this over tortillas or even on a bed of nutty brown rice, but I decided to use it as a stuffing inside a couple halves of whole wheat pita bread. We also thought it would be fun to use this as a filling in those Tostito's Scoops!
Wednesday, September 12, 2007
Why's that pasta so angry?
We have finally settled on a date to go back out east, get the pups and once again make the long drive back to their new home! While I'm not excited about that drive with 2 doggies in the back seat, it will be nice to finally feel like we are completely done with the move - we should be "whole" once again in about 2 weeks.
When I was plucking out recipes to plan this week's menu on Saturday, I decided to pick ones that were fairly simple and quick so we could have a chance to ease into the new kitchen and learn its quirks. Pasta dishes usually fit well into this category, so I chose this Whole Wheat Pasta Arrabbiata with Arugula recipe for tonight's dinner. It also gave me a chance to finally submit something to Ruth's Presto Pasta Night roundup on Friday!
As a pound of whole wheat penne cooks, a speedy sauce begins by softening red onions with plenty of minced garlic in a couple tablespoons of olive oil. To add the "angry" (arrabbiata) element to the dish, a teaspoon of spicy red pepper flakes is also added at this point. To freshen the flavor from the canned fire-roasted diced tomatoes, a splash of balsamic vinegar is stirred in just before the tomatoes hit the pan. Once the pasta is married with the sauce, a generous cup of salty pecorino-romano cheese is stirred in to add a sharp note. To finish this dish, a few handfuls of peppery arugula lends a bit more color and a healthy bite. It was hard to not go dish up another bowl, but I wanted to make sure there would be enough left for both of us to enjoy at lunch tomorrow.
Tuesday, September 11, 2007
Taking treats over to say thanks for a warm welcome...
A few of the neighbors have stopped by now to welcome us to the area - we thought it would be nice to bring them a plate of treats today... the first of many I'm hoping! Maybe we'll have some new taste testers to try out our dishes on!
We've been running ideas back and forth trying to figure out which recipes to bake - we decided on doing a couple of our favorite goodies, instead of experimenting with untried ones. Rather than making a normal chocolate chip cookie, we revisited the M&M Cookie Bars that we first made a long time ago as a treat day item. I see we also used the black and orange Halloween M&Ms that we apparently used the first time! These bars are always a hit.
Since we are almost halfway though September already and fall has begun to grab a hold of the weather, we thought it would be fitting to also bake a batch of those Swedish Gingersnaps we made just a few weeks ago. With their sparkling crackled tops, I imagine that these fragrant, chewy and spicy cookies will be making quite a few more appearances over the next few months (including the annual Christmas Baking Spree that is fast approaching!)
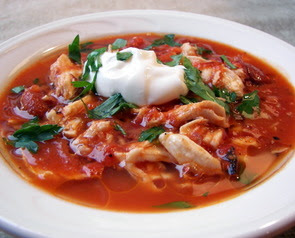
With the wind howling from the north today and the temperature barely climbing to 55 degrees, tonight was the perfect weather for a soup. With just a few simple ingredients, this Chipotle Chicken and Tomato Soup was on the table in around 20 minutes with very minimal prep time. Bringing a smoky depth and a little kick in the back of your throat is a minced chipotle chile in adobo sauce - you can reduce the heat level a bit if you like by scraping out the seeds before you chop the chile. This soup is bulked up by the addition of red kidney beans, stewed tomatoes, chicken broth and shredded cooked chicken - Jeff prefers beans that have a firmer texture, but you could also use a navy bean if you would like a softer texture. To cool you down a bit, a dollop of tangy sour cream is added at serving along with a drizzle of extra-virgin olive oil for a touch of richness.
Monday, September 10, 2007
A little sneaky, yes - but worth it!
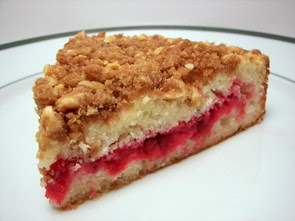
I was going through the pictures from that camera that night and I came across a set from this Cranberry-Hazelnut Coffeecake that we made for Jeff's mom before we left Maryland. I could have sworn that we talked about it, but apparently I didn't get a chance to post it yet!
I had wanted to make at least one more cranberry-filled recipe to use up the last bag that we had in the freezer when I found this recipe. I can't wait until the season hits out here so we can stock up the freezer again! This cake is light, moist and has an almost fluffy texture to it - this comes from the addition of tangy sour cream and soft cake flour. The cranberry layer stuffed inside this cake could not be more simple - it is just simply chopped cranberries! The cake itself is fairly sweet, but with a layer of tart cranberries stuffed in between, it seemed to even out well.
To give the cake a special touch, a sweet streusel is sprinkled on top of the cake before it goes in the oven. A quick-to-make combination of cake flour, brown sugar, rich chopped hazelnut and cinnamon is moistened with just a touch of melted butter. We actually made this and froze it a few days before we left to drive up to his mom's house. It took us a few hours to drive up there and by the time we arrived, the cake had defrosted and we were able to have our pieces for quality control. When we sliced into the cake, I loved how the bright ruby-red filling was gleaming against the golden crust and tender buttery-yellow interior. Even though there is only a quarter cup of hazelnuts, their prominent flavor brought such a delicate nutty flavor that added just the extra punch this cake needed.
I felt slightly evil with tonight's dinner, but I didn't let on until after Jeff had finished his plate of this Hamburger Buddy recipe. This is like a homemade version of boxed hamburger helper (something I've not made in more than a few years), only this was a lot more tasty. It may not win an award for "best looking dish", but it is packed with vegetables and whole wheat pasta.
What makes this recipe appealing is the use of a food processor to finely mince the garlic, carrots and mushrooms allowing the prep work to be done in a snap. Once they have been processed, chunky pieces of onions are tossed in and the mixture is pulsed just until the onions are broken up. Once the veggies are ready, a pound of lean ground sirloin is browned in a large Dutch oven. The minced vegetables are added and the two mingle and bubble until the onions are soft - water, beef broth, the whole wheat noodles and a few dashes of Worcestershire sauce are then added to cook until the pasta is tender. The pasta absorbs most of the liquid, but there are juices left behind that are tightened with a mixture of broth and flour. Sour cream stirred in at the end gives the dish a tangy background with a very creamy mouth-feel. This hearty meal gives a healthy makeover to an old-time comfort food dish and is a brilliant way to sneak in some veggies to unsuspecting picky eaters.
I got the dirty look as soon as I picked up the mushrooms at the market this weekend, but said we would be using them much later in the week to ward off any suspicions that we would be having them tonight. Jeff always says he doesn't like mushrooms and won't eat them if he sees them going into any dish. I watched and grinned with evil laughter in my head as he turned to me with a big smile and said "Wow, this was really good! You should make up another batch to throw in the freezer for lunches!" I then watched that smile turn upside down as I let him in on the secret of what he just ate. Is that wrong if I got some sort of sick pleasure out of that? Hee hee! Oh well, maybe he will finally realize they are not so bad after all and he will give them more chances in the future!
Sunday, September 09, 2007
And finally the reveal!
We finally have some pictures to show you of the new house! My family was able to come up from the farm today to see the house, so we gave them a tour first before we posted these. This is a very image intense post - we will try to keep the number of pictures down, but there are quite a few! As always, you can click on the photos for larger versions if you wish.
Mom brought us an overflowing basket of goodies from the garden - this snapshot is just a small amount of what she brought!
Here's what the front of the house looks like.
Now keep in mind, we have not been able to do any decorating and are still in unpacking mode... there are lots of bare walls and whatnot!
Here is looking down the stairs where the front door is.
When you walk in, there is a small bath off to your left that has this cool sink!
And off to the right is the large open living room area - we were even able to negotiate this awesome pool table when we made the offer on the house! Score!
Here is another view of the living room area.
Off the pool table is a slate landing that leads to a small deck - this is a great place for breakfast in the morning!
Here is the view from the upper-level deck
In between the living room and kitchen is a gas fireplace - this thing really pumps out heat!
Here is a view into the kitchen - the floors in this area are a Brazilian Cherry. The kitchen has a large island in the middle with a big slab of granite. While it is not my large "dream" kitchen, it seems to be working out well! We are just lacking storage space right now.
On the other side of the kitchen leads to the laundry room - nothing too unusual here, except the previous owners added this neat dog bath with a slate background! I bet the pups can't wait for their first rub down!
Of course, downstairs we have our exercise room... at this point we've been to busy to enjoy (um... right) this room. That will change tomorrow however!
Here is a shot of the upstairs master bath - we adore this funky room, the floor in here is even heated! Bring on the chilly weather!
So there it is! I know we didn't post all of the rooms, but we'll add more a little later once we have a bit more time.