Monday, June 30, 2008

Tamales... round two!

We made tamales for the first time last year - it was pretty time consuming then, but I let that slip my mind when I decided to prepare these veggie Corn Tamales with Avocado-Tomatillo Salsa on a weeknight! Oops!

As I learned from the last time, it is best to let husks soak as long as you can - 30 minutes will produce a husk that is just flexible to work with, but they are much more pliable if left for 1 to 2 hours. Another tip - soak a couple extra husks so you can slice them into ties for the tamales.

Coarsely puréed sweet corn kernels are mixed with the masa to bulk up the corn flavor in the tamale dough - when combined, it is a little on the drier side, so you may need to use your hands to fully incorporate the ingredients. Once a portion of the masa is spread on the a husk, a dollop of sautéed red bell peppers and yellow onion are added on top. While the whole process is not difficult at all, doing it 18 times makes it a little laborious, so turn up some tunes and grab a glass of your favorite drink. And yes, dancing in place while assembling tamales counts as exercise... at least thats my story.

Steaming should take about one hour. If you feel the need to check, the tamale dough should feel firm and easily pull away from the husk. While waiting, we worked on a raw salsa to serve along side. Creamy avocado, tart tomatillos, fresh lime juice, cilantro and just a tiny amount of minced jalapeño are tossed together and chilled until the tamales are ready. I've never had tomatillos raw and was afraid they were going to be a little too harsh, but their bright, crisp and citrus-y flavor was so welcoming against the rich avocado! If you've never purchased tomatillos before, you'll want to select ones that are firm to the touch with husks that are tightly attached. The tighter the husk, the fresher the fruit and if you peak underneath, the tomatillo should be bright green.

These tamales are on the lighter side - so the dough is not very traditional being made with just a few tablespoons of canola oil, instead of lard. While they may not be as tender, I thought the texture was still good and their flavor was quite nice, especially paired with the tangy fresh salsa.


Sunday, June 29, 2008

New use for no-boil noodles...

We were not able to get a proper garden in this year, but our goal is to take the time to get a couple beds set up for next year. We did toss in a few plants here or there to try and grow some fresh vegetables...

That was the plan anyway until the evil wrath of this cute, but very mean, bunny came along. I mean really, it has a whole big yard of stuff to eat and the little guy had to come eat my little plants? I'm calling this offender #1:

I'll spare our now naked pepper plants of their humiliating photographs, but needless to say, I don't think we will be getting many jalapeños this year! Oh, and by the way, said bunny has morphed into a family of 5 that are often seen traipsing through the backyard, giggling like little school girls with full bellies! And, as you can imagine, I even caught someone (I wonder who?) out there with a few carrots trying to lure offender #2 in to say hello! Arrgh!

We prepared a total of 9 new-to-us recipes this round - our stand-outs this time where those Maple-Cinnamon Granola Bars, the Pork Tacos with Corn-Jicama Salsa and Guacamole and those Almond Roca Cookies.

Stuffing manicotti can sometimes be a little troubling or fussy, but tonight's Baked Manicotti with Prosciutto uses a new technique that was pretty slick. Making a basic homemade sauce was the first order of business tonight. Regular diced tomatoes would be fine for this sauce, but we opted to use our favorite fire-roasted version to start off with a bang. To keep the flavor clean, the only other ingredients in the sauce are olive oil, garlic, crushed red pepper and a little fresh basil.

Instead of working with those tubular shells or trying to use fresh pasta, the recipe has you soften very accessible no-boil noodles to use for the pasta. The noodles are added to a dish of boiling water - after you slide them in, you should move them around after a minute or so to prevent them from sticking together. Once they were flexible (this only takes about 5 minutes), we transferred them to a clean towel to drain away excess water and covered them so they didn't dry out.

For the trio of cheeses in the filling, a combination of smooth ricotta cheese, sharp Parmesan and shredded mozzarella are mixed with an egg, parsley and fresh basil. To assemble this stuffed pasta dish, the no-boil sheets are laid out, a thin slice of salty prosciutto is draped over the top and a generous dollop of the cheese filling is added and smeared over the prosciutto. Once rolled up, the pasta is set upon a bed of the delicious sauce with additional sauce poured on top to ensure they stay very moist. You could prepare this whole recipe in a regular baking dish, but we used those fancy dishes that we used when we made those homemade lasagnas to make these individual style with two manicotti each. Once they have thoroughly cooked through, each serving got a shower of additional Parmesan cheese and was placed under the broiler to turn a little crusty and brown. While this recipe did have a few steps to it, the process moved right along and I loved how well the components worked with each other. The pasta was tender, but still firm enough to hold its shape and was not mushy at all. Need to serve more than four? This saucy recipe will easy double - just use a 9" x 13" baking dish to bake them in.


Saturday, June 28, 2008

Dreamsicle-esque biscotti

I'm a little overdue with talking about a certain sweet treat we made a couple weeks ago. We had a guest (Hello Mari K!) come by and we were looking for something just a little different... it has been awhile since we made biscotti, so I took a chance on these Creamy Orange Biscotti.

I have to start out by saying that this biscotti was a little frustrating. The recipe is a variation to a basic "Italian"-style biscotti recipe as it doesn't call for any oil or butter to be used. I do typically prefer this type of biscotti as they tend to be a little crunchier and make for a perfect dipper.

The frustrating part? This recipe has you add an additional one-quarter cup of liquid to an already soft and sticky dough, without off-setting it with any more flour. I started out following the recipe as directed, but felt the need to add another one-quarter cup of flour as the dough just seemed a little off to me. If you try this recipe, the dough is still sticky, so be sure to use wet fingers or a wet dough scraper to help you shape and smooth it out. The biscotti log did end up baking fine, at least on the outside, but when I sliced into it, the texture inside was weirdly open with actually a few visible holes! I don't think I've ever had this happen with biscotti before, but there is a first time for everything I guess. Could it have been the additional flour? I don't know for sure (I know I didn't over-mix), but it was just too wet and spread too much without it.

I finished slicing the log and sent them for their second bake to crisp them up. Even being a little "hole-y", they held together fine and didn't fall apart. As they cooled down, I couldn't wait any longer and had to try them and see if the texture distracted from the taste. I was happy to find that they had a delicate orange flavor with wisps of visible zest scattered throughout. Creamy is in the title, so where does that fit in with these crunchy slices? We dunked the bottoms of each in melted sweet white chocolate to add a luscious dreamsicle-esque quality!

Friday, June 27, 2008

Finishing up the leftover jicama with a light salad...

Remember last Monday how we talked about not using jicama nearly often enough? Well, in the recipe we talked about that day, we used a measly half cup and as the jicama we bought was quite large, I needed to figure out what to do with the rest. While we did snack on it, I used the last of it to prepare this Jicama Salad with Chili-Spiced Chicken for our dinner this evening.

This is not your typical "salad", per se, as there are no greens used. Taking the place of tender greens is a combination of sliced jicama and white corn tortillas that had been cut into strips, given a light coating of olive oil spray and baked in the oven to give the dish a fantastic crunch. Bright lime juice, olive oil and a drizzle of sweet honey form the generous dressing to drench the salad base - since there is a lot of moisture here, be sure to wait to toss this together until right before you are ready to serve. This way so those tortillas strips keep their crispy power and don't get too soggy.

Adorning the gleaming salad are sliced chicken breasts that were seasoned with chili powder, smoky cumin and a little cayenne for heat. You can grill these or if you want to fire up the stove, toss them into a skillet with a little oil to cook them off. I actually did this part a few hours a head of time and then kept them chilled in the refrigerator. I tested for seasoning when they were still warm and noticed that I preferred the flavor/texture of the chicken better, with this salad anyway, when the chicken was cold.

We've had a couple heavier-type dishes the past couple of nights, so this cool, refreshing dish that didn't need to heat up the house, was our saving grace as the humidity has been a little wacky here the past couple of days! Jeff commented, and I agree, that the Cocoa-Chili-Rubbed Chicken we made a few months ago would also be a fun match to top off this crisp salad.

Thursday, June 26, 2008

Using up more fresh asparagus...

Are you still finding good fresh green asparagus spears? We picked up some more from the local market as we are trying to make the most use out of the season as we can. While we love a simple roasted asparagus (especially drizzled with balsamic vinegar), those spears also worked well in a casserole like this quite un-photogenic(!) Potato-Ham Bake we made for dinner tonight.

This dish layers together buttery Yukon gold potatoes, chopped ham and sliced asparagus while filling in the empty spaces with a lighter take on a creamy sauce. To loosen up the light cream cheese spread, we heated it with a bit of milk and a little Parmesan cheese. The mixture smooths out fairly quick over medium-low heat and the sauce is then given an interesting twist by adding chopped fresh tarragon. Since we sliced the potatoes and pre-cooked them in some boiling salted water, the assembled dish doesn't require too much baking time. Before taking the casserole out, the dish is sprinkled with additional Parmesan cheese for a sharp element to the crusty top.

The potatoes were tender, yet managed to keep their integrity and held together quite well. Once I had divided all the portions out, there was a little layer of the sauce left behind in the baking dish which I just spooned over each serving to ensure each stayed very moist. Be sure to grab the cream cheese spread that is already flavored with chive and onion for an extra boost in flavor. Between the cooked ham and Parmesan, I thought there would have been enough salt, but I did sprinkle a little coarse sea salt on top of my serving (Jeff did the same) as we felt the potatoes just needed a little extra oomph. The one thing I would do differently next time would be to heat the bits of ham in a skillet to caramelize them before adding the pieces to the dish. While the ham was fine as is, that extra depth would have been a nice bonus to this updated casserole bake.


Wednesday, June 25, 2008

Taking the flavors of a Christmas candy and turning them into an exciting cookie...

So, we had to push the Weekly Treat Day back a day this week, but I don't think anyone will complain once they get their hands on these Almond Roca Cookies.

This recipe takes the flavor of that decadent candy (which we always make around Christmas time) and turns it into a delicious cookie. To give you that rich, sweet taste you get when eating the candy, we bumped up the flavor by using a combination of moist dark brown sugar and granulated sugar. The higher proportion of brown sugar aids in their chewy quality, while the white sugar brought a nice crispness around the edges.

In the candy version, the combination of butter and brown sugar that boils and caramelizes away to a fairly high temperature creates that delicious toffee flavor you may remember. However, in these cookies, this is made a little more accessible by using plain ol' toffee bits. The dough for the cookies was fairly soft when combined, so we decided to stick the mixing bowl into the refrigerator for a couple hours. After chilling out, we could easily handle it without any issue. Now, I bet you're wondering... where are the almonds? Well, rather than mixing them in, the dough is portioned out into balls and then rolled in coarsely ground almonds!

I'm not the biggest fan of milk chocolate, but I do appreciate that slick layer of milky sweetness commonly found on almond roca. To add that element, we chopped up a small piece from one of our favorite hunks of chocolate (Callebaut), melted it in a double boiler and then drizzled it over the baked and cooled cookies. While you may not get the same airy, crunchy texture like that buttery candy has, these cookies are bursting with a satisfying roca flavor that captivated my attention into eating more than a couple quality control pieces!

Tonight's dinner, Turkey and Chipotle Black Bean Tamale Pie, would probably be more appropriately served on a chilly winter's evening, but I've been wanting to make this recipe for too long and decided I couldn't wait anymore. So, after turning the AC up a notch or two, I forged ahead... hey, the oven was already heated up from the cookies!

A very hearty and saucy mixture forms the base of this tamale pie. Onions, a seeded jalapeño (you just want the flavor, not the heat as you get enough from the chipotle) and minced garlic start off the sauce. Flour is added to thicken and a couple generous tablespoons of chili powder start the layering of flavors. Broth, tomato sauce and minced chipotle chiles in adobo sauce are whisked into the pot - add chiles to taste, if you want it especially spicy, add two. If you want this dish to be on the milder side, but still get that smoky aspect, you could scrape out the seeds from one before adding it. Once the sauce thickens up, cooked turkey, tender black beans and a cup of corn kernels are added to come up to temperature.

The process of preparing the cornmeal topping was a little unusual (to me anyway), but I followed the directions and it ended up working just fine! Coarse stone-ground cornmeal is whisked with cold water before being added to the pot of boiling water. I'm guessing this has something to do with making sure the grains don't clump up, but I'm not sure. Since the ratio of grain to water is less than I would usually use, the mixture thickens up fairly quick and was able to be poured on top of the turkey filling. I was afraid the cornmeal would just sink down, but it was light enough to sit right on top! Extra-sharp cheese is then scattered on top and the assembled dish bakes until the cornmeal is cooked through and the turkey mixture is bubbling away.

You'll want to set aside enough time for this to cool down before you cut into it - I would suggest up to 15 minutes or so to give the sauce a chance to set up (we waited about 5 minutes and it could have used the additional 10). Well-seasoned with a nice kick and a cheesy crust on top, I know I can't wait until fall rolls around and those cool winds start to blow in to make this dish again! If you're tired of black beans, I've made a note on the recipe that we should try swapping them out with hominy when we make this again for a different taste.

Tuesday, June 24, 2008

Versatile homemade granola bars...

*Quick note - I finally got a chance to bring both recipe sections to the left up-to-date! Woo!

We had to make a run down to Rochester today and since Jeff is working from home tomorrow, we are pushing back treat day this week to Thursday. Look for what we are sending in this week in Wednesday's post.

We've been a little low in the homemade snack department, so yesterday I made these Maple-Cinnamon Granola Bars to take with us today. Stuffed with lots of good ingredients, these bars are composed of rolled oats, brown rice cereal, whole wheat pastry flour, brown sugar, powdered milk and a sprinkling of cinnamon. If you don't already have brown rice cereal handy, you could just as well substitute Rice Krispies (the cocoa variety would be nice!) or another small crispy cereal. The powdered milk will add a little richness and tender quality to the bars - however, if you want a protein boost, you can use a soy protein powder instead.

They probably don't sound too exciting to far, right? To get the flavor going, pure maple syrup, peanut butter, just a little oil and a couple splashes of vanilla are whisked together to moisten and hold the bars together. If you want to toss in a handful of chocolate chips, mini M&Ms, cinnamon chips or toffee bits, I wouldn't complain, but we left them as-is for simple bars. If you are not a fan of maple syrup, switching it up with a bit of Lyle's Golden Syrup, honey or brown rice syrup would probably work well. I'd also like to try these with some of the homemade cashew, hazelnut or almond nutbutters that I often make.

When the bars are almost done baking, you'll want to take them out and quickly cut/score them into bars (I used a sturdy bench knife), then put them back in the oven for a couple more minutes. I didn't think this was completely necessary, but it did aid in cutting them neatly once they had cooled. These are definitely in the softer realm of granola bars, but they were decidedly chewy, a little sweet and pretty filling. This is a good base recipe that you could change up in a variety of ways to suit your tastes or pantry stock.


Monday, June 23, 2008

A couple of refreshing dishes...

Over the weekend, I made a side dish for one of our meals that I didn't get a chance to talk about. In the original recipe for this Sugar Snap Pea and Barley Salad dish, it called for using a quick-cooking barley to speed up the process.

However, since I had some extra time, I went ahead and prepared pearl barley instead - this took about 45 minutes or so compared to the 10 to 15 minutes that the other variety cooks in. If you opt for the faster grain, reduce the liquid to 2 cups in total. Once tender, we briefly rinse the barley to cool it down - we tossed the plumped grain with matchstick-cut pieces of crisp sugar snap peas, fresh parsley, a little red onion for bite and lemon juice. I went ahead and stashed the salad in the refrigerator for a couple hours so the flavors would have a chance to marry, but this is not completely necessary. I did find though, that the flavor and texture improved after that chilly stint in the fridge. Bright and definitely refreshing on a warm spring or summer day, this is one of those sides that I'll keep handy when we want to take a trip to the zoo or the park for a picnic.

Keeping that refreshing and light theme going, tonight's dinner, Pork Tacos with Corn-Jicama Salsa and Guacamole really hit the spot this evening. I know the recipe reads a little long or daunting at first, but with a bit of prep work, it actually came together in a snap!

Have you worked with jicama before? It is one of those ingredients we like, but don't use nearly often enough. The flavor it somewhat sweet and juicy like an apple, but the texture is more reminiscent of a potato of all things. A little odd at first, but it really grew on us - we sometimes enjoy it as a snack by itself with a squirt of lime juice and a sprinkling of chili powder! The salsa for these tacos is a crunchy combination of corn kernels, diced jicama, black beans, fresh citrus-y cilantro, lime juice and a dash of cumin. Prepare this first and keep it in the fridge to marinate while you prepare the rest.

The guacamole couldn't be simpler for this dish - we mashed creamy avocado cubes with tangy lime juice and salt. I know not everyone likes tomatoes in their guac, but their fresh juiciness is a nice touch here. If I would have thought ahead, we both thought that just a little minced serrano chile would have been good for a touch of heat. Once this is prepared, be sure to cover it with a piece of saran wrap placed directly on top of the mixture to prevent any oxidation (browning).

Tender pork is sliced into thin strips and tossed with a seasoning blend consisting of chili powder, oregano and cumin. As the tenderloin strips are quite lean and thin, cooking them will only take a couple minutes so keep an eye on them. Served and assembled on warmed white corn tortillas, the combination of cool guacamole, spiced pork and the crunchy salsa was invigorating, fresh and inviting. So inviting that there is sadly only one serving left after Jeff and I couldn't stop ourselves from splitting the other one! Stuffed much? Yes, but quite content!


Sunday, June 22, 2008

Meat Goulash with Macaroni...

You would think a tornado went through our kitchen as we prepared a whopping 13 new recipes this week (messy!) - looking back, I think our favorites were those fun Mashed Potato Muffins, Two-Corn Polenta with Tomatoes, Basil, and Cheese and that tempting Praline Apple Bread.

Jeff has been asking for a pasta dish and I finally worked one in tonight with this Meat Goulash with Macaroni that we made for dinner. You can substitute whichever short pasta your heart desires, but we used a favorite mixed-grain macaroni that is full of fiber and protein. After we dropped the pasta (the brand we use actually comes in just shy of a pound, but it doesn't matter too much in the end), we started crisping up a couple slices worth of chopped bacon. Yes, bacon... a hint of salt, a bit smoky and so hard to not pick out the bits as they cooked up. Mmm!

To those naughty bits of bacon, we tossed in a combination of ground pork along with lean ground sirloin to lighten the dish up a bit, yet still retain some depth of flavor. Once the duo of meat browned, we seasoned the crumbles with smoked sweet paprika and tossed in some chopped garlic and onion to soften. To intensify the tomato base, we added concentrated tomato paste to the skillet full of meat to let it cook and caramelize the paste, allowing the flavor to blossom. Meanwhile, we puréed a few roasted red bell peppers and stirred them into the mix, along with a couple cups of rich beef broth, and allowed the mixture to simmer for a couple minutes. To add a silky feel, sour cream is added to smooth out the sauce and the dish is finished off by stirring in the cooked multi-grain macaroni and a handful of chopped parsley. The original recipe did call for the addition of fresh dill, but neither of us are too crazy about dill and beef together, so we decided against it... if that appeals to you though, toss in a small handful of dill too!


Saturday, June 21, 2008

Desvering of a special treat...

Max has been pretty stressed out after loosing his buddy, but day by day his old snarky self seems to be coming back. I thought it was a good time to lift his spirits with a new doggy treat that had an extra special twist just for him.

Our fluffy mess(!) has yet to turn away any homemade treats and we think he tends to enjoy them on the crunchier side. So, for these Crunchy Sesame-Rye Treats, I used a variety of dry ingredients to give flavor and texture - whole wheat flour, rye flour, rolled oats and cornmeal for extra crunch. For the sesame seeds, we used a fairly small handful as they are somewhat high in the fat department - you could even go a bit less if you wanted since the tiny seeds distribute well into the dough, but Max is a pretty active pup.

When you mix everything together, the dough will probably still be a little moist - if so, turn it out onto a floured surface and knead in as much whole wheat flour as necessary to smooth it out. It shouldn't be sticky, but you don't want it too dry either. Using a few small cookie cutters, we ended up with several dozen treats - I lost count! For that extra special twist I mentioned, we went ahead and melted a bit of carob chips (do not use chocolate) and dipped the half of about one-third of the total amount. Not all carob will react the same to melting... you can try using the microwave, but I got the best results by using the old fashioned way of setting a bowl over simmering water. If the brand you try does not melt well enough to dip, you may have to add just a touch of shortening to smooth it out. Here's a snap of him after he gave them a test - I think his reaction says it all!


Friday, June 20, 2008

Shrimp, grits and lots of rhubarb...

We talked about our rhubarb windfall last week - while I froze a ton of it (literally it feels like!), I did make a couple recipes over the past week. Just because it sounded different and fun, the first thing I tried out was this Rhubarbecue Sauce.

A clever name for sure, this unusual sauce is actually quite simple to prepare. Chunky pieces of rhubarb, ketchup, a little water, onions, a couple cloves of garlic, brown sugar, Dijon mustard, cider vinegar, Worcestershire sauce and a couple dashes of cayenne pepper sauce are simmered together until the rhubarb softens and becomes very tender. To get that slick texture, the batch is scooped into a food processor (or a blender) and puréed until it smooths out. Tangy, a bit tart and a little sweet with a nice kick, I've only gotten a chance to mop this sauce on some grilled chicken we used in sandwiches for lunch. We both thought it was tasty and nice change of pace - I've frozen the remaining in tablespoon and quarter cup portions to pull out when our taste buds crave a sauce that is a bit different than the norm.

Yesterday, I talked about those savory muffins and I mentioned that I also had a sweet batch of muffins waiting to be talked about. It just so happens that we snuck some of our abundant rhubarb into them too!

I baked these Cinnamon-Rhubarb Muffins earlier in the week and have stashed most of them in the freezer for a quick on-the-go snack. The batter for these muffins is quite thick and might look like it won't all fit into a regular 12 cup muffin tin. However, don't fear - you can fill the cups right up as that thick batter with help support the muffins into baking up and not out, spilling all over the top, as a thinner batter might. When preparing the rhubarb, try to get the pieces to about a 1/4" dice - you want them visible, but not too big or they won't have enough time to achieve that soft, buttery quality. These are fairly rich for muffins with sour cream and butter, but I have a feeling you could easily substitute half of the butter for drained applesauce and use a reduced-fat sour cream without affecting the lighter texture too much.

Using drained applesauce (place it on a few layers of paper towels for a couple minutes) will give the needed moisture, but not have the excess liquid that could make them soggy or gummy. To tie in that cinnamon flavor from the batter, the unbaked muffins are sprinked with a fragrant cinnamon-sugar right before they go into the oven. You can test for doneness a couple ways - if you press down gently on the tops of the muffins, they should be done when they spring back. You could also place a toothpick in the center and it should come out mostly clean with a few moist crumbs attached. When you take them out of the oven, be sure to remove them after about 5 minutes or so to finish cooling - if they sit in the muffin tin, they will start to steam and their golden crust will go from tender to tough.

Now... I really need to move on to what we actually had for dinner tonight. Although, it has been a while since we've done a three-in-one post, hasn't it? The weather is really starting to heat up over here in Minnesota, so I counted down the time until I could turn off the broiler after this Shrimp and Cheddar Grits dish was done. You know... we may just have to bite the bullet and pick up a "real" grill as it would have been nice to get out of the kitchen this evening and adapt this recipe to be done on that.

Since I was a little short on time tonight, we used quick cooking, not instant, grits for these - the texture is just a bit heartier this way and doesn't add that much time. To cook those grainy granules, we used a duo of broth and water to impart a little more flavor. After a short 5 to 7 minutes, they ballooned and thickened right up... and because the mixture is fairly bland as is, we stirred in a few ounces of sharp white cheddar to liven the grits up.

While the grits were doin' their thing, we tossed a pound of peeled shrimp with sliced scallions, olive oil, a little garlic powder and the obligatory salt and fresh ground black pepper. The size of the shrimp will determine how long they need to stay under the broiler - ours were the 16-20 per pound variety and only needed a couple minutes to go from translucent to that blush pink tinge. Just stay close to the oven once you put them in - if you've never cooked shrimp before, you'll want to take them out when they turn color and have a slight "C" shape to them. If they are curled tightly, they are over-done and may be a bit rubbery. Once I plated the succulent shrimp over the pool of creamy grits, Jeff could hardly contain himself (he was doing that antsy dancing in place thing...) as the picture process was happening. While I'm not the biggest seafood fan (yet!), I did enjoyed this and Jeff was in heaven as he inhaled his portion and even nibbled on some of the leftovers before I got a chance to put them away!

Recipes

Thursday, June 19, 2008

Mashed potatoes... turned into muffins?

We've made several sweet muffins and in fact, I'll be posting another one in the next few days (I need more time!), but for tonight's dinner, we seduced those individual goodies to the savory side of life.

I've had a little leftover plain mashed potatoes stashed away in the freezer that I needed to figure out what to do with. Rather than just reheat them as a side, we defrosted them and transformed the creamy mixture into these Mashed Potato Muffins!

Just saying the name made me think these might end up being heavy and dense, but we were pleasantly surprised to find out that this was not going to be the case! With a portion of the dry ingredients being cornmeal, these muffins were slightly reminiscent of cornbread, yet not as sweet with the texture being closer to a regular muffin than a crumbly bread. As we like to do and mention often, I used a combination of all-purpose and whole-wheat pastry flour - feel free to use entirely all-purpose without worry. Besides adding dots of color to these well-risen muffins, minced green onions and finely chopped red bell peppers back up the savory nature and add another layer of flavor. I was not convinced that Jeff would like these, but he had more than his fair share and is making sure I don't let this one fall too far into the void of tried recipes - the only thing I might do next time is add a little minced jalapeño for a smidgen of heat.

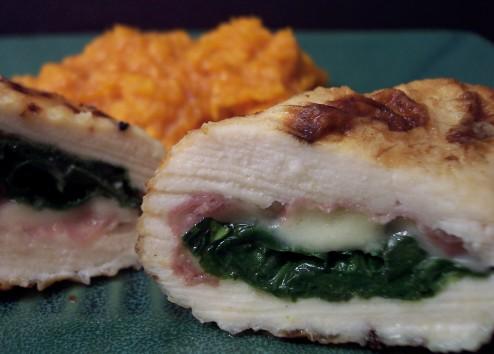
Remember how just a few days ago we made those stuffed chicken breasts? Well, we used those skills again to make tonight's main dish, Pork Chops Stuffed with Sun-Dried Tomatoes and Spinach.

The tangy filling for these chops starts out by warming up garlic, sun-dried tomatoes, thawed spinach (don't forget the potato ricer trick!) and a bit of thyme. When thoroughly heated through, the mixture is scooped into a bowl, followed by the additions of goat cheese and cream cheese. The heat from the spinach gently softens the two cheeses to create a lush generous filling to stuff into the pockets of lean center-cut pork chops.

The chops are then slid into a warmed layer of olive oil in the same skillet used for the filling (less dishes!) and cooked to a light golden brown. They are then placed onto a plate (cover with foil to keep warm) and a combination of broth, lemon zest, lemon juice and Dijon mustard are stirred in to extract all those delicious caramelized bits stuck on the bottom of the skillet. That bubbling action releases those bits and reduces the liquid down to concentrate the flavor and create a sauce to serve with the stuffed pork. I liked using the the sun-dried tomatoes as their intense flavor was upfront and didn't require a large amount of them to achieve that depth. Besides keeping the chops moist, the filling adds a hearty element while still keeping the dish fairly light and healthy.


Wednesday, June 18, 2008

Savory potato bites...

As I said yesterday, we made two items for Jeff to bring in for treat day today - to accompany that pineapple loaf, I also prepared this Praline Apple Bread.

This quick bread is a little unusual as there is no butter or oil to be used in the batter - the main source of fat comes from a full cup of sour cream. When you're mixing the eggs with the sugar and sour cream, be sure to beat the mixture for at least two minutes so you incorporate enough air to add to the lightness of the cake. We of course used pecans in this apple bread, but I added a step to provide an extra boost in the flavor department. You will need a cup of chopped pecans in total, but take a few additional minutes to toast the half cup that will be folded into the batter - this lures out their delicious nutty flavor and helps them retain some texture while sitting in the moist batter. The remaining half cup is sprinkled on top and will be exposed to direct heat, so you'll want to add those in their raw state so they don't burn.

While the praline element to this bread comes in a fairly untraditional form, gild the lily and pour this liquid gold on top. The mixture is simply butter and brown sugar melted down to form a thick, sweet syrup that is drizzled over the golden loaf. Go back and forth in lines across the top so it won't form a giant puddle - you'll also get those luscious drips that slowly wiggle themselves down. As soon as the butter mixture boils for a minute, work quickly as it will begin to set up and be too thick to drizzle (not that I did that intentionally so I could eat a little with a spoon or anything...). I do suggest that you try and keep the apple chunks on the smaller side or they might be a little too firm to enjoy in the bread. While we thought the bread was sweet, we found it was not cloyingly so with the inside being studded with tart Granny Smith apples and the toasted pecans.

The other day I ran out of time to talk about it, but I made these Twice-Baked Potato Bites as a side for dinner and didn't want to forget about them! Think a big twice-baked potato that was shrunk down into little poppable bites!

So the potatoes didn't fall apart, we used sturdy red new potatoes that we first halved. Because these little guys like to roll around, take a sharp knife and slice a very thin layer off the bottom of each potato half - this give them a little base to sit on as they bake. Drizzled with oil and lightly seasoned, the small potatoes are perched on their new flat bottoms and baked until they soften just enough to be easily pierced with a knife. Since you need to handle these pipping hot potatoes, don't forget to set aside enough time for them to cool down a bit. I think it took them about 5 or 10 minutes before they were cool enough for us.

To get the divot and enough flesh out to make the filling, we used a small melon baller to scoop the round out from the center of each half. We then smashed those scoops of potato flesh with tangy sour cream (the amount of sour cream we've used over the past few days was a little crazy!) and onion-y chives. You can either pipe or spoon the now creamy filling back into the potatoes - we just slipped an open star tip into a zip-loc bag and they were assembled in the blink of an eye! Now, at this point, you could stop, cover and refrigerate them for up to a day if you want to prep them ahead of time. If not, they go back into oven for their second bake to warm them through and crisp up the tops a little. Served with additional chives on top for flare, these would be a fun make-ahead appetizer or a tantalizing side for a variety of main dishes.


Tuesday, June 17, 2008

Tropical loaf cake and amping up chickpea burgers...

I baked two separate items for the Weekly Wednesday Treat Day tomorrow - the second one is currently cooling, so that one will have to wait until tomorrow (assuming it passes quality control!). I prepared the other recipe, Coconut-Pineapple Loaf Cake, earlier in the day so it had plenty of time to cool down before we sliced into it.

I could have just made a double batch of the first cake, but in the interest of options, we thought we should prepare a different one too in case some don't like coconut or pineapple! Before we began this recipe, I opened and poured the pineapple chunks into a strainer so any excess liquid had plenty of time to drain away. While the pineapple will of course keep the cake moist, you don't want the pieces to have too much liquid or you will end up with a soggy loaf.

While the pineapple was dripping away, we tossed some shredded sweetened coconut onto a large baking sheet and stashed it in the oven as it was preheating. Keep an eye on the white shreds and toss them every two minutes or so... they can go from lightly toasted to burnt quickly! The batter for this cake was quite plain, so we did splash in a little vanilla to add some interest in the background. The well-drained pineapple and crisp coconut are gently folded into the thick, pale batter and once spooned into the loaf pan, additional toasted coconut is scattered on top. Because that coconut is toasted, you will want to carefully tent the loaf with foil about half-way through to prevent those shreds from burning.

Thanks to the mound of sour cream, the baked loaf was tender and moist - the chunky pieces of pineapple melded into the cake well and didn't come out as being obtrusive as I thought they might. I would suggest that you halve any extra large pieces of the pineapple so they are evenly distributed inside - however, I don't think I would go down and use the tidbit variety as I think they would just get lost.

We've done a couple variations of Chickpea Burgers like the ones I prepared for dinner tonight, but this recipe used a few ingredients that we thought made these stand out.

Buzzed up in a food processor is a combination of chickpeas (garbanzo beans), mild scallions, a couple slices of sandwich bread, almonds, fresh ginger, garlic and smoky cumin. When roughly chopped, you remove half of this mixture to a bowl and add an egg to the food processor. The remaining half is processed with the egg until it smooths out and is fairly creamy. Why do this? Well, this gives you the moisture needed to hold the burgers together, but removing half of it will give the assembled burgers integrity, texture and a hearty mouth-feel. The mixture was just a little tacky, but easy to work with and formed into patties well.

While they are fairly sturdy patties, brushing them with olive oil will not only add flavor, but helps prevent them from sticking once they hit the grill. To serve, we set them on toasted English muffins and a bit of baby spinach (lettuce would work just as well) and dolloped a tangy sauce composed of mayonnaise and Dijon mustard on top. I loved the flavor from the crunchy bits of almonds and will have to remember that for other veggie burgers! Peanuts would also be a good choice for these if you don't already have almonds in the pantry. We did enjoy the lightness of English muffins, but I think we'll have the leftovers on our favorite homemade burger buns just because. I think a little bite to these would be appropriate (at least for our tastes), so I will probably toss in a little prepared horseradish into the sauce when we have the rest.


Monday, June 16, 2008

Two-corn polenta and a kicked up pork tenderloin...

Tonight's side, Two-Corn Polenta with Tomatoes, Basil, and Cheese, originally called for instant polenta (which is perfectly acceptable!), but we have really grown to love using coarse (stone-ground) cornmeal. Yes, it adds quite a bit of time over the instant version, but the texture and flavor that develops is well received.

If you are short on time and opt for instant polenta, you'll want to add it and the fresh corn at the time same. It should take about 5 minutes before it thickens up enough and then you can continue on with the recipe. Our twist took about 25 minutes or so - if it looks like the cornmeal mixture is getting too thick, don't be afraid to stir in a little extra broth or water to loosen it up. After the corn kernels have been added and heated through, the polenta's flavor is heightened by the final addition of sharp Parmesan cheese as it melts into the steaming cornmeal. To liven it up and add a fresh note, we placed chopped tomatoes and shreds of basil (our plants are finally up to snuff and we have started harvesting the leaves!) in the center of each individual portion.

We mentioned last week when we made that Pineapple-Stuffed Jerk Chicken we thought the spice could have been a little more intense. Well, we ran with the idea and decided to try it out on this Jerk Pork Tenderloin as our protein of choice for dinner.

Rather than a simple spice rub, this uses a more pungent marinade consisting of (get ready!) chopped scallions, serrano chiles, soy sauce, fresh lime juice, allspice, garlic, sugar, thyme, cinnamon, ground ginger and fresh grated nutmeg... whew! If you enjoy that tingling heat from chiles, go ahead and leave most of the seeds in the serranos when you chop them. We kept them all and it wasn't blow-your-head off hot for us, but there was a pleasant burn. If you're feeling especially dangerous, replace them with a halved (and seeded!) Scotch bonnet.

A trimmed pork tenderloin is added to the marinade and we left it to chill out for roughly 8 or 9 hours in the refrigerator. When you are ready to grill it, remove it from the marinade and let the excess liquid drip away. We then drizzled the pork with a little canola oil and let it cook just until the center retained a pink hue to ensure it stayed moist. As we frequently mention, be sure to let the tenderloin rest so the juices have a chance to redistribute back into the meat and won't gush out when you start slicing. Jeff and I thought this was hands-down better in the flavor department compared to that chicken recipe with the allspice captivating our senses. If you've never had allspice, it is reminiscent of cloves, with a hint of cinnamon, nutmeg and a mild peppery heat. I've seen several recipes that call for just a jerk-seasoned rub, but this piquant marinade allowed those racy flavors to penetrate deep into the pork. I think we'll turn the leftovers into a fun wrap or sandwich for lunch tomorrow!


Sunday, June 15, 2008

Steamed Pork Buns...

We pulled another 10 new recipes out of our enormous to-try piles this past week... this time I think we'll choose those Coconut-Blueberry Cheesecake Bars with a Browned Butter Graham Crust, the Grilled Peaches over Spinach and Arugula with Goat Cheese and Prosciutto along with that Szechuan Chicken and Red Rice Salad with Sesame Dressing dish as our favorites.

I've always wanted an excuse to buy a bamboo steamer and I finally gave in to give this Steamed Pork Buns recipe a try.

Before we began the dough for these buns, we followed the directions by first preparing the pork so it would have time to chill out*. Simply dusted with five-spice powder, the pork is grilled (feel free to use your favorite method, a grill pan, real grill or a table-top appliance like the Griddler). As with most meats, you'll want to give the tenderloin plenty of time to rest so the juices don't gush out when you slice into it. To finish up the filling, the tender pieces are tossed with green onions, hoisin sauce, rice vinegar, soy sauce, a dribble of honey, garlic and fresh pungent ginger. *One note - I found there was plenty of time while the dough was resting that you could easily just cook the pork once the dough was prepared and save yourself some downtime.

Onto said dough. This one is a little interesting... while it is a yeast based dough, once it has risen and been punched down, baking powder is kneaded in. This gives the buns an extra boost with rising in the hot steamy environment and allows them to be quite light in texture. The dough was easy to work - when you fill them and bring the ends up to enclose the pork mixture, be sure to give it a little twist to ensure a complete seal. Since our steamer is a little on the smaller side, I was only able to steam 8 of the 12 buns as the trays would have been too full. If you have the same issue, just set the filled buns aside and do them in a couple batches. Instead of that, we just froze the extras well wrapped - to cook them, just put them into the steamer frozen and add an extra 5 minutes or so.

I should have known better, but since I've never worked with bamboo steamers before, I didn't put anything down on the bottom on the tray... so our buns did stick a little. I was able to coax them out though without much tearing, but I'm sure it will be a pain to clean them now. I suggest adding a cabbage leaf or a round of parchment paper so you don't have this problem! I loved how these were more study than ordinary dumplings and could easily be eaten out of hand without falling apart. The filling was well balanced flavor-wise and the texture was moist without being wet. My one comment about these buns is there seemed to be a bit too much of the dough, compared to the filling, (a little too "bread-y" near the bottom) which took a little of the wind out of the delicious savory filling.

Saturday, June 14, 2008

Our sourdough trial...

I get my hands dirty and knead up a loaf of homemade bread fairly often - usually they are recipes we've made before though and are really not too much work. However, every once in awhile I get ambitious and try out a recipe that is pretty lengthy and involved.

That ambition struck about a week ago when I began the process of this Whole Wheat Sourdough Bread. I've never attempted a homemade sourdough bread, so I couldn't tell you if this was very authentic or stayed true to sourdough standards. I'll start off by saying that this bread was tough in the sense of difficulty, but there were just many steps and long resting times in between those steps!

I started this loaf about 7 days ago by making a viscous batter of all-purpose flour, warm water and just a pinch of yeast to get things movin' and groovin'. After a fairly lengthy wait, the mixture had tripled in volume as the recipe called for - at this point, it is stashed away in the refrigerator for 3 days to allow the souring process to begin. Three days later, we stirred in a bit more flour and water - this is again left in the refrigerator for 3 additional days. Now, I hadn't told Jeff what all this fuss was about yet, so after the 6 days, I asked him if he would like to be let in on what was happening. I let him open the container for a whiff, so he would get the idea, except he ignored my warning and put his nose right into the container of dough. I had to pull myself off the floor as I watched his face turn from giddy excitement to oh-my-god did my nostril hairs just burn off? Oops! Let's just say the smell was pretty strong!

Once he got over his full "sourdough" experience, he quickly recovered and could hardly wait to finish the process as he loves sourdough bread. Sadly, he still had to wait quite a bit of time before it would be ready! Half of the strong starter is used to create the bread while the other half is either tossed (don't do this!) or fed to keep the starter active. There are directions at the end of the recipe on how to keep the starter active so you can continue to make batch after batch of bread. Into the halved starter, warm water is stirred in until it is very wet and slosh-y. Enough strong white bread flour is stirred in, creating a thick, viscous paste. This is again set aside and left to rise for at least 12 hours (I told you it was a lengthy recipe!). At this point, we've used entirely white flour (all-purpose or bread), so to make this "whole wheat" we started mixing in whole wheat bread flour. I was able to find this at our local natural market - I'm not sure if using regular whole wheat flour would give you the same results or not, but I would probably try it out and think about adding just a little vital wheat gluten for lift.

More often than not, I'm using a loaf pan when we are making bread, but this recipe is shaped free form - shape it into a torpedo shape as we did for a long loaf or swirl it into a ball for a boule (round loaf). Once the dough has risen again(!), you'll want to slash it a few times to allow for expansion - I need to work on this part as I don't have a proper lamé to make those slashes, so I just had to use a sharp serrated knife. It did its job, but could certainly look better! To give the loaf color and shine, it is also brushed with a light egg wash before hitting the hot oven.

While it is wicked hard to wait for homemade fresh bread to cool down, we did manage to keep our grubby hands away so it would slice well. The baked loaf was crusty, the inside was delightfully chewy and it had that distinctively tangy quality that both of us love with sourdough. This made a huge loaf, but I'm anxious to get going with the rest of the starter and try this again so I can work on my shaping and slashing techniques (which need help!). Maybe it's just me, but homemade bread lights a little fire in my heart and I count down the time until I can use my hands to turn a simple mixture of flour, water and yeast into a delicious treat.