I had to grab some more bananas at the market today - between those banana bars yesterday and tonight's dinner, I ended up using all of the ones I had set aside getting ripe to throw in the freezer!
I know we just did breakfast-for-dinner a few nights ago, but it has been forever since the last time we had French toast and Jeff asked if we could make it sometime this week. Since you actually mash the bananas on the bottom slice of bread for this Baked Banana-Stuffed French Toast, you will want a hearty type for this - we used a medium-sliced whole wheat bread. If you use a softer bread, be sure to mash the bananas in a bowl and spread them on the slices instead.
Since our bananas were very ripe, I didn't add anything to them - if you still want to make these and your bananas are not as sweet as you would like, add a sprinkle of brown sugar when you mash them. The assembled toasts are then dunked in a mixture of eggs and milk that is spiced up with vanilla, cinnamon and a pinch of fresh grated nutmeg. They are briefly cooked in a pat of butter just until both sides are golden - the toasts then slide into the oven to continue baking until the banana filling is warmed through.
Firm and not soggy, you can dress these golden stuffed French toasts in a couple of ways - they were just fine with a dusting of confectioners' sugar as seen above. But, below, a drizzle of warm pure maple syrup brought a tempting whole new dimension to them.
Wednesday, January 30, 2008
Tuesday, January 29, 2008
Sharp banana bars...
It's that time again for another edition of baking for the weekly Wednesday Treat Day for Jeff's co-workers. I've been letting some bananas go to get nice and ripe to put in the freezer, but decided to mash a couple so we could make these Banana Bars with Browned Butter Pecan Frosting.
I had enough bananas to get the full cup required for the recipes (about 2 large), but if you run short, just fill the rest of the cup with applesauce and it will be just fine. I love pairing brown sugar when using bananas, so these bars use a duo of sugars for sweetness - while the granulated sugar helps with the sweetness, the brown sugar gives these a rich depth. The bars are more soft and moist, rather than dense and chewy, and stay quite tender from the use of sour cream.
If you wanted a lighter treat, you could simply dust the top with confectioners' sugar, but we went a little more decadent with a browned butter cream cheese frosting to slather on top of these sharp banana-flavored bars. Browning the butter before using allows it to gain a very nutty flavor which plays off some toasted pecans we added on top. The butter can go from browned to burned fairly fast, so be sure to watch closely - remove the butter from the heat just when it begins to turn golden. Sometimes confectioners' sugar-based frostings can be a bit too sweet, but the cream cheese in the mixture helps to tone that down a bit. You could mix the pecans right into the frosting, but adding them on top adds a nice visual touch and allows those that don't care for nuts to sweep them off before they dig in.
I've had some Israeli Couscous sitting around in the pantry from the last time we used it and came across a recipe that sounded good to us when I was menu planning on Saturday. Israeli couscous, sometimes labeled as pearl couscous, is much larger than regular couscous - roughly about the size of a while peppercorn.
Because of the size difference, it does take quite a bit longer to cook - however, it is just as easy. This recipe prepares the couscous by pouring boiling water over and letting it sit, covered, for an hour. There may be some liquid left by the time they are done - just drain that off and you won't have to worry about them being too moist. The couscous is done when the pieces are plump and tender, yet not soggy or gummy.
There was a bit more to do while we waited, so we continued on with this Israeli Couscous and Corn Salad by sautéing onions, corn (still using up the fresh kernels we froze from the farmers market this past summer!) and red bell peppers, spiced with coriander and caraway seeds, until the vegetables were tender. Once the vegetables and couscous are tossed together, some minced jalapeños are added for a spicy bite, along with green onions and mint for a cooling freshness. With a few quick strokes of a whisk, a sweet lime-honey dressing is combined from fresh lime juice, canola oil, rice wine vinegar, honey and lime zest to coat the colorful salad with a snappy finish.
Monday, January 28, 2008
Spicy Mexican chicken soup...
While you will find many versions of this Mexican chicken soup, Caldo Tlalpeño, Jeff and I both liked the combination of flavors and thought the preparation time to complete the dish was good for a busy weeknight.
One of the main flavors that seemed to be fairly consistent among all of those recipes is the addition of a smoky heat from chipotle peppers. You may be surprised to see a whole head of garlic used, but because the individual cloves are separated and simmered along side a couple chicken breasts, this process removes the bite allowing the garlic to become quite mellow. The chicken and garlic are poached in the same liquid that will be the base for the soup later on, so you will want to be sure to skim any of the foam or debris that float to the surface.
While those two bubble away, a chopped onion and an Anaheim chile pepper are cooked until they soften and have a tinge of golden on them. The garlic is moved to a blender, the chicken is set aside to cool slightly and the onion mixture is married with the broth mixture. Part of that broth, along with the spicy chipotle, are added to the garlic and buzzed together to create a smooth purée. Since we only need one chipotle from the entire can, I chopped the rest of the peppers and froze them in one tablespoon portions to use at another time. I have found they do keep for quite awhile if you keep them in an air-tight container in the refrigerator though.
This purée is added back to the soup base - to speed up the next part, the recipe calls for instant brown rice which cooks in just a few minutes, rather than the 30 to 40 minutes it would normally take. When the rice is tender, the soup is ladled into bowls that contain shredded pieces of the tender poached chicken breasts. Crisp, peppery slices of radishes are added on top, along with some chopped fresh cilantro and a squirt of lime juice. Unlike the last time we needed one, the market actually had some avocados... unfortunately for us, they were hard as rocks! So again, toss some creamy chunks on top for a cooling contrast. As a side, we served some basic cheesy quesadillas made with a blend of Mexican cheeses.
Sunday, January 27, 2008
Wheat Berry and Edamame Salad...
I mentioned yesterday that we spent some time in St. Paul. We decided to go over and check out the winter carnival - not quite what I was expecting, but we did think the ice carvings were pretty impressive! And yes, it may not be quite "Minnesotan" of us, but we skipped the traditional "hot dish" that many enjoy (and my stomach thanks me!).
Here are some snowmen...
Notice the poor little guy in front who got a little to close to the "ice" fire and melted!
Here are some characters from the Wizard of Oz...
The back of the display was just as neat!
Tonight's dinner is one that could easily be served as a side, but we ended up just having a bit more of it, along with some of that cornbread that was in the freezer from a couple weeks ago, and called it a meal.
This Wheat Berry Salad with Edamame is not a necessarily a speedy recipe per se, but the majority of the time needed is just spent waiting on the wheat berries - they require about an hour of simmering to soften. When the wheat berries are ready, a couple cups of edamame are tossed in and allowed to cook along with them until they become tender. I was just about to bring another pot of water to a boil to cook the green soybeans, but stopped myself when I realized I should just add them to the wheat berries and save a pot to clean!
For some contrasting texture, crisp celery, sweet chewy currants and chopped sun-dried tomatoes are added to the cooked wheat berries and edamame. We used oil-packed tomatoes, but if all you have is dry, just soak them in some hot water for a few minutes to plump them up. To dress the salad, a garlicky balsamic dressing is created by combining balsamic vinegar, extravirgin olive oil, crushed garlic, salt and fresh ground black pepper. Light and refreshing, you could also toss in some cooked shrimp or chicken to make it a little more filling.
Saturday, January 26, 2008
Chewy candies bursting with fruity flavor!
We were out and about in St. Paul today and had to run some errands afterwards, so no treat baking for us today. However, earlier this week, I wanted to send in an extra treat that was a little more unique and unexpected for Jeff to share with his co-workers.
These Cranberry-Raspberry Jellies were definitely a task and required lots of downtime, so we spread the process out over a couple days. Back in September, Mom brought us up a basket of goodies from the farm - one of the items not shown was a few bags of freshly picked sweet raspberries! I've been hoarding them in the freezer, but we finally decided to pull them out for these fun squishy candies.
To get a very intense cranberry-raspberry flavor, we used a cranberry juice cocktail concentrate, in addition to the frozen, but thawed, raspberries and cranberries. While a little of the juice is used to bloom a few tablespoons of gelatin, the remainder is combined with the fruit, fresh lemon zest, juice and granulated sugar. This thick mixture boils and bubbles away slowly to extract as much flavor as possible and until a candy thermometer registers firm ball stage (about 244 degrees).
Once we reached that magical number, we removed the syrup-y mixture from the heat and stirred in the bloomed gelatin. At this point, you need to move with a little more vigor as it starts to set somewhat quickly. So the end candy is silky smooth, all of the skins and seeds need to be remove - this is accomplished by straining the mixture through a fine sieve. Use a sturdy wooden spoon to carefully mash as much of the hot sticky liquid as you can out of the two berries - the resulting mixture is then poured into a baking pan to set. After a few hours at room temperature, the jelly needs to chill in the refrigerator which will make cutting them a little easier.
While the jelly is firm and set, it is still very s-t-i-c-k-y, so you need to make sure your cutting surface is generously dusted with granulated sugar and your knife is lightly oiled between cuts - just be patient and take your time. Once cut into small squares, all cut surfaces are coated with sugar and are left to dry at room temperature for a few more hours. The texture of the finish candy is soft and very chewy - the first description that came to my mind was a gumdrop that had an intense fruity flavor you might find in a jolly rancher. I was a little nervous that the sugar on the outside would push the sweetness of them over the edge, but it did not at all - they were sweet yes, yet because the cranberries are quite tart, the jellies had a nice balance to them. Fun, different and worth the effort!
Recipes
Cranberry-Raspberry Jellies
Friday, January 25, 2008
Blueberry Buckwheat Pancakes... for dinner!
We haven't done breakfast-for-dinner in awhile, so for tonight's meal, we each had a few of these Blueberry Buckwheat Pancakes. I enjoy making pancakes or waffles as one can usually scale the recipe up or down without much problem - I like to make a batch and a half sometimes to freeze the leftovers for those mornings Jeff needs a speedy breakfast before work (someone likes to hit that devilish snooze button).
These pancakes gain a darker speckled appearance with a more pronounced flavor than most because of their even ratio of buckwheat to whole-wheat pastry flour. With a good cup of buttermilk, these pancakes were light and had a slight tang to them, but I found the batter to be a little runny. I let the batter sit for about 10 minutes to see if the flour would soak up a little more of the liquid - it didn't seem to change much and the first few pancakes were fairly thin. Don't get me wrong, thin pancakes are just as tasty, but I like seeing some heft to them. By the time I got to the last couple of scoops of batter though, it was a little better and they came out a bit thicker.
I used tiny frozen wild blueberries and since the batter looked thin, I decided to just sprinkle them on the pancake once they began to cook. I've learned that they tend to bunch up in the center if the batter is on the thin side. The pancakes are just slightly sweet with only a tablespoon of honey in the batter, which would make them a perfect vehicle for a dusting of snowy confectioners' sugar and a rush of warm pure maple syrup (even better if you spike the syrup with a few blueberries before you warm it!).
Recipes
Blueberry Buckwheat Pancakes
Thursday, January 24, 2008
Flounder... the other white fish?
While Jeff loves shrimp, he doesn't tend to venture much further than that. Our seafood area of the recipe section to the left is fairly tiny compared to the rest and even so, most of those recipes involve shrimp! So, in an effort to get more fish into our diet, I made this Flounder with Smoked Paprika and Asiago Polenta recipe for dinner tonight.
Because the flounder will be quite strongly seasoned, a side of creamy polenta will get us started as a great canvas to set off the fish. If you want to cut down the time to prepare this part, you can use the finer-textured quick-cooking polenta which can be ready in about 5 minutes. If you can spare the 25 to 35 minutes (or longer if you can!) I prefer the depth of flavor that develops while cooking with a more coarse cornmeal. Once the polenta is ready, a good handful of Asiago is stirred in to add a little saltiness and a sharp flavor - to keep it creamy while you finish with the fish, be sure to just keep the pot covered. This will help slow down the polenta from setting up.
The fish is rubbed with a coating made from olive oil, smoked paprika and garlic powder. Once coated, the fillets are quickly cooked in a skillet just until they begin to flake - you could also do this in a grill pan, if desired. Now, the original recipe did call for Tilapia for the fish and Parmesan for the cheese in the polenta, but flounder looked superb at the market this morning and we wanted to add a slightly different flavor in the soft polenta. If you like a bit of spiciness, use a hot smoked paprika if you can locate it - besides the rich smoky flavor, it has a nice balance between a bit of heat and a touch of bitterness.
Wednesday, January 23, 2008
Huh? Rusty potato soup?
The weather people are promising a warm up this weekend (30 degrees again! woo!), but until then it is still very cold outside and suppose to drop to -17 tonight. Perfect night to cozy up with a steaming bowl of this Ecuadorian Potato Soup we had for dinner this evening!
This soup has an intriguing combination of flavors and a special ingredient that slowly bleeds into the liquid creating a rusty color. What is it? Annatto! Besides dying the soup, the ground seed lends a uniquely earthy flavor with a slight peppery note. Annatto can also be found in variety of cheeses and butter as a coloring agent.
Once some onions are sautéed and the annatto, along with cumin, are added to briefly toast, thick chunks of a few starchy russet potatoes are added to the pot. Milk, cilantro and a few pieces of chopped jalapeño are also added and allowed to simmer until the potatoes are tender. So the soup retains some texture, the potatoes are partially mashed with a potato masher, rather than pureeing the soup - if you prefer a silky soup though, I don't see why you couldn't stick an immersion blender into the pot and whirl away. To add some body, the soup is thickened slightly by tempering a lone egg yolk with a bit of the hot liquid and then whisking it back in and allowing the mixture to simmer for a few minutes.
While some chopped cilantro and jalapeño were natural additions to sprinkle on top, I would have never guessed what comes next. While I thought the ingredient was a little odd at first, Jeff and I both were pleasently surprised! The recipe calls for a few chopped hard-cooked eggs as one of the finishing touches - the firmer texture seemed to play well and the bit of richness from the yolks was a nice contrast to the light soup. I'm sure it would have been even better if we didn't have to miss out on one of the last toppings for the soup. It called for some creamy chopped avocado, but when I was at the market this morning to pick up a few other ingredients they had not gotten their shipment today or for the last few days either - next time!
Tuesday, January 22, 2008
Toffee bundt cake with a sweet surprise inside...
I asked Jeff this weekend when the last time was that we made a cake for the weekly Wednesday Treat Day. One nice thing about the blog is we can go back to see just how long ago that was! I searched and found the last one was that spectacular Crunchy Milk Chocolate–Peanut Butter Layer Cake back in November.
I'm not sure that this dark golden Brickle Bundt Cake is in the same league as that massive chocolate cake, but it is certainly just as tempting!
Inside this dense cake are two distinct layers of caramel-esque toffee bits mixed with a bit of sugar, crunchy toasted walnuts and our favorite Vietnamese cinnamon (I can't tell you how much I love having Penzey's not more than 5 miles away from our house again!).
Now, don't read into dense as being heavy and dry - with a full cup of sour cream, this cake is very moist and quite tender. One technique that I found interesting in this recipe was drizzling a few tablespoons of melted butter on top of the assembled batter, before placing the pan in the oven to bake. I turned the oven light on halfway through and found myself distracted from cleaning up for a few minutes as I watched that butter slowly bubble down into the rising batter.
Do you ever say a little prayer when you un-mold a cake like this? Thankfully, the cake easily released from my bundt pan - but I was a little worried that the toffee bits would bleed through and end up making the cake stick. I love using those baking sprays that have flour in them (I prefer Pam with Flour or Baker's Joy) and have never had a cake stick yet! For a little teaser of what's to come inside the cake, a light confectioners' sugar glaze is drizzled over the top to give some sticking power for a sprinkling of those sweet crunchy toffee bits.
Since I knew we would do our part in the "quality control" department, I figured we should off-set our treat tonight and make sure dinner would be pretty healthy. This Couscous Salad with Roasted Vegetables and Chickpeas dish was just the ticket to fill up our bellies!
You know how much of a fan we are of roasted cauliflower and I bet you already know that we both were tapping our fingers waiting for this to finish so we could dig in. Adding some sweetness to the crisp cauliflower is the addition of chunky sliced carrots this time. The duo is slicked up with a drizzle of olive oil and seasoned simply with smoky cumin, salt and fresh ground black pepper. Because of the volume of vegetables, you will want to spread this mixture over two baking pans to ensure the vegetables have enough room to spread out and evenly cook. While they roast away, quick-cooking whole wheat couscous is cooked in vegetable broth (again, the original recipe called for water, but this is a great opportunity to introduce more flavor!) for just 5 minutes and then set aside to cool. Adding moisture and a bright tangy flavor, a dressing to coat the salad is whisked together from fresh lemon juice, lemon zest and just a touch of oil.
The nutty couscous is tossed together with the tender (but not mushy) roasted veggies, some chickpeas for protein, a few thinly sliced scallions for a mellow onion-y flavor and is then drenched with the tart dressing. Since I already had a bunch of fresh spinach leftover from that quinoa bake last night, we served the hearty mixture over a few of the tender leaves - but try some arugula if you would like a contrasting peppery bite.
Monday, January 21, 2008
Seeing what else quinoa can do...
We've made our fair share of quinoa dishes of late, but most of them have been in some sort of salad. Now, that doesn't mean we have not ventured out of that box once or twice... remember those Quinoa and Potato Croquettes?
We thought it was about time we tried something a little different with this complete protein and see just how versatile it can be. In the original recipe for this Quinoa-Spinach Bake, it just called for 2 cups of cooked quinoa - to boost the flavor a bit, we cooked the quinoa in vegetable broth (feel free to use chicken broth!) instead of water as typically called for. While that was bubbling away, we quickly blanched a very large mound of fresh spinach - this literally takes seconds and you want to plunge the spinach in an ice bath as soon as it turns bright green. I used to end up having to pick out ice cubes from the cooked spinach when we did this in the past, but a couple years ago I started placing a colander in the icy water first so I wouldn't have to deal with that! You can use a towel to wring out the excess water, but I've grown to like using a potato ricer as it makes a little less mess (the one we have now comes with 3 disks and we use the coarse one for this). Oh, and am I the only one that is always amazed at the tiny amount you end up with afterwards?
If you don't want to bother with that step, just use a 10 ounce package of frozen chopped spinach, it should be close enough. Once those ingredients have been prepped, an onion, along with fresh thyme, rosemary and crushed red pepper are sautéed until the onion is softened. A couple cloves of garlic are then added until you can smell their fragrant aroma. The cooked spinach, quinoa, some ricotta cheese and a couple eggs are then combined with the onion mixture in a large bowl. It did call for using cottage cheese, but I switched that for ricotta as I already had half a container aching to get used (or risk being tossed in a few days!). Baked in a square dish until the center is set and the edges are golden, you could either slice this into several cleanly-cut pieces to serve as a side or just quarter it to have a big hunk for a veggie main dish. With the amount of spinach and (somewhat) bland/earthy quinoa, I think you could be a little more aggressive with the spices to heighten the flavor a bit more. It also didn't call for any salt, but I tasted it before it went into the oven and it was a little flat, so I stirred some in before it went into the oven.
Sunday, January 20, 2008
Do figs, prosciutto and blue cheese work well on a pizza? Only one way to find out!
9 new recipes came from the kitchen this week - our favorites were of course those wicked Chocolate Oatmeal Almost-Candy Bars, the Southwestern Chili Pasta and the Korean-Spiced Beef and Cabbage Rolls.
As you know by now, we cook and use a variety of different grains, pastas, flours and whatnot... I've been asked a few times how I keep things organized and stored. So, here I present to you our shelf of goodies (don't forget, you can get a closer view by clicking on any pictures!).
We do have a fairly big pantry "closet", but I like to keep things out where I can see them... I find that I tend to use the ingredients more often this way! All of these clear jars come from Ikea and are available in a multitude of sizes and shapes. On the top shelf is whole-wheat spaghetti, orecchiette and whole-wheat penne pasta (there are others in the pantry though!)
The next shelf has pearl barley, brown basmati rice, whole-wheat couscous, steel cut oats, arborio rice, wheat berries and whole grain cornmeal. Next comes all-purpose flour, oat groats, Israeli couscous, green lentils, kasha and granulated sugar. Underneath that is brown sugar, quinoa, M&Ms(!), jasmine rice, bulgur and confectioners' sugar. As you can see the other shelves occupy some baking pans, a bowl of Granny Smith apples and a variety of pound plus chocolate bars from Trader Joe's (we go through so much chocolate it is ridiculous!). You may be asking where all the whole-wheat flours we use are... I keep those in the freezer, along with most of our nuts, to keep them fresh and to prevent them from going rancid. While we buy in bulk and go through most of those ingredients quickly, I also think it just helps to preserve their flavor a bit!
Since it is so quick to make, I was able to use some of that whole wheat flour to prepare a batch of our favorite dough for this Fig, Prosciutto, and Blue Cheese Pizza we made for lunch today!
After we whizzed together the dough and let it rest, we were able to easily stretch it out to about a 13" circle - if you would like a little more crunch to the bottom of the finished pizza, use some cornmeal, instead of the flour, while maneuvering the dough. We thought any sort of tomato-y sauce would be a little odd with the combination of flavored we were after, so we opted to just rub the dough with a light coating of extra-virgin olive oil. We sprinkled creamy blue cheese crumbles over the now-glistening round of dough, followed by chopped sweet black mission figs and a handful of buttery fontina cheese. With such strong flavors already, a good dose of fresh ground black pepper was all we needed to add before we slid the pizza on the stone.
Where's the prosciutto you ask? Well, some recipes call for it to be added before it hits the oven, while some have you add it after - use it how you see fit as we think it is a visual and textural preference with what you like. We have found we like prosciutto best (at least with pizza) when it is applied after. The residual heat will just slightly warm up the salty meat without making it too dry. We didn't have any idea if this would actually turn out well as we were really just playing around with flavors and using up leftover ingredients in the fridge, but Jeff and I very much enjoyed this salty, sweet and pungent combination of flavors paired with that crisp wheat-y crust!
As you know by now, we cook and use a variety of different grains, pastas, flours and whatnot... I've been asked a few times how I keep things organized and stored. So, here I present to you our shelf of goodies (don't forget, you can get a closer view by clicking on any pictures!).
We do have a fairly big pantry "closet", but I like to keep things out where I can see them... I find that I tend to use the ingredients more often this way! All of these clear jars come from Ikea and are available in a multitude of sizes and shapes. On the top shelf is whole-wheat spaghetti, orecchiette and whole-wheat penne pasta (there are others in the pantry though!)
The next shelf has pearl barley, brown basmati rice, whole-wheat couscous, steel cut oats, arborio rice, wheat berries and whole grain cornmeal. Next comes all-purpose flour, oat groats, Israeli couscous, green lentils, kasha and granulated sugar. Underneath that is brown sugar, quinoa, M&Ms(!), jasmine rice, bulgur and confectioners' sugar. As you can see the other shelves occupy some baking pans, a bowl of Granny Smith apples and a variety of pound plus chocolate bars from Trader Joe's (we go through so much chocolate it is ridiculous!). You may be asking where all the whole-wheat flours we use are... I keep those in the freezer, along with most of our nuts, to keep them fresh and to prevent them from going rancid. While we buy in bulk and go through most of those ingredients quickly, I also think it just helps to preserve their flavor a bit!
Since it is so quick to make, I was able to use some of that whole wheat flour to prepare a batch of our favorite dough for this Fig, Prosciutto, and Blue Cheese Pizza we made for lunch today!
After we whizzed together the dough and let it rest, we were able to easily stretch it out to about a 13" circle - if you would like a little more crunch to the bottom of the finished pizza, use some cornmeal, instead of the flour, while maneuvering the dough. We thought any sort of tomato-y sauce would be a little odd with the combination of flavored we were after, so we opted to just rub the dough with a light coating of extra-virgin olive oil. We sprinkled creamy blue cheese crumbles over the now-glistening round of dough, followed by chopped sweet black mission figs and a handful of buttery fontina cheese. With such strong flavors already, a good dose of fresh ground black pepper was all we needed to add before we slid the pizza on the stone.
Where's the prosciutto you ask? Well, some recipes call for it to be added before it hits the oven, while some have you add it after - use it how you see fit as we think it is a visual and textural preference with what you like. We have found we like prosciutto best (at least with pizza) when it is applied after. The residual heat will just slightly warm up the salty meat without making it too dry. We didn't have any idea if this would actually turn out well as we were really just playing around with flavors and using up leftover ingredients in the fridge, but Jeff and I very much enjoyed this salty, sweet and pungent combination of flavors paired with that crisp wheat-y crust!
Saturday, January 19, 2008
Should have made these Anzac biscuits much sooner!
Since it's way to cold too go anywhere outside, what else is one to do but bake? Cookies sounded good today and we decided to go for a recipe we've been talking about making for awhile... Gingery Anzac Biscuits!
When I pulled the first trays out of the oven, my first though was that I must have been too light-handed with the flour. Our cookies went a little more lacy that I thought they should have - I gathered after reading a few descriptions that these cookies would spread and be somewhat thin, but ours were almost see through!
If we put that aside, the taste and texture were exactly what we needed today. What makes these cookies special are those wonderful caramel undertones from a couple tablespoons of Lyle's Golden Syrup. A bottle or jar of this is good for many things by the way... it is fantastic on toast or warmed up and poured over pancakes!
Traditional Anzac cookies don't have ginger in them, but we love the combination of sweet and heat, so I added a modest half cup of the crystallized variety. You will also notice that the cookies have a decent amount of coconut in the recipe - however, I didn't detect much of that flavor at all if that is not your thing - it mainly adds a definite chew to the cookies. When you bake them, be sure that they are a rich golden brown before you remove them - they will be soft right out of the oven, but they will slowly crisp up around the edges, yet remain chewy in the center, as they cool. A bonus to these is they keep for quite awhile without loosing their texture.
Friday, January 18, 2008
All we needed were some cowboy hats...
I don't know why, but apparently some time ago we bought a bag of wagon wheel pasta... I'm guessing Jeff made me buy it on impulse thinking it would be fun to toss into a recipe, but who knows?!
I was cleaning up the pantry last weekend and came across said bag - when we heard about how cold it was suppose to get this weekend, Jeff immediately asked if we could make a big ol' pot of chili at some point this weekend. The high tomorrow is suppose to be -6... brrr! So, after some digging around, we decided on integrating that wagon wheel pasta into this Southwestern Chili Pasta dish for dinner tonight as it would make just enough to give us a few extra bowls to enjoy Saturday and Sunday.
A pretty typical recipe for chili, this one starts out by lightly browning a healthy dose of chopped onions and red peppers. In the same skillet, sans cooked vegetables, a pound of lean ground sirloin is added to brown up. To the beef, we added the best part in my opinion, the spices! You can play around with the amounts to your taste, but we used a combination of regular and hot chili powder (from Penzeys of course!), a little unsweetened cocoa powder, cumin for a smoky depth and just a couple pinches of cinnamon - the cinnamon may sound odd to some, but its subtle sweetness just adds that extra "something".
After the spices have toasted briefly, stewed tomatoes, black beans and a cup of beef broth is stirred into the meat, along with the golden veggies, and allowed to simmer for a few minutes to let the flavors meld. Be sure to use this time to break up the tomatoes a bit as they cook - they are still fairly large right out of the can. This mixture is then added to the cooked fun wagon wheels to create a thick, chunky and very stomach-warming one-bowl meal. If you don't have the wheels, this would work quite well with the same amount of ziti pasta instead. Jeff and I both took a bite to see if we needed to add any of the traditional chili toppings, but we were quite pleased and decided to leave off the sour cream and cheddar we would typically add. We are so looking forward to having this hearty dish for lunch tomorrow!
Thursday, January 17, 2008
Side dish or dessert... you choose!
The more I think about tonight's side dish, Green Grapes with Feta Cheese and Honey, I have a feeling it might make another appearance soon as a dessert instead! While we thought it was still appropriate as a side, I really think this sweet, yet savory recipe could go either way.
Chunky pieces of salty feta cheese are sweetened up by a drizzle of sticky orange-blossom honey, while the savory flavor is back up with a little extra-virgin olive oil and fresh ground black pepper. Juicy green grapes and thick slices of a ripe, but firm Anjou pear. A good way to check if the pear is ripe is to gently press near the stem - if it gives slightly, you are good to go. Don't use the round bulbous end to check as if that is soft, the pear is probably over-ripe already. The plump grapes we found at our market were quite small so we left them whole - if yours are much bigger, I would suggest halving them shortly before serving. To make the flavor pop once the grapes, pears and feta are combined, thinly sliced basil leaves are scattered among the fruit adding a burst of freshness.
I knew I was going to have a bunch of cabbage left over from those beefy buns we made last night, so while I was menu planning last weekend, I kept that in mind and pulled out a recipe for Asian Steak Salad with Cucumber and Napa Cabbage to make for tonight's dinner.
Fresh lime juice, rice vinegar, canola oil, toasted sesame oil, crushed red pepper and a smashed garlic clove are whisked together - half of this tangy mixture is used for a dressing later on, while the other half is combined with soy sauce to tenderize a hunk of flank steak. If you have time to prepare this part before hand, let the steak marinate in the refrigerator for a few hours; if not, ten minutes or so at room temperature will be good enough.
While the steak is cooking, half a head of Napa cabbage is shredded and combined with crisp and cool cucumber slices. When the steak is done, be sure to give it at least a 5 to 10 minute rest when it is done so the juices don't gush out when you slice it. The thinly sliced strips of medium-rare steak are served on the bed of dressed vegetables and topped with a scattering of crunchy chopped peanuts. Light and clean, yet quite filling, Jeff asked that we make sure to file this recipe away to make again, except to grill the steak instead of broiling to keep the kitchen cool on a warm summer night.
Chunky pieces of salty feta cheese are sweetened up by a drizzle of sticky orange-blossom honey, while the savory flavor is back up with a little extra-virgin olive oil and fresh ground black pepper. Juicy green grapes and thick slices of a ripe, but firm Anjou pear. A good way to check if the pear is ripe is to gently press near the stem - if it gives slightly, you are good to go. Don't use the round bulbous end to check as if that is soft, the pear is probably over-ripe already. The plump grapes we found at our market were quite small so we left them whole - if yours are much bigger, I would suggest halving them shortly before serving. To make the flavor pop once the grapes, pears and feta are combined, thinly sliced basil leaves are scattered among the fruit adding a burst of freshness.
I knew I was going to have a bunch of cabbage left over from those beefy buns we made last night, so while I was menu planning last weekend, I kept that in mind and pulled out a recipe for Asian Steak Salad with Cucumber and Napa Cabbage to make for tonight's dinner.
Fresh lime juice, rice vinegar, canola oil, toasted sesame oil, crushed red pepper and a smashed garlic clove are whisked together - half of this tangy mixture is used for a dressing later on, while the other half is combined with soy sauce to tenderize a hunk of flank steak. If you have time to prepare this part before hand, let the steak marinate in the refrigerator for a few hours; if not, ten minutes or so at room temperature will be good enough.
While the steak is cooking, half a head of Napa cabbage is shredded and combined with crisp and cool cucumber slices. When the steak is done, be sure to give it at least a 5 to 10 minute rest when it is done so the juices don't gush out when you slice it. The thinly sliced strips of medium-rare steak are served on the bed of dressed vegetables and topped with a scattering of crunchy chopped peanuts. Light and clean, yet quite filling, Jeff asked that we make sure to file this recipe away to make again, except to grill the steak instead of broiling to keep the kitchen cool on a warm summer night.
Wednesday, January 16, 2008
Beefy buns... err Korean-Spiced Beef and Cabbage Rolls!
I was originally planning to halve the recipe for tonight's dinner, Korean-Spiced Beef and Cabbage Rolls, since it had a fairly large yield, but after I checked the inventory list of the freezer, I decided to just make the whole recipe so we could freeze the leftovers to have for quick lunches. Boy were we glad that I changed my mind once we finished our plates!
With ingredients like mild green onions, soy sauce, sesame seeds, toasted sesame oil, a shot of dry sherry, a couple teaspoons of sugar, fresh garlic, minced ginger, black pepper and just a dash of cayenne, there was no way this filling was going to be bland! Once whisked together, this powerful list of ingredients is mixed with half a pound of lean ground sirloin. My first thought was "I wonder if this is right as it looks very wet!". Once the mixture is added to the hot skillet, the beef begins to cook and slowly you will notice how it transforms from being a liquid-y mass to moist and glazed crumbles of beef. The volume won't look like much at this point, but we change that when we add a mound of thinly sliced crisp Napa cabbage. Once the cabbage is tender, this mixture is set aside as it needs to cool completely before you work with it again.
Now, you might expect these rolls to be yeast based, but this recipe is a bit different. Instead of the yeast, the recipe calls for baking powder to keep the rolls pillow-like - this also cuts down the total time needed to make the dish allowing it to be a little more reasonable to make on a weeknight. I found the dough to be quite easy to work with, but teetering on being a little sweet for us - I would think about reducing the honey to 3 tablespoons. While you don't need to wait for the dough to rise, you do want to give it a good 5 to 10 minute rest after kneading - this will give the gluten a chance to relax and it will roll out much easier for you.
Once the rolls have been assembled and given a light egg white wash, a scattering of nutty sesame seeds is added to each. Baked until golden, these filled buns were very good warm, but I can easily see them being served as a snack at room temperature. I thought there was a decent filling-to-bun ratio, but I would have liked a little more of the well-seasoned meat mixture.
Tuesday, January 15, 2008
Like a Chunky bar wrapped in a delicious oatmeal peanut cookie...
I already had an idea in mind when I asked Jeff what item he would like for the weekly Wednesday Treat Day - all he requested was that it contained oats and peanuts. Score! I thought to myself when I ran through the ingredient list in these Chocolate Oatmeal Almost-Candy Bars that I had marked to try.
Have you ever had one of those Nestle Chunky candy bars? You can still find these retro candy bars here and there, but they can be hard to come by. I haven't had one in ages, but after Jeff took a bite from his "quality control" piece of these bars, that name was the first thing he said! While these bars are not quite the same, the thick fudgy middle layer has flavors that are reminiscent - chocolate (updated to bittersweet!), raisins and peanuts.
First, the bottom layer is like a rich and sturdy oatmeal cookie laced with chunky peanuts - a small portion is set aside and we'll get to that in a bit. While firm, the base is still fairly chewy from a generous amount of brown sugar - however, because the peanuts are salted, this helps keep the balance to ensure it is not cloyingly sweet. The dough is not notably sticky, but it is not dry and crumbly either - if you find it tough to press the dough into an even layer, place a sheet of plastic wrap on top to help you move it around the pan.
Next, the studded chocolate layer is prepared - this is like a quick fudge made simply by heating sweetened condensed milk with bittersweet chocolate and a couple pats of butter. You want to work with this mixture warm as it will begin to stiffen as it cools - when the mixture is melted and smooth, a shot of vanilla, plump golden raisins and more crunchy salted peanuts are stirred in. You can use golden or dark raisins here, but make sure they are nice and moist - if the raisins are dry, just steep them in boiling water for a couple minutes and pat them dry before adding them.
Now is when we bring back the reserved oatmeal cookie dough that was set aside. You want to drop chunks of this mixture all over the fudge layer - you are not looking to smooth it together as you want it lumpy and bumpy so don't try and be perfect here. You want the chunks to be somewhat large - about marble size or a little bigger as they will spread just a bit and connect together. This way you get those beautiful buttery cookie bits strewn all over the top. Serve them at room temperature or chilled - either way, these neat and clean squares will be gone in no time!
Sadly, I can't comment myself on the taste of the finished product as I have to eliminate(!!) chocolate due to health issues for the next couple of months - so I hope I was able to describe them well enough from Jeff's feedback. I did sneak several tastes of the delicious cookie dough though! Don't expect me to stop baking with chocolate however; I don't think we'll have a problem finding people to let us know how whatever it may be came out (well, it would have to get past Jeff first!).
Monday, January 14, 2008
A snazzy fruit salad with a light cauliflower gratin...
Naturally sweet, fresh and very colorful - I think that is all I really need to say about the Citrus and Kiwifruit Salad with Pomegranate Seeds and Pistachios recipe we made as a side to tonight's dinner.
The title pretty much says it all - in this clean-tasting dish are invigorating slices of vibrant green kiwifruit with segments of juicy oranges and tangy grapefruit. Like sparkling jewels, each serving is scattered with pomegranate arils just waiting to burst in your mouth with their sweet, yet tangy juice. For a unique twist, a drizzle of orange-flower water adds a tempting aromatic note without distracting you from the delicious fruit - while leaving this out wouldn't make or break the recipe, we think it is certainly worth looking for if you don't already have a bottle. Since most of the textures are smooth, though those ruby arils do have a bite to them, a few raw pistachios are the only thing needed to finish off this snazzy side with a contrasting crunch.
I know we do this a lot and I'm sure this Skillet Cauliflower Gratin would be great as a side to many recipes, but Jeff and I both were glad we decided to just split it between us for a healthy main dish.
Rather than steaming the cauliflower, the florets begin by cooking in a bath of milk until they become tender. Flour, dissolved in a little more milk, is then stirred into the skillet to thicken up the milk and create the base for a creamy sauce. A handful of sharp Cheddar cheese, some chives for a hint of onion and a dollop of Dijon bring depth and a bit of richness to the sauce. To finish off this gratin, a mixture of whole-wheat panko breadcrumbs, a little more cheese and olive oil are tossed together and scattered across the cauliflower. The skillet is then placed under the broiler for just a minute to crisp up that crumb topping and add some color. Even though this dish lacks butter, we didn't seem to miss it as the cheesy sauce had enough flavor to carry the tender cauliflower without being bland.
Sunday, January 13, 2008
Bite-sized pizzas...
Back to report 9 new recipes for us this week - the stand-outs for us this time were the Pear and Blue Cheese Flatbread, Banana Piña Colada Muffins and the Fettuccine with Parmesan, Pine Nuts and Lemon.
We had a particularly busy day today and I did not feel like fussing much with dinner... so it was not long before Jeff and I were chowing down on these Mini Spinach and Cheese Pizzas we had tonight!
The base of these little guys are just mini whole-wheat pitas that were split in half. On top of the split pitas is a mixture of creamy ricotta seasoned with oregano, garlic, a few crushed red pepper flakes for heat and of course the obligatory bit of coarse salt and fresh ground pepper. Next, a layer of spinach is strewn across the ricotta. Rather than using shredded mozzarella, we arranged a generous amount of tiny pearled fresh mozzarella balls (labeled as perlini at the market) for the final cheesy layer. You could also use bocconcini and just halve them before you put them on. The only thing left to do is toss them under the broiler to melt the cheese - while the recipe doesn't make a ton, they would be fun as little appetizers, great for a quick lunch or just split the whole batch between you and a friend for dinner!
Saturday, January 12, 2008
A little chocolate can go a long way!
We have certainly made our fair share of coma-inducing, outrageous and obscene brownies before (click on those if you don't know what I'm talking about!), but what if you wanted one that was not crazy full of calories, yet could still satisfy a chocolate craving? While these Dark Fudgy Brownies may not be as jam-packed with butter and chocolate like those others, they were able to put our craving to rest today!
These brownies are dense, chewy and decidedly fudgy (don't confuse that with gooey though!), as there are no leaveners called for - without them, you have your choice of what cocoa powder you wish to use. We chose Dutch-process cocoa powder which gave our brownies an extra dark finish and a smooth rich chocolate flavor. However, if you prefer the slightly bitter edge that natural cocoa powder has, you can swap them without needing to change anything. The original recipe calls for light corn syrup - I try not to use that unless it is absolutely necessary, so I used Lyle's Golden Syrup which gave the brownies a mild burnt sugar depth. You could also use brown rice syrup if you shy away from corn syrup.
For an extra punch of chocolate, we chopped up some extra bittersweet chocolate into small shards to throw in at the end. Jeff doesn't care for nuts in brownies, but feel free to toss in 1/3 to 1/2 cup of toasted walnuts, or nut of your choice, when you fold in those small chocolate bits. When you test for doneness, you don't want the toothpick to come out clean - a few moist crumbs clinging to the toothpick is ideal. If you pull up wet batter, give them a couple more minutes and test again. While they may not be entirely guilt free, they are certainly lighter than most... and besides, a little chocolate is good for you, right?
Recipes
Dark Fudgy Brownies
Dark Fudgy Brownies
Thursday, January 10, 2008
A satisfying pork and rice meal...
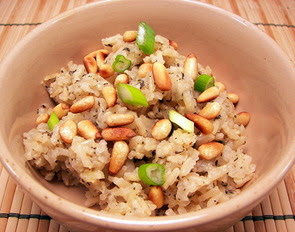
We certainly kept the stove busy preparing dinner tonight! While the oven was full taking care of the main dish, we had our side of Herbed Brown Basmati Rice keeping one of the burners company.
This dish starts off by lightly toasting brown basmati rice and a clove of garlic in a little olive oil to bring out the natural nuttiness of the rice. The liquids are added - a combination of vegetable broth and water - and then seasoned with basil, thyme and a dash of salt. This will take roughly 30 to 40 minutes to cook, but check early to see - the rice should be tender, but still have a slight bite to it. The original recipe called for a tablespoon of fresh basil and a teaspoon of fresh thyme, but I opted to add the dried spices to give them a chance to permeate into the rice. If you prefer to use fresh, be sure to wait and add it once the rice has finished cooking. Once ready, the rice is given a dose of Parmesan cheese, sliced green onions, toasted pine nuts and a scattering of fresh ground black pepper. We love the heartier flavor brown rice has, but feel free to use white if you already have it - just reduce the cooking time to about 15 minutes to compensate. With subtle, but delicious flavors, this side of rice could easily be served with a variety of dishes or turn it into a main dish by adding some cooked shredded chicken or even shrimp if seafood sounds good one night!
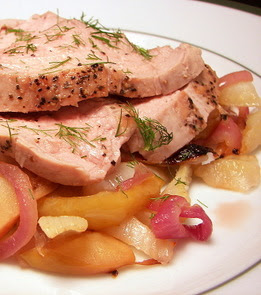
While the rice was bubbling away on top of the stove, the recipe for the main portion tonight, Apple and Fennel Roasted Pork Tenderloin had the oven slaving away. We kept two racks busy - on the bottom rack, we had a slew of sliced sweet-tart Fuji apples, licorice-y fennel, and red onions that were coated in olive oil and roasting away. While they were cooking, we quickly seared a lean pork tenderloin on one side, turned it over and then slid the skillet into the oven to finish. Once the two were finished cooking, conveniently at about the same time, we transferred the pork to a cutting board to rest and we pulled up all of the tempting bits stuck on the bottom by adding a few tablespoons of cider vinegar. Brimming with flavor, this mixture was poured over the golden veggie/apple mixture. We served this dish by thinly slicing the juicy still-slightly-pink-in-the-center pork and arranging the slices over the roasted mixture. For a finishing touch, we we sprinkled some chopped fennel fronds on top on an additional note of fennel.