Tuesday, April 26, 2011

Chocolate Chunk Cookies...

Jeff has been and will be in a few intensive meetings this week - he originally thought about skipping the Weekly Treat Day, but I thought bringing in a plateful of cookies might be a nice way to lighten the mood. He agreed - I zeroed in on a recipe I've had marked ever since I picked up that snazzy cookbook I can't keep my nose out of. These Chocolate Chunk Cookies are basically a rift on the classic, well-known Toll House recipe, yet seemingly injected with steroids.

When you have the buttery dough combined (if you have a scale, definitely haul it out for this recipe - I've included both gram and cup measurements), scoop the mass into a separate container or leave it right in the mixing bowl - cover, then as hard as this might be, stash it in the refrigerator and forget about it for a day. Believe me, I know wholeheartedly this is torturous, but trust me with the fact that you will be rewarded for your patience.

Why is this really that important? If you give the dough that aging time, the flour has time to absorb all the liquid-y properties from the butter and eggs, resulting in a well-textured cookie that has practically accelerated its own flavors into another level. Probably a little dramatic on my part, but I could taste the difference.

If you have a few exquisite bars of quality semi or bittersweet and milk chocolate that you've been wanting to use, break them out for these cookies. While I did use a bar of milk chocolate, I decided to use bittersweet chips only because I had a bag of excellent drops already in the pantry. I would suggest using a higher end brand that has at least 60% cocoa content to truly give these cookies that dark chocolate wallop they deserve.

I didn't look for reviews of the cookie before I made the dough, but I noticed how it seemed almost too light and sticky once it was thoroughly mixed. I searched around and found that the author posted the same recipe here, but the measurements for the both flours were a bit different. They ended up being about 1/4 cup off, so I went ahead and stirred the extra in a couple hours after the dough had been chilling out in the refrigerator - the texture definitely seemed better. If you'd like to try and match the dough to exactly what is listed in the cookbook, bring the all-purpose flour down to 140 grams (about a cup) and the bread flour down to 150 grams (again, about one cup). Let me know how they turn out that way!

Now, did this affect the cookie? I think so, but in the positive factor - they had some definite heft in the thickness department, but at the same time they were not too puffy or cake-y. The edges are crispy, while the centers stayed soft with a delightful sweet chew (thanks to the strong bread flour!). I think that if the extra flour would not have been added, the cookies may have spread into thinner, flat rounds - not what I had hoped for. I'm sure they still would have tasted wonderful, but texture can make all the difference!

Saturday, April 23, 2011

Couple of new recipes...

We've had some crazy weather out here - from cold snaps, to highs close to 90 and then there was that horrendous tornado outbreak last weekend. We didn't receive nearly as much damage as they did closer to the coast, but it was pretty gnarly here. The garden did have a little setback due to hail, but it looks like most of the plants survived and have started growing again. Since that seems to be tending to itself, I have some time to share a couple new recipes with you today that we've made over the past few weeks.

The first recipe came about because Jeff spied a killer deal on a few pounds of pork (he's getting good at that!) from one of our favorite places to shop since we moved out here to Charlotte. I trimmed most of the cuts to store in the freezer, but saved out a few chops to make this Pork with Pomegranate Pan Sauce.

Quickly cooked chops, seasoned lightly with a modest rub of garlic powder, cumin, salt and fresh ground black pepper, gave us a base layer in the pan to create the sauce that made this dish. Finely chopped shallots groove in the stuck-on bits left behind in the pan, followed by a healthy splash of pomegranate juice and a scoop of granulated sugar. Also added is a tablespoon of dark balsamic vinegar, giving the sauce a tangy, bright bite.

Not only does this finish in a flash, making for a swift weeknight dinner, it plates well and is quite elegant. The sauce is sweet, yet balanced by the sharpness from the shallots and a subtle snappy tartness that made it pop on the tongue. Do keep on eye on the chops - depending on the thickness, they can become over-done rather fast. If you are unsure, keep an instant read meat thermometer close by and pull the pork out of the pan when they reach 145 to 150 degrees - at this temperature, you'll keep the meat tender and juicy, while not having to worry about it being too underdone. The pork should retain an ever-so-slightly pink hue in the center when sliced into.

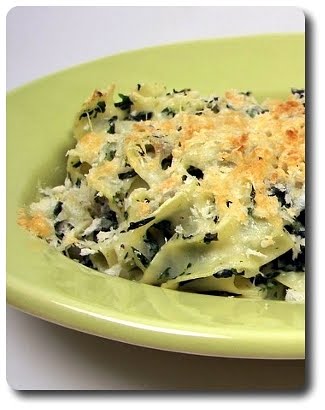
The other recipe we made in the past couple weeks was this hearty Spinach-and-Egg Noodle Casserole, which could be served either as a side, filled to the brim in a ravishing family-style baking dish, or as we did, in individual oven-safe crocs for a meatless main dish.

I did modify the pasta amount from the original recipe - it called for a full pound of egg noodles, which sounded a bit heavy handed for the amount of sauce. Bumping it down to twelve ounces worked well for us, giving the curly noodles room to groove, yet not end up soupy. The sauce, made with milk and thickened with a pale roux (butter and flour, cooked just enough to remove any raw pastiness), is also given a boost in richness by whisking a bit of the hot mixture into a couple egg yolks. This brings the temperatures of the yolks up slowly, allowing you stir them back into the hot pot and keep that silky consistency, preventing a scrambled mess.

Already cooked spinach, onions and garlic, along with the al dente cooked pasta, are stirred into the warm sauce, then the whole shebang is portioned out into individual serving dishes. For a textural bite, the tops of each dish are sprinkled with a sharp concoction of panko breadcrumbs, nutty Gruyère and salty Parmigiano Reggiano cheese. The assembled dishes won't need to bake for long - just a quick trip under the broiler to turn that top golden, cheesy and crisp.

As a meat-free main dish, Jeff and I were completely satisfied when we scraped the last bite out of our portions. Again, you could serve the pasta up in a large help-your-self casserole dish, but we also think you could finagle this into a slick side dish by throwing on a more personal spin. Simply divvy out the noodles between the wells of a 12 cup muffin tin and bake them off that way. You may want a bit more of the breadcrumb topping though, giving each portion a generous sprinkling as some may consider this the best part!


Tuesday, April 19, 2011

Chocolate cookie repeat...

There is a cookie recipe that we made way back in 2005, shortly after we started this website, that we have sent to friends and family, made for neighbors and prepared for a few bake sales over the years since then. What we haven't done was make them again for the Weekly Wednesday Treat Day!

I was thinking about this the other day and mentioned those Peanut Butter Filled Chocolate Cookies to Jeff - he suggested that we skip a new recipe this week and get these into the oven as soon as possible. Because we both even liked the picture we took way back then, I gave the camera a break this week too!

What I did do was tool around with the recipe we had posted - no differences in the ingredients really, but I wanted to update it to how I write out recipes now. I honestly don't have much else to say that I haven't already said when we first talked about these, other than these cookies are still just as exceptional as when we first tried them out - if you haven't made them yourself, what are you waiting for?

Saturday, April 16, 2011

New twist on snickerdoodles...

I'm a sucker for hazelnuts - I'd keep them stocked in the pantry more often than I do, but I know I'd just eat them all before I got to use them in a recipe. A few recipes have been kickin' around my desk using the nuts for a couple weeks as they have been whispering my name when we travel down the nut isle in Trader Joe's. We finally nailed down what we were going to use them in - these extraordinarily-lengthy-titled Hazelnut-Cream-Stuffed Snickerdoodle Sandwich Cookies.

The dough for these cinnamon-y (and, of course, I used fancy Vietnamese cinnamon - I find it has more muscle, mixes in well and has this dimensional sweetness that does a lingering dance on the tongue, rather than fading instantly away) cookies uses a pure butter base, a duo of sugars and a splash of vanilla to round out any rough edges. You won't need to chill the dough, we means you'll get cookies that much faster!

While the original recipe called for making a whopping 6 sandwich cookies, we figured we could stretch the dough out a bit more and not be so overkill with the size - 24 cookies (making 12 sandwiches) felt much more sensible without compromising the end result. The dough is soft, but we were able to scoop and handle it without leaving our fingers covered in stickiness. Instead of rolling the balls to coat, just the tops of the dough balls are covered in a speckled blend of granulated sugar and more of that precious cinnamon.

Once the cookies have baked and are cooling, don't hit the off button on the oven just yet. To make the filling, we scattered hazelnuts on a short baking sheet and roasted them until their brown jackets began to split and the nutmeat underneath began to shift from pale blonde to a toasty light golden brown. To get the skin off the nuts, as soon as you pull them out from the oven, scoop them out onto a clean kitchen towel, wrap them up and let them sit to steam for just a couple minutes. Then, vigorously rub them together (still in the towel, while they are warm) and most of their skins will fall off.

Don't fret if they are not all pristinely clean - the bits that remain only add to the filling, whereas if all of the skin was left, their bitterness would be very present. You can save yourself a step by buying pre-skinned hazelnuts, but I'm rarely able to find them in the store and the extra expense isn't worth it. After coarsely grinding the cooled, naked hazelnuts, they are pepped up with confectioners' sugar, a couple tablespoons of butter and just a note of salt, then processed again to make a spreadable consistency.

Now, I know why they would classify this as a snickerdoodle, but for me, I do feel a real (or maybe traditional is the word I should use) one has to have cream of tartar in it. Why? That's hard to pin down exactly - for me the texture is just slightly different enough to notice and the flavor seems more pronounced in the cookie. With that said, thankfully that's not enough to turn me off trying a cookie, especially these! I am glad we pared down the size some - I could have definitely eaten a giant one, but these spiced sandwiches turned into a decent sized snack that hit the spot, without leaving one feeling overly guilty.

I do have a problem after all of this... I have plenty of hazelnuts leftover (which is good!), but I better figure out soon how to use them before I waste them all by simply snacking on the groovy nuts!

Tuesday, April 12, 2011

Cornmeal-Lime Cookies...

If you remember from back in 2007 (yikes...), we made these lemon biscotti that utilized a technique of using your hands to rub fresh citrus zest into the sugar called for in the recipe that I gleaned from one of Dorie Greenspan's cookbooks. Ever since then, any time a recipe calls for zest in a dough or batter, I instinctively do this extra step and am always fascinated by how intensely aromatic and moist the zest turns the sugar. I used this method today, making these shiny Cornmeal-Lime Cookies for the Weekly Wednesday Treat Day.

Besides the refreshing zing and lightness of lime, what makes these cookies special are the crunchy bits of coarse cornmeal in the dough - seek this out if you don't carry any in your pantry as you won't get the same unique bite using a fine grind of cornmeal. I found the combined dough to be soft, yet a bit tacky to the touch - meaning it would start to stick to your hands if you tried to roll the dough into balls, but it is still firm enough to hold its shape.

Once scooped out onto the baking sheets though, you will want to flatten each slightly - keep your fingers lightly moistened with water and the dough won't cling to you.

You can make these cookies bakery-sized by using scant 1/4 cup measurements for the dough (you will need to tack on a few extra minutes to the bake time), but we scaled them back to roughly 2 tablespoons for each. This ended up being a generously heaped tablespoon cookie scoops' worth, giving us 22 cookies instead of the 14 to 16 listed.

I recommend you keep an eagle eye on these cookies as they bake - you want the tops of them to remain pale, while the edges should have a light golden ring around the edges. If they are taken much farther than that, the cookies won't have that soft, a-couple-steps-away-from-being-a-cake-like quality. I did let two cookies go for a few minutes extra for comparisons sake (curiosity got me!) and instead of being crispy, they just became drier and more crumbly.

While the cookies have a solid hit of lime already, to punch up the pucker, each cookie is painted with a sweet, zest-studded opaque glaze made from confectioners' sugar thinned out with water, fresh lime juice and of course, more of that vibrant zest.

You could dunk the tops of each cookie (not as easy since they are tender) or drizzle it over, but I agreed with the recipe directions by brushing the glaze on with a pastry brush. This gave me the control to make an even, thin coat without making a mess - I was left with this though.

And trust me, none of it went to waste - a few swipes with a spoon (and right into my mouth!) made quick work of any leftover dribbles.

Tuesday, April 05, 2011

Cinnamon-Streusel Coffee Cake...

We've made a ton of cookies for the Weekly Wednesday Treat Day lately, be it in the form of bars, rolled, sliced or drop. I actually had another already sitting on my desk when it dawned on me just how many we've made... I figured it was time to seek out another treat! Luckily I had a pile of food magazines that have been neglected - when I got to the second one in, this Cinnamon-Streusel Coffee Cake danced off the page and bellowed to be made.

It may look like there are a lot of steps and ingredients to this cake, but rest assured it just reads that way - I broke down the listed ingredients into their individual steps, rather than a more concise one that would end up having several ingredients that need to divided. This way, there is hopefully no confusion to what amount of every ingredient is going into each step.

There are four parts to prepare this cake from start to finish - the cake batter, a cinnamon-laced, pecan-packed sugary filling, the slightly nutty, crumbly streusel topping and a slick glaze to run all over the top and sides.

The streusel topping was on tap to accomplish first, which is just a mixture of flour, brown sugar, cinnamon, cubes of icy cold butter, salt and a handful of toasted chopped pecans. When you mix in the butter cubes, you can use a pastry blender if you like, but I used the best tools available - my fingers! All it takes is smashing the butter into the dry ingredients until the mixture begins to come together and forms hefty clumps - as soon as this happens, cover the bowl and keep it chilled until called for.

The filling to this homey cake echos the streusel topping, but not completely - it takes out the flour and butter completely, then ups the ratio of those toasted pecans for a surprising crunch inside. After you've beaten the cake batter into a fluffy, voluptuous mixture, half is scooped and smeared into the bottom of a tube pan, followed by a sprinkling of the filling and the rest of the batter. The generous, and I mean g-e-n-e-r-o-u-s, streusel crumbs are then scattered over the top and the cake is ready to bake.

My tube pan is probably closer to 10" than 9", but it didn't seem to affect the result much, besides the cake being a touch shorter - it took roughly the same time listed in the recipe (about 55 minutes) for the tester to come out mostly clean with a couple moist crumbs clinging. When it comes time to turn the cake out, it may be worth your while to affix a piece of plastic wrap or finagle a sheet of parchment paper around the tube and on top of the crumb mixture. Some of the crumbs will inevitably come loose during flipping and having a little protection over them never hurts - it would also be helpful to have another pair of hands for added insurance.

Even if a few of the crumbs do come loose, it is not the end of the world - call them baker snacks, or just re-position them on the cake. When you add the simple confectioners' sugar and milk drizzle over the top, it will cement all those nubbins together. I would have been completely pleased with a plate of those scandalous buttery nuggets that adorn the top of the cake (and we'll just forget that there is more butter in those nuggets than there is in the cake... oh snap!), but getting through them and reaching the soft sour cream cake underneath was what really sold me.

The sour cream doesn't lend much of a tang, but does wonders to keep the cake tender and light. Jeff was taken by the thick line of brown sugar and crunchy pecans in the filling, scooping them out before he even bothered to get to the rest of his slice! Be sure to use your best cinnamon - I went with our favorite Vietnamese Extra Fancy Cinnamon, which gave the filling and crumbles a rich bite that flowed through into the plain cake with each forkful, without having any in the actual batter.

Friday, April 01, 2011

Brown-Rice Veggie Burgers...

We are definitely meat eaters around here, but I've noticed over the last few years we have cut down our consumption. Whereas we would serve meat probably four to six nights out of the week, lately it has been perhaps once or twice, with some weeks not having any at all! I can't say there has been any specific reason for the decline, other than we physically feel better when we don't eat as much. This does mean we have had to come up with dinners that had plenty of interesting textures and flavor to keep us entertained - like these Brown-Rice Veggie Burgers.

To make the patties for these veggie burgers, we used a packed cupful of cooked brown rice, which I made using our favorite no-fuss method. I didn't use a measured amount of dry rice to begin with as I always make extra and place the rest in the freezer for later use! Three quarters of that rice is tossed into a food processor, along with Monterey Jack cheese, a good dose of salt and a single chipotle pepper. Chipotle chiles are ripe, red jalapeños that have been smoked and in this case, packed in a vinegar-y adobo sauce. They are fairly potent, but if you'd like a milder, smoky heat, open up the soft pepper and scrape out the seeds first.

Ground down to an almost pasty texture in the processor, next to add is a seeded and chopped poblano pepper, a couple scallions and a scoop of thawed frozen peas, along with roasted and salted pepitas. Pulsed just to incorporate and break down the newly added veggies, the mixture is then scraped out into a bowl, with the remaining cooked rice kneaded in for extra bite. Portioned into four hearty sections, each piece is firmly shaped into a thick patty - I did find the mixture fairly tacky, but if you keep your hands moistened with water, it won't be messy or sticky.

Homemade veggie burgers can be somewhat notorious for falling apart, but I've found in the past that chilling the patties for about a half hour before cooking does wonders for keeping them solid. Even though the recipe didn't call for it, I went ahead and scheduled the extra downtime in for added insurance. With one side brushed with oil, the patties were added into a heated grill pan, oiled side down, and cooked until well toasted and a bit crusty. Before flipping, the uncooked side is quickly brushed with a dab more oil, then turned to cook just the same.

Sadly, I didn't have any of our snazzy homemade burger buns in the freezer and I didn't think enough ahead to make any either, which meant we had to go with those fiber-packed sandwich thins we already had handy. Jeff wanted his plain, as in just the patty and bun, but definitely pack on any variety of toppings you see fit - think about lettuce leaves, thick tomato slices, salsa, sour cream or even thinly sliced avocado. If you'd rather not use a burger bun, how about stuffing one of these thick patties into a warmed pita pocket instead?

Tuesday, March 29, 2011

Chewy Caramel Popcorn and Pretzel Bars...

Sweet and salty fans unite! This week's Wedneday Treat Day was made just for you (and me!). I've had these Chewy Caramel Popcorn and Pretzel Bars temping me every time I went sifting through recipes looking for the next treat we were going to make and finally gave in to their siren call.

You'll need several cups of popcorn to make these - I had some loose kernels in the pantry, so I used the old-fashioned method of making it on the stove in a heavy pot. It took roughly 1/2 cup of the golden kernels to make the twelve cups called for - you could also use microwave popcorn if you like, popping two bags and measuring out the amount needed from both. For a firmer salty crunch, a scant half pound of small pretzels, busted into irregular shapes, are tossed in with the popped corn, along with one additional ingredient that wasn't in the recipe.

You could definitely stop here and end up with a smashing success, but we couldn't do that - Jeff made the suggestion to throw in one of my favorites candies - Reese's Pieces! Why? Well, both of us love peanut butter with pretzels, either as a dipper or stuffed inside those little hard nuggets - how could they not be wonderful here too? Besides, the nutty buttons would also add a splash of color... I was definitely game for that idea! I used a heavy handful, roughly around 1 cup.

Sprinkling the candies directly on top once the mixture is in the pan would work, but placing them with the popcorn in the beginning gives an advantage - some of them will burst open from the heat of the caramel, exploding their now liquid-y peanut butter centers as you combine the ingredients together. The rest remain intact and will return to their crisp texture when the bars cool.

To package all those ingredients together into a solid bar, an intriguing version of caramel is made. Caramel may seem scary to make, but this "wet" version (as opposed to dry, where you wouldn't be adding water and can be more temperamental) doesn't have to be - all it takes is heating sugar with salt and splash of water, then allowing the syrup that forms to boil until it turns a golden amber color. You won't be stirring at all while this is happening, but if you notice the color is not happening evenly over the bottom of your pan, a gentle swirl or three helps to even the syrup out.

At that point, a gradual stream of cream is added to stop the cooking process (be careful when you do this - the cream will cause the hot sugar to sputter a bit), followed by what I thought was one of the more interesting parts... a couple cups of miniature marshmallows! That last add-in was a first for me in caramel, but I could see where the recipe was going - the mallow will help keep the caramel more creamy and soft, while giving it strength to firm up as it cools.

Before we get any farther, I do have a quick note about the caramel - as stated, the caramel at the amber stage will have a sweet, toffee-like flavor that we thought matched well with the ingredients - strong enough to notice, but not too potent that you can't taste anything else. However, if you prefer a richer depth to your caramel, take the color a bit darker before you add the cream and marshmallow.

The original yield was 12 large bars, but Jeff and I thought these would be a bit too rich at that size and decided to pare them down to 16 instead. If you have an insane sweet and salty tooth (which, by the way, is accentuated with an optional sprinkling of salt at the end - I did this and will do it next time), then by all means, keep them in chunky, hunky monster squares and revel in their goodness! On the flip side, I could also easily see slicing the popcorn slab into 18 pieces, for a two or three bite treat. As you can see, the caramel sets enough to slice the bars well, but at the same time it is soft enough, giving this luscious, gooey quality to them that guilts you into licking the tacky caramel from your fingers after every bite.

Thursday, March 24, 2011

Guess who's joined the craziness!

On Tuesday, we mentioned that we have been very busy a round here with some news to share. From the e-mail questions we got since that post, no, we are not moving again - at least, as far as I know. Please don't put any ideas in Jeff's head!

We do, however, have a new addition to the household - meet Dora!

We got a call about this sweet girl late Friday night - she was owner surrendered to a kill shelter over in Raleigh, NC. A friend who works for a foster organization north of us let us know of her situation and we drove up an hour Saturday morning to see her - after walking in and seeing her happy self, we knew instantly she was going to be coming back home with us! Sadly, we don't have any other information on her, other than she's about 2 or 3 years old. Our vet saw her Monday morning and said she looked great, but suggested we do around of blood work just to make sure there wasn't an underlying issue as to why she was given up.

She did come with silvery painted toe nails, so we assume she was possibly in a home with children that no longer could take care of her (either not enough money or time) or she has some medical condition. We've found her temperament pretty spot on with Gus's - laid back, not a barker, pretty playful and such a sweetheart! She hasn't shown any aggression towards other people, the random dog during our walks or even with her food. Now, of course, the question is, what does this dude think of her?

He has taken quite an interest in her! Playing around with friendly chasing parties and we've even seen an occasional snuggle on the couch or outside in the grass. We didn't know how he would react since he's been by himself for some time now, but apparently we had nothing to worry about! Although, I think he is trying to make up for lost time with the ladies, if you know what I mean... and yes, both of them are fixed.

Since it has been a few years since we've had two dogs in the house, it's taking a bit of time to get into that routine again. Life sure is hopping around here now! For whatever reason she was given up, Jeff and I are happy that we found her and can give her a safe, loving home to spend the rest of her life in. Welcome to your forever home, Dora!

Tuesday, March 22, 2011

White Chocolate Cherry Shortbread...

The past few days have been a bit hectic (more on this in a couple days... we have some news to share!) and we've been lucky to get anything on the table for either dinner or snacks. With the Weekly Wednesday Treat Day right around the corner, I knew I had to scrounge around enough time to get a treat made - I ended up going with these White Chocolate Cherry Shortbread.

Do you know what I love best about shortbread? The simple ingredient list and non-laborious preparation! Plenty of butter (oh yeah!), a few scoops of flour, salt, sugar and whatever add-ins to flavor it, which in this case was vanilla, dried cherries and white chocolate. Even though we were already using vanilla extract, I did up the ante by stealing a half cup of vanilla sugar from my precious jug I have brewing in the cabinet. The simple reason for this is I am infatuated with the combination of cherry and vanilla! If you don't have any, of course regular granulated sugar would be fine.

When you add the dry ingredients into the creamed butter and vanilla sugar, just mix it until it looks like coarse crumbles - not combined or smooth at all. The reason for this is the cherries and white chocolate - it takes a bit of oomph to work the two into the stiff dough and you don't want to overwork it.

These wedges have a wicked melt-in-your-mouth texture, with each bite landing a jackpot of cherries and white chocolate morsels - each piece was practically bursting at the seams with the two! I thought the sweet innuendo from the double burst of vanilla hit all the right spots, without stealing the spotlight away from either of the two stars. I was worried using both the scented sugar and extract may end up flowery, but thankfully that didn't happen!

Between the sugar and white chocolate inside and on top of the wedges, I went with, and suggest you do the same, dried tart cherries for a nod towards balance - the cherries usually do have a bit of sugar added, but they still retain a pleasant sour note. I used white chocolate chips (not "vanilla flavored" or "white baking chips") just because I prefer their creamier mouth-feel as they have actual cocoa butter inside, then chopped up a bar of quality white chocolate for the drizzle. If you do use the other types of chips, you may need to add a teaspoon or two of shortening when you melt them down for that drizzle. If you don't, the chips tend to either end up gloppy or too stiff to drizzle well.

I do have one additional note - the directions were clear about pressing the dough into an ungreased baking pan, but I might suggest lining the pans with parchment paper. Of course, there is plenty of butter within the cookies and they didn't really "stick" per se, but they didn't just fall out of the pan either. With each round being cut while they are resting in the pans, that sheet of parchment may also give you a little protection from the tip of the knife. If you do line the pans, and are comfortable with the flipping process, I also might suggest you instead just flip the shortbread out onto a board and cut them there, saving your pan (and knife!) from being beaten up.

Friday, March 18, 2011

Herbed Asiago Rolls...

I pulled out one of our favorite go-to biscuit recipes the other day to make for dinner the next night, but when I thought more about what we were going to be having them with, I decided to switch it up and try out these sturdier Herbed Asiago Rolls instead.

If you were to look up the original recipe, you would notice the ingredients are pretty similar, yet the directions take a different turn. I've been using instant yeast for years - I buy them in two pound blocks, then store them in the deep freeze until I need to use the tiny granules. This yeast has the lovely benefit of not having to be activated by soaking in warm water first - all you need to do is whisk it right into the dry ingredients.

If you'd rather use active-dry yeast, which is what the recipe called for to begin with, swish the yeast around in the warm water (not too hot now! You should be aiming for 100 to 110 degrees) called for, along with a tablespoon of the honey. Let the mixture sit for five to ten minutes - the yeast should start to look bubbly and a little foamy. If it doesn't, toss it away and try again - if it fails again, the yeast is more likely too old and you should find another batch.

Oregano, basil, crushed fennel seeds and a touch of cayenne pepper make up the seasonings of choice in these speckled rolls, added right into the flour mixture before you begin needing. Also added to those ingredients? The shreds of Asiago cheese! Not all of the amount though, you'll see where the rest goes shortly. I love to feel the essence of the dough as it changes from a shaggy mess into a smooth, slightly tacky ball - however, you could just as well use a stand mixer if you like. Toss the ingredients into your mixing bowl and let the mixer rip, using the dough hook attachment - depending on your mixer, it will probably take 4 to 7 minutes or so on speed two or three.

After the kneaded dough has rested and risen, the mass is whittled down into twelve portions, with each made into a tight ball - this is done simply by using slight pressure from the palm of your hands while rolling it on the countertop. If you find that the dough needs a little grip on the work surface to do this successfully, give the surface a light spritz with water and that should do the trick. Arranged on a baking sheet and covered to rise once more, just before sliding the puffy dough balls into the a roaring oven, the rounds are topped off with a shower of the same cheese we kneaded inside.

Taking less than twenty minutes to bake into golden browned rolls, as hard as it was, we did let them rest for another ten before grabbing a couple each. Soft, yet equally chewy with a cheesy crust, the robustness of the herbs was captivating and seemed to penetrate throughout every crumb. I had wondered if the cheese would melt into the background and fade away, but both of us found its sharp bite lingering on our tongue, making its presence known and enjoyed.

If you have extra time, you could prepare these a couple weeks ahead of time - let them cool completely, set them in the freezer until they are frozen and then wrap them up tightly. Let them thaw at room temperature and you are good to go! You could rewarm them if you like by wrapping them in foil and tossing 'em in a heated oven for 5 to 10 minutes, but the few we froze and thawed were well received left at room temperature.

Tuesday, March 15, 2011

Double-Chocolate Sandwich Cookies...

More cookies for the Weekly Wednesday Treat Day! This time, we made these exquisite flower-shaped Double-Chocolate Sandwich Cookies.

While this recipe was labeled double-chocolate, there are actually a few types used - Dutch-process cocoa powder in the rich cookie dough and a drizzle of melted bittersweet on top of the cookies, along with dark and milk chocolate in the filling. Bittersweet (sometimes closer to semi-sweet, depending on brand) and dark chocolate can be fairly similar - we used a bittersweet that was around 62% cocoa, while the bar of dark was just over 70%.

You will notice in the ingredient list that I called for "ground toasted almonds" - I used whole almonds that I first toasted, then cooled completely and whirled them around in the bowl of our food processor. You can use already ground almonds if you have them handy and toast them or not - I wanted the nuttiness of the almonds to stand up to par against the chocolate, rather than get lost in the background.

Besides those almonds to perk up the dark dough, a hint of cinnamon and a small scoop of instant espresso power are mixed in. This duo should be not as upfront as those almonds though - the cinnamon is very subtle, while the espresso powder is only there to heighten the chocolate and not give it a coffee flavor. You will need to work with the dough well chilled before rolling, then give the cut-out shapes a trip through the freezer to firm back up before baking - be sure to plan enough time for these steps. We used a flower shaped cutter (hello Spring!), but of course use whatever shape suits your fancy.

After the cookies have been baked and cooled, the ones with the punched-out centers (couldn't resist using a heart for this!) are drizzled with the melted bittersweet chocolate, then left alone to set. While they rested, the silky smooth ganache filling was made using the two chocolates mentioned above, a generous splash of cream, a nob of butter for shine and a small pinch of salt. Make the filling as soon as you intend to use it to slather over the bottom halves of the cookie sandwiches - it is easier to maneuver while warm (it will set as it cools) and will help anchor the top halves as they cement together.

Two crisp, but not too crunchy, dark cookies, with an outrageous chocolate filling in between, these sandwiches are a chocolate lover's dream in a tidy hand-held package - will you be able to stop at just one? I know I couldn't! The ganache centers may even be stiff enough that if you placed a lollipop stick in the middle while sandwiching, you could "plant" these in a pot for a swanky presentation - I didn't test this though!

Friday, March 11, 2011

Smoked Gouda Quiche...

I'll be honest, I don't have any introductions, stories or any fun reason to talk about why we made this Spinach, Green Onion and Smoked Gouda Quiche for dinner the other night. I pulled out the recipe simply because I was in a hurry and didn't have time to fuss over what to make this week! Usually I try to sit down and spend a half hour or so every weekend and pick out the menu for the week, but it was unfortunately not a luxury I could afford this past Saturday.

The crust is fairly unique for this quiche - not so much the ingredients, but how it comes together. It also has a few steps to it, so be aware of all the extra time needed. For a typical pastry crust, you'd be mashing, with either your fingers, food processor, a pastry blender or even a fork, several tablespoons of butter (or maybe even lard if your feeling especially frisky) into a mixture of flour and salt. This recipe calls for soft butter, a splash of milk and an egg yolk - nontraditional (or not very), yes, but it is a bit lighter. You'll see that you need to blend the milk and egg yolk together, then add them both very gradually into the butter - don't dump it all in at once or you'll be left with a chunky mess. Pouring it in a tablespoon at a time won't break the butter and you'll be left with a smooth, creamy base.

With the flour added, and mixed enough to just barely combine, the dough will need to chill for about an hour before using it. With the dough cold, but not rock hard, it rolled like a dream for us without any cracking or patching needed. Once fit it into the dish, do note that it has sit in the freezer for several minutes before baking. Why? The butter needs to firm back up after being bashed with the rolling pin - it also helps the crust stay in its intended place. This way, you won't be screaming in horror as you watch the sides of the dough slide down the edge of the pan through the oven door.

Into the baked, cooled crust (and be sure to let it get lightly browned all over before you pull it out of the oven) went the filling of sautéed green onions cooked with a clove of garlic and a generous amount of fresh baby spinach. That combination is then added into a bowl of milk (half-and-half would make for a richer result if you feel the need, but we felt regular milk was fine), eggs, smoked Gouda cheese and a pinch of freshly grated nutmeg. Please don't switch out the Gouda for cheddar or even Swiss cheese - the intensity and bite of the smoky cheese brings this quiche to life.

You can somewhat control the texture of this - if you want the finished dish to be creamier (or maybe even a better way to describe would be custard-y), take it out at the time called for. If, however, you wanted a firmer, almost buoyant texture, leave it in an extra five minutes. It won't dry the filling out by any means, but will produce a more set result. Jeff and I both thought this was excellent, especially considering it is not nearly as laden with fat as you may expect with a quiche - in fact, Jeff has already asked that we put this on the list to make again.