Friday, June 13, 2008

Rhubarb windfall...

We recently came into a windfall of tart rhubarb stalks thanks to the patch at Moms farm and one of Jeff's co-workers. We got so many stalks and since rhubarb freezes well, I've already prepared a bunch for the freezer. All I do is clean up the stalks, cut them into 1/2" to 1" chunks and throw them onto a baking sheet. They go into the freezer until the pieces are rock hard, then I transfer them to a zip-loc bag and in most recipes you wouldn't even need to thaw them! You could even blanch them if you are worried about any flavor-loss, but I don't think you really have to go that far.

I've already made a couple recipes with some of the remaining fresh rhubarb, but today I'll talk about the Rhubarb Crumb Cake I just made yesterday for Jeff to bring in for a surprise Friday the 13th Treat Day at his office!

The vanilla-scented batter for this cake was a breeze to prepare - to ensure the cake has a soft, tender quality to it, be sure to add the dry ingredients alternately with the tangy sour cream. You can use the mixer for this entire process, but I like to stop at the last flour addition and fold that in by hand. This will leave you with a thick, pale batter that spreads nicely into your baking pan.

One of the best parts of a crumb cake are those buttery sweet nuggets that are scattered over the top. We used a combination of granulated and brown sugar to give the crumbs some depth and tossed in a bit of cinnamon for flavor. You don't even need anything special to create the crumbs, just add the softened butter and use your fingers to mix the ingredients together. When combined, all you have to do is squeeze the mixture and it will stick together just enough to form uneven clumps. Just about half of this mixture is scattered on top of the prepared batter. To make the rhubarb shine, the pieces are first tossed with a bit of granulated sugar to temper the sourness before being placed into the pan. It may look like all of it won't fit since you are using a full three cups worth, but try your best to squeeze them all into a single layer. The rest of the crumb mixture is then scattered on top of the rhubarb.

Baking this cake can be a little tricky as it can be tough to tell when it has cooked enough - look for the crumbs on top to be golden and the top to be well risen. When you test for doneness, you'll be pushing the toothpick through the soft, moist rhubarb, but you should still be able to pick out if you have any raw batter left from the cake - just start checking around the 60 to 65 minute mark. Jeff and I thought this was quite the tasty cake - the thick rhubarb layer was a pleasant contrast to the moist and tender cake. I had to stop myself from picking the larger crumbs off the other pieces as I couldn't get enough... I wish I would have thought to make a little more of that mixture to add on top!

We were going to be having leftovers for dinner tonight, but I thought I would start us off with this Grilled Peaches over Spinach and Arugula with Goat Cheese and Prosciutto so we'd still be having a new dish.

The bed of this light salad was tender baby spinach and peppery arugula, very simply dressed with olive oil, salt and fresh ground black pepper. The wedges of fresh peaches were quickly grilled to give them a caramelized flavor and a showy finish - be sure not to leave these on too long, you want them to keep their firm texture and not turn mushy. Thin, salty strips of sliced prosciutto are then threaded through the tender greens, followed by crumbles of tangy goat cheese. What could push this flashy salad over-the-top? A bold mixture of reduced balsamic vinegar and sticky honey that creates a dark syrupy mixture to drizzle over the top. A quite light and refreshing salad that grabbed a hold of our attention the entire time. I thought the goat cheese worked well here, but feta might be nice way to play around with the flavors - you could also add the prosciutto to a skillet and crisp it up to give a bit of crunch for texture.


Thursday, June 12, 2008

Cheddar potatoes and pineapple chicken...

The side for tonight's dinner wasn't anything different or exceptional, but just a simple go-to recipe that doesn't need a lot of fluff or attention. We left the peels on for these Cheddar Smashed Potatoes (lots of nutrients in those skins!), but if you don't groove on them, you can always peel the russets before you use them.

When the chunky potato pieces were tender, we drained the water away and put the potato back into the pan - this is an extra step, but the process will evaporate any of the excess liquid. Warmed milk and butter are poured into the starchy potatoes and smashed together - just be sure to not add all of the liquid at first. Start out with about half and then add more if you find that they are not moist enough. If you have the tool and want an extra creamy bowl of mashed potatoes, a ricer would be a good bet, but we wanted a heartier texture and just used a potato masher. A couple ounces of shredded white cheddar are then stirred in to give these a sharp bite - also, potatoes eat up salt like crazy, so be sure to taste and re-season before serving. I find that mashed potatoes freeze well, so you could always double or triple up on this recipe and portion them out into individual servings for a quick side-to-go on those busy nights.

If you wanted to break down a whole pineapple for tonight's sweet and savory Pineapple-Stuffed Jerk Chicken, be my guest, but we took advantage of a sale at the market and already had a can of pineapple chunks in juice in the pantry aching to get used.

Thyme, allspice, cayenne pepper and a bit of cayenne are the spices used to create a pared-down version of Jamaican jerk seasoning to coat chicken breasts. Before you get your hands all full of chicken, a combination of the pineapple chunks, tangy lime juice, granulated sugar and a couple scallions are tossed together, forming the filling. This makes a fairly generous amount, so rather than butterfly the chicken breasts to stuff them, a small slit is made that will give you just enough access to wiggle the knife inside, creating a pocket, to pack in the pineapple mixture.

Once all the chicken is stuffed, they are massaged with oil, seasoned with the jerk spices and broiled on a baking sheet lined with foil, leaving you with easy clean up! If you don't trust your oven or just want ensure it is completely cooked, you can always double check to make sure the chicken is done by sticking an instant-read thermometer into the center of the stuffing to see if it has come up to temperature. We thought the spice mixture was good on the chicken, but I have a feeling that it could have been a bit more intense. We loved the stuffing though - clean, bright and sweet enough to stand up to the heat in the spice rub. While we did quite enjoy the potatoes, next time I make this, I think I would prefer to serve it over a bed of coconut rice to round out a tropical-themed meal.

Wednesday, June 11, 2008

Blueberries and cheesecake...

Since Jeff was working from home today, we had to push back the weekly treat day we do at his office until tomorrow. This week I chose a treat that looked a little different that what we have been doing lately and would be full of flavor. How does this Coconut-Blueberry Cheesecake Bars with a Browned Butter Graham Crust sound?

The name is probably a bit much, but I didn't want to overlook the decadent crust for these bars. You could always simply heat the butter until it melts, but taking the extra few minutes to let the milk solids darken and the liquid go from very light creamy color to a rich golden brown culls out a sensational nutty essence. For texture and depth, that liquid gold is poured into a mixture of crushed graham crackers (we used cinnamon), flour, sweet flakes of coconut, ground pecans and just a little granulated sugar for crispness.

For extra insurance against a soggy crust, it is pre-baked to firm up for a few minutes. While it is in the oven, the filling is a basic mixture of smooth cream cheese, granulated sugar, eggs, a small shot of brandy and a sprinkling of vanilla. You'll want to beat the cream cheese and sugar well so it is nice and smooth, but once you start adding the eggs, try to keep the mixing down to a minimum. The creamy filling is poured onto the hot graham crust and the top is deluged with plump orbs of juicy blueberries. Once baked, you'll want to let these bars cool to room temperature and slip them into the refrigerator to chill down and firm up before trying to cut them into squares. This allows the flavors to meld and you will achieve cleaner cuts. The fresh blueberries are of course the star as they burst with sweetness, but the involved crust is not far behind with its complex nutty flavor. I thought about adding a bit of lemon zest, since I love the blueberry and lemon combo, but with that strong crust, I don't think the creamy filling needed it at all. Now we'll just have to see if Jeff takes them in the morning or "accidentally" leaves them behind so he can eat a few more pieces!

Anticipating the "quality control" of the bars, I wanted to keep dinner on the lighter side and prepared this Greek Lamb and Quinoa Pilaf. The original recipe did call for using a long grain white rice, but we thought we could put our own spin on it with quinoa. Well, to be honest, that's my speak for saying I misjudged the amount and realized a little too late that we didn't have quite enough rice already on hand... oops!

Chopped onions, carrots, minced fresh garlic and lean ground lamb are cooked off in a bit of oil to crumble the meat and soften the veggies. For that "hmm, what is that spice I can't pick out but love what it adds" line of thought, we added a sprinkling of our favorite Vietnamese cinnamon when we tossed the cup of well-rinsed quinoa into the pot. I used vegetable broth for the cooking liquid as I already had some in the ice box, but you could also use a mild chicken broth as well. The time varies a little, but it should take about 15 to 20 minutes to cook the quinoa - you are looking for most of the liquid to be absorbed and the seeds to explode, releasing the germ that resembles tiny curls.

Chopped tomatoes (salmonella free, thank you!), parsley, fresh mint and a few tablespoons of bright lemon juice are stirred into the cooked quinoa mixture and left to mingle, off-heat, to let those flavors permeate the dish. While I'm sure it would have been good with rice, we enjoyed the texture of the quinoa in this dish, but we did note it was kind of hard to see the meat once it was plated. I think the only thing we would do differently would be to add a little more of the fresh herbs into the mix and maybe a few scallions to bump up the flavor. I should say that it is rare that we cook with lamb and we've only used it ground... however, we are determined to branch out soon and try other cuts as we find we like the cleaner flavor of the meat. If lamb is not your thing, you could always substitute ground sirloin, if so desired.


Tuesday, June 10, 2008

Mocha cookies...

We're having to move around the weekly Wednesday Treat Day to Thursday this week, so as long as plans stay on course, I should be posting about the treat tomorrow. I do, however, have something sweet to share that I made a little while ago.

Chocolate chips are a staple around this house, but there are a couple other chips that I always have in the pantry - Cinnamon and Cappuccino! We've used them in everything from fudge to muffins and apple bars. This time, we tossed a couple large handfuls of both into the dough for these Mocha Cookies.

Darkening the dough and adding a chocolate flavor is the addition of unsweetened cocoa powder - I used natural cocoa for these to add a slightly more bitter note. While the dough was slightly sticky, I didn't find that I needed to refrigerate it at all to control spreading - they were in the middle of the road between thick and thin. Using a combination of white granulated sugar and moist brown sugar imbued the cookies with a chewy texture that still had a bit of crispness to it. For the full cappuccino experience (in a sense anyway), a whole tablespoon worth of espresso powder is added while you cream together the butter and sugar - if you use instant coffee powder, you might want to up the amount a bit.

With chocolate cookies it can be harder to tell when they are done - you'll want to bake these just long enough to set the center. This means that the center should still be moist and will probably not spring back when you touch it, but the cookies shouldn't collapse or have raw dough in the center either. I'm one who likes to nibble around the edges of a cookie and then chomp down on the center and when I got to the middle, this decadent cookie had a charming, almost alluring, fudgy quality to it. Not quite as squidgy as you might expect in a brownie, but reminiscent of such. I got around 40 cookies using a tablespoon cookie scoop, but this recipe would halve easily if you don't need as many tempting you to sneak another bite. As if they were not already delicious enough, I had to be a little naughty and soup these up with a scoop of espresso ice cream to make an outrageous cookie sandwich.


Monday, June 09, 2008

Another round of red rice...

Remember when we tried that unusual (to us at least!) Wehani rice a few months ago for the first time?

Well, I finally got another chance to try out that red rice tonight in this Szechuan Chicken and Red Rice Salad with Sesame Dressing dish.

This time, we cooked the rice for slightly less than the last time we used it - I'm not sure if we played around differently with the simmer temperature or what, but the grains were pleasantly chewy, yet still tender. If you can't locate Wehani rice specifically, you could use any red rice - just note that you may need to play around with the broth (or water, if desired) to rice ratio.

As the rice was cooling, we cooked (use whichever method is best for you - we simply poached) and shredded a couple chicken breasts before we started on the tongue-tingling dressing. With a myriad of complimenting flavors, creamy tahini, salty soy sauce, rice vinegar, hot sesame oil, toasted sesame oil, granulated sugar to balance, minced fresh ginger, a couple garlic cloves and crushed Szechuan peppercorns for that lingering tingle are whisked together, creating the dressing. A couple tablespoons worth of this mixture are tossed with the shredded chicken before being drizzled over the colored rice.

To serve, a bed of the rice is created on each serving dish, then topped with crunchy bean sprouts, the moistened shredded chicken, scallions and a sprinkling of peanuts. I did have to veer from the recipe at this point - I apparently left an ingredient off the shopping list yesterday and had to forgo the cucumber the recipe called for. While I didn't feel like I was missing a component once I tried a bite, the crisp slices would be a nice cooling contrast to the pungent dressing. A couple notes on the dressing - if you don't already happen to have hot sesame oil, you could replace it with additional toasted sesame oil and maybe add a squirt or two of Sriracha for a little kick.

The tahini is a sesame seed paste that we typically have in the refrigerator, however you could use a creamy peanut butter since you are using peanuts at the end. We both agree, though, that the tahini brought a more complex nature which made the dressing that much more interesting.


Sunday, June 08, 2008

Flank steak stir-fry with a healthy dose of veggies and basmati rice...

10 new recipes was our total for this past week - our picks (though very hard to chose this time!) were those elegant Lemon-Pistachio White Chocolate Buttercream Cookies, the Beef and Bulgur Soup with Chickpeas and the Black Forest Cherry Cheesecake we talked about yesterday.

Today was a pretty hectic day between shopping at the market, getting the lawn under control (lots of rain = grass on steroids!) and trying to fit in at least a few minutes to relax on a weekend evening. Dinner needed to be quick and stir-fries usually fit the bill, so I turned to this Flank Steak with Snap-Pea and Asparagus Stir-Fry for our meal tonight.

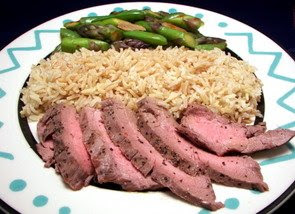
As the brown basmati rice gingerly took its time getting done, we simply seasoned a hunk of flank steak with salt and fresh ground black pepper, threw it into a hot skillet and briefly cooked it until the slab was still a little soft in the middle, just about medium-rare. While it was resting, sugar snap peas (see, I told you that the crisp green veggie has grown on me!), fresh asparagus, a few cloves of thinly sliced garlic and a small dose of crushed red pepper are added to the same skillet we cooked the steak in. For a bit of moisture to help cook the vegetables, just a quarter cup of broth is also added. Once they soften slightly and are still crisp-tender, a couple splashes each of salty soy sauce and tangy rice vinegar are stirred into the skillet-full of veggies. You could toss it all together if you wanted, but after we thinly sliced the tender steak (across the grain please!), we arranged each component on the plate and drizzled everything with the flavorful pan juices.

We both liked this, but felt it could have used maybe some sesame oil, sesame seeds or just a little nudge to give it more depth. Jeff did note that it didn't really seem very stir-fryish while I was preparing it... but we'll just chalk that up to semantics I guess. Next time, I would think about starting out by slicing the steak and quickly cooking the strips in sesame oil rather than doing it whole.


Saturday, June 07, 2008

Cherry week comes to and end with a Black Forest Cherry Cheesecake...

Sadly, we're wrapping up our week of cherry recipes today... but that doesn't mean those sweet little rubies won't be seen here again!

In the past week we crammed in that Dark Cherry Bundt Cake, Grilled Tilapia with Cherry Salsa, Chicken Salad with Cherries and Goat-Cheese Dressing, Ricotta Pancakes with Brown Sugar-Cherry Sauce, Cherry-Vanilla Ricotta Muffins and we're rounding it out with this Black Forest Cherry Cheesecake I made a few days ago.

Fair warning - this cheesecake has quite a few steps to it and if you would like to make this, I would start a day or two ahead of when you plan to serve it. A thick cherry sauce is the first order of business for the cheesecake - this dark red sauce is a simple mixture of pureed fresh cherries, sugar to sweeten, lemon juice and a few shakes of cornstarch. It is briefly boiled to activate the cornstarch, then placed in the refrigerator to chill down and continue to thicken.

Up next? A chocolate graham cracker crust - this recipe uses a lighter twist to make the crumbs sticky and hold together, but if you're not concerned about that, remove the egg white and use enough melted butter to moisten (you'll probably need 4 to 5 more tablespoons worth). As with most, this dark crust is baked slightly so it retains a crispness to stand up to the moisture in the cheesecake. If you have a Trader Joe's close by, their chocolate cat cookies (a favorite snack around here... they also have a ginger version that is nice too and would work well with, say, a pumpkin cheesecake) would make for a nice stand-in for the graham crackers.

The mocha-colored filling is a luscious combination of softened cream cheese, sour cream and viscous sweetened condensed milk. You could certainly keep with the light theme and use reduced-fat ingredients, but I'd stay away from fat-free as they can alter the texture a bit too much (at least for us). The mocha color is achieved by a shower of Dutch-process cocoa powder (feel free to switch it with natural cocoa) to infuse a mild chocolate flavor. To add another chocolate layer, chopped bittersweet chocolate is the last addition to the smooth filling - chop it to the size of mini chunks/chips so they don't interfere too much with the creaminess of the filling. Normally I'm a fan of water baths when baking cheesecakes, but this one is baked at a gentle 300 degrees and I skipped it this time. As you can see, nary a crack can be found on the sleek surface on top - though check out that lone chocolate chunk that made an appearance!

If your cheesecake does happen to crack (typically a sign of being over-baked), it's no matter as that cherry sauce is sloshed over the top. To add a fancy flare, halved fresh cherries are arranged on top of the thick sauce. All ready to take your fork in for a big bite? Well, hold it! I warned you of multiple steps! The assembled piece needs to chill out in the refrigerator overnight so the cheesecake has a chance to completely set. Usually when I put cheesecakes in the ice box, I tend to get some condensation on top - to off-set that, I like to create a barrier by putting a large piece of paper towel on the rim of the springform pan, then cover the cheesecake with plastic wrap and secure everything with a large rubber band so the paper towel won't touch the top. Any water drips are absorbed by the paper tower and won't mar your hard work! While this cheesecake wasn't as tall as I'm used to, it didn't disappoint at all - a little dense (in a good way), moist and very creamy with a pleasant contrast of chocolate to cherry... it brings a silly little grin to my face just thinking about taking a bite.

One note - while those neatly arranged cherries on top brings that showy finish, it also makes it a pain to slice neatly. However, rather than try to slice through them, just push them off to one side or another to make it work.

Oh, and by the way, I did stash a few of the cherries into the freezer so we could make that Fresh Cherry Smoothie again to chill us down during those upcoming warm summer days!


Friday, June 06, 2008

Ugly soups can be very tasty...

I'm not sure if our pantry just happens to be well stocked or luck was on our side tonight, but I didn't even need to run to the market to throw together this Beef and Bulgur Soup with Chickpeas we had for dinner tonight.

As soon as the spices hit the hot oil and the aromatic flood of fragrance lifted into the kitchen, Jeff and I couldn't wait to let the first spoonful of this soup roll around our taste buds. The combination of smoky cumin seeds, a couple cloves of garlic, fresh ginger, turmeric, spicy cayenne and an intense spice blend, garam masala, was exotic and pungent - so much so that it was not a good idea to take a big whiff once they began to toast (oops!). Garam masala is a blend of spices including black cardamom, cinnamon, cloves, black peppercorns and a few others. Toasting will not take long, so be sure to keep them movin' and groovin' in the pot so they don't burn.

In a couple stages, lean beef stew meat and chopped onions are browned so the onions can soften and the beef has a chance to caramelize. Once that step has finished, rich beef broth and stewed tomatoes are stirred into the mix. You'll need to chop the tomatoes as they are pretty chunky - you can either snip them into pieces while they are in the can with a pair of kitchen shears or put them into the pot (wait on the broth) and use a sturdy wooden spoon to break them apart. As soon as the broth comes to a boil, the pot is covered and the mixture gently simmers so the flavors can mingle together. Chickpeas (garbanzo beans), bulgur and thinly sliced carrots are stirred into the bubbling soup and it continues to cook until the bulgur swells up, drinking in all those exciting flavors.

This soup would probably be more appropriate served on a chilly winter day, but I don't think that will stop me from making this any time of the year. While it is not the most attractive soup in the world, it was completely filling, savory and healthy. I'd also love to try this at some point using barley instead of bulgur! The one downside for a weeknight dish was that it was a little time consuming between the prep and cook time - however, most of it is downtime where the soup only requires an occasional stir.


Thursday, June 05, 2008

Workin' those fresh cherries into vanilla muffins...

I was a little worried that we would be cherried out by now, but we're not showing any signs yet... still love 'em! I have already made the remaining two recipes that used them, since they probably would have been a little on the icky side by now, and we are finishing up the last two Cherry-Vanilla Ricotta Muffins tonight that I made earlier this week.

With the ricotta in these golden treats, they are not exactly the lightest muffin on the block (unlike those pancakes from the other night, these don't have the benefit of beaten egg whites to add that airy quality). While they are a little dense, they are not heavy and do still have a little lift to them. I liked that these muffins were not too sweet with just a half cup of sugar in them, but you may want to bump that measurement up to two-thirds cup if you like muffins on the sweeter side.

A full cup of buttermilk keeps these muffins extremely moist and the delightful tang worked well along side the zesty punch from the added lemon. As usual, we used a combination of whole-wheat pastry and all-purpose flours, but if you don't have the former handy, completely all-purpose would be fine. We used fresh cherries, but I don't see why you couldn't use frozen - if you do use frozen, I would wait until the last possible minute to add them and quickly fold them in so they don't stain the pale batter too much. The one thing I would do differently to these is scatter the tops of the unbaked muffins with a crunchy sugar like turbindo for a little contrast in texture.

With their crisp fresh flavor, sugar snap peas have really grown on me lately and I'm always keeping my eyes out for interesting recipes to use them. While there isn't anything too unusual about this Ham Risotto with Sugar Snap Peas recipe I made for tonight's dinner, their vibrant nature helped to lighten up a heavier starchy dish.

We have made quite a few risottos over the years now - besides *usually* tasting well, they are a snap to prepare and the mindless work of stirring the rice is an oddly relaxing process, at least for me. The only real extra work for this risotto is blanching the sliced snap peas - besides keeping the peas bright green, it takes the edge off their crunch, but allows them to retain some crispness. Milder leeks and a couple cloves of garlic flavor the base of this dish before the rice is added to toast slightly.

As with most recipes, this one includes a few splashes of white wine for the needed acidity and depth. Once the broth has been added (you may or may not need all of the broth called for) and the rice becomes tender and plump, a scant cup of diced ham is tossed in. The total time for the rice is probably around 15 to 20 minutes - while the grains should be tender, they should also have a bite to them in the center. Right before serving, a generous shower of sharp Parmesan cheese is stirred in, along with the peas and fresh ground black pepper to taste. If you spot some gorgeous asparagus, I think that would be a very appropriate substitution if you don't like the sugar snaps or the peas don't look too well at the market. As an afterthought, a sprinkling of snipped chives on top would be a nice spring-y addition to finish this dish off.


Wednesday, June 04, 2008

Enhancing chicken and mashed taters...

Chicken and potatoes... a good, comforting duo that is welcome any time of the year. We took that idea for dinner tonight and added some interesting twists to amp up the flavor of each dish.

I'm not sure I would have thought about adding green soybeans to potatoes, but this Edamame Mashed Potatoes recipe I made as the side this evening changed my mind! We quite often enjoy these earthy beans just on their own, cooked for just a few minutes and seasoned generously with salt and fresh ground black pepper. You'll want to let these bubble away a little longer than you normally might, as you want them to be fairly soft. To help break them down, they are placed in a food processor to quickly chop them up - just pulse them few times and set them aside.


While we were working with the edamame, we began cooking the chunky pieces of starchy russet potatoes - to add a little more oomph to them, we cooked them in chicken broth and just enough extra water to cover. Before you drain the potatoes, be sure to save about 1/2 cup of the hot liquid - that liquid is then poured into the food processor to warm the soybeans back up and give them some extra moisture to assist in pureeing them. The edamame won't be ultra smooth (though I admit I didn't let them go for very long, so they may continue to smooth out if you leave the processor on long enough), but it was fine enough for us. The potatoes and edamame are then mashed together with warmed milk and olive oil to add to some richness. We are peel people, so I don't usually remove them when we mash potatoes, but feel free to take that extra step if you desire. While I'm not crazy about the pea-green color, the flavor they added to plain 'ol mashed taters more than made up for it!

I had a prosciutto habit a few years ago where I was almost having a slice or two daily(!), however that didn't last too long as it is not exactly the cheapest snack in the world. So, I jump at the chance for a reason to buy some (and maybe a little extra for me) to use in a recipe. To enhance the chicken portion of our meal tonight, we bump up the flavor of chicken breasts by making this Chicken Saltimbocca dish.

Because you are rolling the chicken up, you'll need to flatten the pieces to a thin layer before you can move on with this recipe. For less clean up, put the chicken between a couple pieces of parchment, wax paper or even in a zip-loc type bag. If using the latter, add a few drops of water when you put the chicken breast in as it will add some lubrication to help keep the thin pieces from tearing.

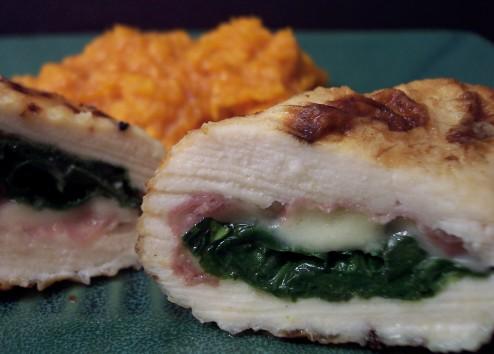
The flattened chicken is topped with salty pieces of prosciutto, thawed spinach (lightly seasoned and tossed with a touch of oil) and finished with a shower in sharp Parmesan cheese. They are then rolled up, jellyroll style, to hide those savory ingredients. I was able to leave a clean little border on the chicken, so the chicken stuck to itself and created a decent seal - if this isn't the case, you should secure the seam with a toothpick so they stay closed. The stuffed chicken is then seared until each side takes on a lovely golden hue - they won't be done at this point, so to help cook them through and keep them very moist, a bit of chicken broth and fresh lemon juice is poured in. After they are finished, the cooked pieces of tender chicken are taken out and that extremely flavorful liquid left behind is concentrated down to form a light sauce that will be served over the chicken. Relatively light, this chicken dish may have a bit of labor to it, but it was really pretty easy to assemble and worth the mess (you could even do most of the work ahead of time and keep the pieces chilled in the refrigerator)!


Tuesday, June 03, 2008

Dainty Lemon-Pistachio cookies and another cherry dish...

As you know, Tuesday's the day we bake for the Weekly Wednesday Treat Day! Since we just did a treat with cherries for his co-workers last Friday, we went a different route and decided to try out these Lemon-Pistachio White Chocolate Buttercream Cookies.

The dough for these bright sandwich cookies is buttery, rich and shortbread-like with tiny shreds of fresh lemon zest studded throughout. Because you want to keep the cookies tender, I like to roll the dough between two sheets of parchment paper - this way you don't need to add any additional flour and it is a little cleaner. The dough for these is a little on the sticky side, so be sure it stays fairly cold while you work with it - if it gets too soft, just stop, cover it and place it into the refrigerator or the freezer until it firms up enough. Don't let us sway you with what shape to cut these in, use whatever simple cookie cutter you want - we chose a scalloped rectangle cutter just because it looked fun. Round, oval or square would be just fine - if I had more time, I would have used a combination of shapes just to change them up.

To gussy these up, a white chocolate buttercream is prepared to spread in between the crisp cookies. To continue the lemon theme (and because white chocolate and lemon work very well together), a bit more zest and fresh juice is added to the creamy filling. The pistachios come in once the cookies have finally been assembled. To help the nuts stick and add a decorative flare, the top of the cookies are given a squiggle of white chocolate, followed by a few pieces of the chopped pistachio. I could have eaten the single cookies by themselves and been satisfied, but that delectable generous layer of buttercream really set them off with a bang. Very lemon-y, these cookie sandwiches were a pleasure to work with and I can easily see these at any function, be it a business meeting, a casual get together or just because!

Since the treat day goodies didn't have any cherries, we carried them into a breakfast-for-dinner night this evening and made these Ricotta Pancakes with Brown Sugar-Cherry Sauce.

Before preparing the fluffy pancakes, we were busy making the sweet ruby sauce to pour on top. Chunky halved cherries and a bit of water are mixed with brown sugar and a dab of butter for the base of the sauce. To thicken up the juices, a slurry of cornstarch and water is added - it will quickly thicken once it comes to a boil, so if the sauce gets away from you and becomes too thick, you can add dribbles of water to thin it back down. I loved how brown sugar added a wonderful syrup-y depth that I thought would have been missed if you used a granulated sugar instead. Once removed from the heat, a shot of fresh lemon juice is added for an acidic note.

Because ricotta can be quite heavy, the batter for the pancakes needed a little help so they didn't feel like hockey pucks. So, instead of using whole eggs, the whites are separated away and beaten with a dash of cream of tartar until they are stiff, but not dry. Folded into the mixture in a few additions, the whites gave wings to the batter and lightened it right up. Because the batter is quite airy at this point, you'll need to gently spread the mound of batter once dropped onto your griddle - you can either use an off-set spatula or even the bottom of the measuring cup to move the process along.

Jeff has a "thing" about ricotta cheese still... so I got the old eye roll as soon as he saw me pull out the container tonight. I don't know why this is as he has eaten ricotta so many times now and always ends up enjoying it - I wonder what's up with that? Fairly mild already, the ricotta brought a nice background and made these a little more filling. If I would have thought of it, a little vanilla or maybe some vanilla sugar would have been a nice way to infuse a little more flavor into the cakes. In the end though, it probably doesn't matter too much as they worked as a nice vehicle to soak up the delicious cherry sauce.


Monday, June 02, 2008

Speedy salad with chicken, fresh cherries and a tangy goat cheese dressing...

More cherries please! Well, that is what Jeff has been saying the past few days anyway. I think I need to put them in a container that has a lock and key to keep him from snacking on them - at least until I get all these cherry recipes completed!

Of course I'll have a couple baked treats coming up this week, but today's cherry recipe used them in this Chicken Salad with Cherries and Goat-Cheese Dressing dish we had for dinner.

Quite creamy, the dressing is a mixture of crumbled fresh goat cheese, sour cream, mild chives and a couple splashes of white-wine vinegar. You'll need to add at least a tablespoon or two of water to thin it out enough so it will coat well - if you like your dressing on the thin side, you'll probably have to add a bit more. Honestly, it was hard to keep my little spoon out of it while I was "checking" for seasonings... very tangy and luscious.

We did have one issue, but it had nothing to do with the recipe. The chicken for this dish was suppose to be seared, but we were having some issues with our burners working correctly and wasn't able to prepare it that way. I would have preferred that golden finish on the thin cuts of chicken, but it was fine in the end. We really enjoyed the textures in this salad - torn tender leaves from the Boston lettuce, beautiful juicy cherries (simply halve them so they have firm presence in the salad) and crunchy pieces of toasted chopped walnuts worked in harmony together.

Now, this snazzy salad could be served a couple of ways - you could arrange everything in sections on the plate for a more dramatic presentation and allow you and your guests to simply toss the ingredients together as you eat. This is also particularly handy if you want to save a portion for leftovers! However, you could also just toss everything together in a big ol' bowl if you want to dig in right away.

Sunday, June 01, 2008

Cherries go savory too!

Well, after a very rough week, we are slowly getting accustomed to the "new" normalcy around the house. Thank you again for your support - as we expected, Max has been very reserved and quiet without his pal to pounce on. He is starting to show signs of his former happy self, but it is hard to see him go through his own confusion on the situation.

We had just 7 new recipes this week - the tops this round was the Dark Cherry Bundt Cake, Hamburger and Grape-Tomato Pizza and that light Strawberry Mousse. As I mentioned, we now have a bounty of fresh cherries to plow through - I have quite a few recipes planned, as long as we can keep our grubby paws off of them long enough!

More sweet recipes will of course be showing up over the next few days, but tonight we'll marry those juicy cherries with this savory dish, Grilled Tilapia with Cherry Salsa, for dinner. Before you start on the salsa, you'll want to fire up your grill so it has a chance to come up to temperature (or in our case, that ever-so-handy Griddler). To a couple cups of coarsely chopped cherries, a combination of finely chopped mild red onion, fresh cilantro, a seeded jalapeño and a few squirts of fresh lime are tossed together for a snappy salsa that almost bites back (you could leave the seeds in the jalapeño though if you really want to sweat!)

The tilapia fillets are lightly drizzled with olive oil and then dusted with a very simple and clean spice mixture of ground coriander, salt and fresh ground black pepper. If you cook them on a grill, be sure to lightly oil the grates before you place the fish on to quell any sticking issues. It should take about 2 to 3 minutes per side on the grill, however if you use something like the griddler as we did, it will be about half that time. Sweet, tangy and tart, the chunky salsa was a brilliant star in this dish, but my one concern was that it kind of took over any flavor that a mild fish like tilapia has and the fillets were kind of there "just because". However, if you have any guests that are just starting to test the waters on fish or are turned off by a stronger flavor, then this would be a good thing!


Saturday, May 31, 2008

Get those cherry pitters ready!

So, how did we make a dent in the bounty of fresh cherries we picked up the other day? We began by making this Dark Cherry Bundt Cake that Jeff brought into the office to share yesterday.

Swirled inside of this soft cake is a homemade cherry "filling" that is almost as thick as you might expect with a jam. Just a little granulated sugar to sweeten and cornstarch to thicken is added to a healthy three cups of the dark sweet fruit. A little kirch and lemon zest is stirred in to deepen the cake's flavor - if you don't use alcohol or don't care to buy a nip for a recipe, you can go ahead and use fresh orange juice. Since cherries and almond pair exquisitely well, the mixture is given a splash of almond extract once removed from the heat.

Soft in texture, the cake achieves this by mixing a combination of light cake flour and whole-wheat pastry flour. If you don't have the more nutritious pastry flour, you can get away with using all-purpose. To lend a buttery flavor, yet not require the use of a full stick, a few tablespoons are combined with a healthier canola oil. While the cake is still fairly low in the fat department, don't think that it will be dry by any means - just over a cup of vanilla yogurt added will keep the cake moist while adding an alluring tang.

To bulk up the vanilla flavor in the yogurt, a good dose of vanilla extract is added to the cake batter. And lest we forget about that splash of almond extract in the filling, we also added a bit to the batter to tie the two together. When you swirl the batters together, the jam will inevitably ooze out a bit, so be sure to prepare your baking pan well. For bundt cakes especially, I always use a baking spray that has flour added (like Baker's Joy or Pam with Flour) and have yet to have a cake stick on me. I didn't think that this cake needed any fancy drizzles of frosting or glazes, but I did dust the top with confectioners' sugar right before we sent it into the office which gave the cake a more finished look.


Friday, May 30, 2008

Finally, the season for this fruit has arrived!

One thing Jeff looks especially forward to each year around this time is when the markets are flooded with a certain fruit. Sweet, with a rich red color, these little guys finally arrived up here with a killer price... so I took full advantage and bought a bunch. Expect several recipes with this fresh fruit over the next few days - we'll start it off tomorrow with an end of the week Treat Day treat that Jeff brought in today!

Tonight's dinner, Bulgur with Roasted Chickpeas, Red Onion and Lemon, could easily swing either way as a side or main dish, depending on how hungry you may be. We used a coarser bulgur wheat for this dish, but I think it would be fun to try it with millet or even quinoa. As the bulgur was busy hanging out in some hot vegetable broth, we started working on the next portion of this recipe.

Into a skillet goes a lengthy combination of rinsed chickpeas, thinly sliced red onion, olive oil, fresh lemon juice, a couple bay leaves, cumin seeds, a dash of turmeric, smoked paprika and just a bit of cayenne for heat. To give the protein-rich chickpeas (also called garbanzo beans) a head start, they are first placed on the stove until they begin to sing and dance around as the heat warms up the oil. The skillet is then transferred into a heated oven to infuse the chickpeas with the tangy, yet smoky flavors from the tart juice and spices added. While I wouldn't say that the chickpeas were crispy, their trip in the oven seemed to transform their texture into a more firm and chewy bite that was very appealing. With quite a zesty flavor combination in the chickpea mixture, once it was combined with the mild chewy grain, the assembled dish balanced itself out well. While it is a meatless dish, I think you could easily toss in some cooked well-seasoned protein of your choice to bump up the filling factor of this recipe. It is pretty dull in the picture below as I didn't have any parsley in the refrigerator, but a few leaves chopped and scattered on top would help freshen up its appearance!


Thursday, May 29, 2008

Lightening up a mousse in the calorie department...

We have quite a few cookbooks, but I don't have nearly as many as I would like. I enjoy heading over to the library and browsing through their selection to see if they have any that I've been wanting. I'll either check them out or sit down with a basket full of them and start browsing to see if it either grabs my attention or I'm able to mark at least a few recipes to make it worth it. I noticed a recipe for Strawberry Mousse in one of those books I was looking through and after I made it today, I've already ordered the book from Amazon!

A mess of strawberries are pureed and poured into a saucepan to gently simmer until they reduce and intensify their glorious sweet flavor. To take their flavor up a level, fresh lemon juice and a dash of Kirsch (cherry brandy) are stirred into the slightly thick ruby mixture. Now, because this mousse is from a "lighter" book on dessert, there are a couple tricks used to get that familiar luscious, creamy texture, without the guilt!

To help add some support to the bright berry puree, yet not so much that you feel like you are eating Jell-O, a little melted gelatin is added to the mixture. To achieve a similar (but not quite the same) richness you get with cream, ricotta cheese is also added and the whole shebang goes into a food processor to smooth out and completely combine. A heated meringue is then prepared and gently folded in to give the mousse its light and very airy finished texture. While the egg whites are heated, they are not completely cooked - if you worry about this, you could certainly use pasteurized eggs to remove the concern. Transformed from a ruby red to a pale pink in color when combined, roughly half of the amount is divided between a few dessert glasses - for a fun surprise, sliced fresh strawberries are then placed on top and then covered up by the remaining berry mousse.

The assembled desserts are then covered and chilled until you are ready for them, making for a perfect make-ahead treat. Right before serving, additional sliced fresh strawberries are placed on top. After being chilled, the mousse ever-so-slightly firms up from the gelatin, however it remains very creamy and spoons out of the glass like a dream. Summer better not be too far away as I can't wait to go out and pick my own berries to make this dessert even more special.

Now, before we devoured that tasty mousse above, we were busy enjoying the Farfalle with Turkey Sausage, Leeks, and Broccoli Rabe I made for dinner tonight. You'll need about 1 bunch of broccoli rabe for this recipe - if you've never used or spotted this bitter vegetable before, you may also find it labeled as rapini in your market.

Once you have cleaned and chopped the greens, they are plunged into boiling water for a minute or two to allow some of the bitterness to leach out of the them. As soon as they start to wilt, they are shocked with cold water to stop the cooking process. You have a couple options to cook the bow ties for this dish - I went ahead and just dropped the pasta into the same liquid as we cooked the broccoli rabe. However, if you are nervous about any of that slight bitterness infusing into your pasta, you could dirty another pot to do this - neither of us found that it changed the flavor much though.

To softened leeks, a bit of crushed red pepper and a couple thinly sliced cloves of garlic are added. As soon as the garlic took on a light golden hue, a pound of lean hot Italian turkey sausage is added and crumbled as it cooked. To help ensure it doesn't dry out at all, a bit of the cooking liquid from the pasta/veggie liquid is added to the sausage mixture after it had a chance to brown. The cooled broccoli rabe, cooked pasta and just a touch of fresh lemon zest are stirred into the pan and allowed to warm back up. Ricotta cheese and a couple ounces of fresh grated Parmigiano-Reggiano are added to the full skillet for a creamy and sharp finish. While I'm finally starting to love the pungency of broccoli rabe, the slight bitter flavor remaining was balanced by the mildly sweet leeks and hearty sausage.