Friday, February 29, 2008

The boys got their way with more pup treats!

Time got away from me this week - the poor pups had to suffer a few days without any homemade treats... tragic I know, right?

(Spike was not in the mood for camera time today.. boo!)

They survived, but after a few days of whining (can we say spoiled?), I rolled up my sleeves and threw together a special batch of treats for them.

For an array of texture in these Vanilla-Peanut Butter Treats, we used a few different dry ingredients - whole wheat flour, all-purpose flour, cornmeal, rolled oats and rye flour. To moisten that combination, a wet mixture is whisked together consisting of water, canola oil, a few tablespoons of creamy peanut butter and the surprise ingredient, aromatic vanilla! If this mixture is too wet, don't be afraid to add additional whole wheat flour- the dough will be a little soft, but shouldn't be sticky. You will also want to be generous with the flour as you roll and cut out the dough. This makes several dozen treats, depending on the size of your cutter, so if you can't fit them all on a couple baking sheets, cover and set the filled sheets aside while the others bake. While I was cleaning up, I had set a wire rack filled with cookies on a smaller table in the kitchen to cool and as soon as I turned my back, I heard little nails slowly prancing on the hardwood floors heading straight for them. Luckily, I caught Max just in time before he decided to gorge himself on more than his fair share!

Once I had gotten those out of the way, I also needed to get our favorite Hamburger Buns together so we could serve tonight's dinner, Glazed Bacon-and-Cheese-Filled Burgers, on them.

"Glazed" is used loosely for these - there is not a wet mixture spread on them per se, but instead a generous amount of a spices are rubbed on the formed burgers. Dark brown sugar, paprika, garlic with smoky cumin and chipotle powder are combined to form said spice mixture. Because that mixture has a high sugar content, it melts and caramelizes as it heats up. The ground sirloin used for the burgers is first shaped into eight patties, with four of them having a mound of sharp white cheddar and crispy bacon crumbles placed on them. The remaining four patties are added on top and the two are melded together - be sure to pinch the edges well so all of the cheese stays inside. I loved how the salty crisp bacon spread its smoky flavor throughout the meat as the burgers cooked. With three tablespoons of dark brown sugar in the rub, you may think it would add an unpleasant sweetness - however, combined with the savory spices, the combination just adds a barbecue depth without the mess.

Thursday, February 28, 2008

Hungry? Throw together this pork dish in a snap...

Some weeknights I have plenty of time to spend in the kitchen and don't need to worry how I will get dinner ready. However, there are certainly a number of nights that I'm thankful for my stack of recipes I have set aside that can get dinner on the table in a short amount of time.

I knew today was going to be one of those busy days that would run right into dinnertime, so I set aside a recipe for this Pork Paprikash dish that could be on the table in a little less than half an hour. The pork mixture will be served over tender egg noodles, so we needed to get the salted water boiling to cook them - if you cover the pot, it happens a bit faster!

While the noodles were busy, we halved the lean pork and then sliced it, crosswise, into 1" thick pieces. The meat is then seasoned with sweet paprika (which may also be labeled as Hungarian) along with salt and fresh ground black pepper. The reddish-coated strips are then added to a hot skillet dancing with a thin layer of canola oil. Once browned, yet not completely cooked through, the strips are removed and set aside. Onions are then added to cook - when they have softened, the caramelized pork pieces, along with another punch of paprika, a can of whole peeled tomatoes and a bit of water are stirred back in. As this mixture simmers, be sure to use a sturdy wooden spoon to break up those whole tomatoes a bit - you could also always just snip them with kitchen shears while they are still in their tin if you wanted them more chopped. The heavy skillet, brimming with sauce and melt-in-your-mouth pieces of pork, is removed from the heat and a big ol' scoop of sour cream is stirred in, adding a luscious texture and a slight tang. Served over a dune of buttered noodles, this enticing dish came together in a snap without filling the sink with a bunch of dishes.


Wednesday, February 27, 2008

Comforting take on meatloaf and potatoes....

When I think of comfort food dishes, one that immediately pops into my mind is meatloaf. While I love making big free-form loaves, its fun to prepare them in an unexpected way and make mini individual loaves.

What else goes well with meatloaf? Potatoes of course! Mashed is always tasty, but we also enjoy whole roasted... so, our dinner tonight was a recipe for Mini Honey-Mustard Meatloaves with Roasted Fingerling Potatoes.

To keep these from feeling like your eating a mis-shapened dense hamburger, an egg and crisp panko breadcrumbs is added to the ground sirloin to help lighten the texture. Ketchup is the classic topping that is usually slathered on top, but a sweet tang is added to these by cutting the smooth tomato with honey-mustard. Since there is a handful of cheese inside the meatloaves, a sprinkling of the same sharp white cheddar is placed on top before they go into the oven to bake.

To make efficient use of the oven, the potatoes are roasted at the same time as the meatloaves - just be sure to use the upper and lower thirds of the oven to give enough room for airflow. Keeping the flavor clean, the potatoes are simply coated in olive oil and seasoned with salt and fresh ground black pepper. The potatoes will probably take around 5 minutes more time than the meatloaves, but this is a good thing as it gives the the meat a chance to rest before serving. You don't have to use fingerling potatoes (they can be kind of pricey, but they are so good!) - you could just as well quarter or halve some new potatoes instead. Pretty effortless, filling and definitely comforting, you could quickly assemble the meat mixture beforehand and just pop both items in the oven for a speedy weeknight dinner.


Tuesday, February 26, 2008

Chocolate chip cookies, grown up...

What is a more classic treat than chocolate chip cookies? For the Weekly Wednesday Treat day, we thought it would be fun to bring some in, though these have a few intriguing additions to keep them anything but ordinary.

For these All Grown-Up Chewy Chocolate Chip Cookies, a rich all-butter cookie dough is made with several common ingredients including all-purpose flour, brown sugar and granulated. These cookies have "chewy" in their title - so what makes these cookies this way? The first special ingredient - Lyle's Golden Syrup. This is a unique caramel-tasting syrup (perfect to drizzle on pancakes by the way!) - you could substitute corn syrup to mimic the texture it gives, but you would be missing out on the captivating subtle flavor this thick mixture brings. With an unmistakable bouquet, a full tablespoon of vanilla into the dough accentuates the sweet notes, but doesn't make you feel like you're eating vanilla cookies.

These cookies have that "hmm... I can't pick out this flavor, but it is so good" quality to them - this comes from the addition of chocolate malted milk powder (I use Carnation). There is not enough for a malted flavor, but it just adds to the complex nature of these cookies. Espresso powder is another one of those ingredient that doesn't really add flavor, but its bitter quality is there to perk up the final addition to the dough. These wouldn't be chocolate chip cookies without the chips of course - a full pound of fat bittersweet chips are stirred in by hand before heaping tablespoons of the dough are placed on the baking sheets. Being an all-butter dough, I tested out about 4 cookies before baking them all - this way I could check for spreading and baking time. Happily, they spread out just enough without needing to be refrigerated, so I didn't need to wait around for it to chill down.

Bake these until the edges achieve a rich golden brown with the centers retaining a light blond color - a little underdone. These cookies are left on the baking sheet to cool for 10 minutes once removed from the oven - this will finish cooking them through and allow them to stay very bend-y and chewy. I wouldn't normally use a pound of chocolate for cookies (12 ounces or less is usually good), but I'll make an exception for these any time as the "grown-up" flavors in these can withstand the intensity. While not paper thin, yet not too thick either, I loved eating through the crispy ring on the perimeter giving free access to the chocolate-laden, quite chewy centers - my favorite combined texture in a cookie!

Foreseeing the sweet "quality-control" time after dinner, I thought we should keep our meal tonight on the light side. This dish, Apricot Chicken and Quinoa, defies the usual mess I make during dinner as it is all contained in one pot. The chicken is actually cooked nestled in the quinoa, but we first seasoned and seared it in a touch of olive oil to ensure a well developed flavor.

Once the onions, garlic and quinoa had been added, broth, slivered apricots, grainy mustard and fresh lemon zest are stirred in. The seared chicken breasts are then embedded into the quinoa to finish cooking it through - a few minutes before the dish is ready, chopped broccoli florets are tossed on top allowing them to steam until they were crisp-tender without the need to dirty another dish. Tangy mustard and the sweet apricots combined with the nutty quinoa made for a delicious lemon-scented bed to set off the moist chicken breasts. Fit for two, this well-rounded dish could easily be expanded to fill more stomachs if needed.


Monday, February 25, 2008

Peanut butter noodles...

We've been talking for the past couple of months about whether or not we should make any changes to the website - we pretty much like how it is right now, but are open to suggestions or ideas on what you might like to see or have changed. Neither of us have much experience in coding and whatnot, but we still try our best - so please feel free to let us know!

There was a bit of prep that needed to be done before we were able to finish making this Szechuan Spicy Noodles with Carrot-Cucumber Relish for dinner tonight. It's not that there is a lot of work involved - there are just a couple steps that require long downtimes. Cucumbers are fairly wet and light in flavor, so to extract some of the excess water and heighten their flavor, we shredded it and tossed the threads with salt. After an hour in the colander, you should have a good puddle underneath it. The rest of the relish is combined by tossing the cucumber with shredded carrots, seasoned rice vinegar, a couple teaspoons of sugar and toasted sesame oil. This now needs to chill out in the refrigerator for about another hour to let the ingredients mingle together.

Udon noodles, thick Japanese wheat noodles, are tossed into a pot of boiling salted water once you are ready to finish the dish. You should be able to easily find these in your regular market, but if you have trouble locating them, a decent substitute would be whole-wheat spaghetti. For a meaty addition, ground pork is sautéed with thinly sliced green onions, fresh ginger and a bit of garlic once the pork has lost is pinkness. The sauce, a smooth mixture of vegetable broth, natural peanut butter and sambal oelek (chile paste with garlic), is added to the cooked pork and bubbles until it thickens slightly. This pork ragout is tossed with the noodles and the dish is complete with a drift of the bright relish. The cooling relish tames the heat from the sambal to keep it in check so you can fully appreciate its flavor while the creamy dressing adds a nice mouth feel to the hearty noodles.


Sunday, February 24, 2008

Potato and Turkey Bacon Pie...

Sunday means the weekly recap of our adventures in the kitchen - we made 9 new recipes this round and our favorites had to be those Crunchy Sesame Cookies, the Pasta with Three Kinds of Garlic and those sinful Frosted Cinnamon Apple Bars.

Tonight's dinner was one out of necessity since we were trying to get odds and ends used up from the pantry and refrigerator. This Potato and Turkey Bacon Pie could be described as a cross between an egg-y crustless quiche and skillet frittata - so let's just call it a pie and be done with it! When I was sifting through the refrigerator before we went to the market today, I noticed we had a few strips of turkey bacon languishing in the meat drawer leftover from breakfasts this week and about a cup worth of ricotta from that Chicken and Orzo Frittata. We also happened to have a couple lonely potatoes in the pantry.

While we let those last strips of lean bacon crisp up in a skillet, we added some chunked russet potatoes and cold salted water to a saucepan, brought it to a boil and let the potatoes simmer until they were just tender. To create the frittata/quiche part, a few eggs and egg whites, along with the leftover ricotta, heaps of sharp white cheddar and a few seasonings are whipped together until combined. Once all this prep work had been completed, the crumbled bacon, firm, yet tender potatoes and chopped spinach are warmed up before the egg and ricotta mixture is poured in. Because this pie is quite thick, the bottom would probably burn before the mixture could completely set if it was cooked on the stove, so instead we slid the skillet into the oven to bake it.

When it is done, the center will be just firm to the touch and a knife place in the center should come out clean - be sure to let it rest at least 5 to 10 minutes before serving it. Pairing well with the crisp smoky bacon pieces, the delightful chunks of potatoes kept their shape well without turning mealy. While the ricotta aided in keeping this moist, it has a fairly delicate and mild flavor - the sharp bite from the white cheddar was a welcome addition to keep our taste buds standing at attention. Feel like going to the dark side? Use a flavored bacon (applewood or whatnot) and then use the drippings, instead of the olive oil, to push this to a new level.


Saturday, February 23, 2008

Crunchy Sesame Cookies...

We are decidedly lovers of peanut butter - we use it in savory dishes often, but baked good is where the money is. We've made quite a few cookies using it... I've even gone so far to sacrifice one of Jeff's coveted boxes of Cap'n Crunch Peanut Butter cereal for batch once! However, when I was looking for a cookie to bake for us to munch on this weekend, I wanted something with a similar profile, yet different.

In came these Crunchy Sesame Cookies to satisfy our sweet tooth. Lots of cookies use shortening or butter, but not these exquisite rounds - the fat requirement is fulfilled from the use of tahini (sesame-seed butter) and pungent toasted sesame oil. This duo of sesame brings an enticing nutty flavor with a hypnotizing rich aroma.

Aiding in their crisp texture is the addition of cornstarch and Lyle's Golden Syrup - if you don't have the latter, you could substitute with light corn syrup. The dough was soft, but not sticky at all - once we divided it out and rolled the pieces into balls, they are swirled in a bowl of granulated sugar. They do need a little head start, so be sure to flatten them slightly with your palm or the flat bottom of a glass before they go into the oven. You want to bake them until their surface on top cracks and the edges are turning golden. With a sparkle from the sugary coating, these cookies are fairly crisp and crunchy, but don't take that as hard and dry - the cup of brown sugar adds enough moisture so they have a nice snap to them. No, they don't taste exactly like peanut butter cookies, but we both agree that these would be a notable substitute for those who may be allergic to peanuts or just love sesame like us!

Friday, February 22, 2008

Jumpin' on the shrimp train...

Jeff always has a smile on his face when he opens the refrigerator and spies a mound of shrimp chilling out. I'm sure if he had his way, we would have to include it once a day! Now, I'm not that big of a fan yet, but be assured I am slowly coming around!

Covering the bottom of our plates for this Brown Rice with Shrimp, Snow Peas and Avocado is a layer of brown basmati rice - you could use any long grain rice, but both of us quite like the nutty, more hearty flavor that the brown basmati lends. I gave quite a large range for the cooking time for this part as it just depends on your rice and the amount of heat used - don't be afraid to peek early to check for doneness. If the rice is done and all of the liquid has not been absorbed, I usually turn the pot over into a strainer, wait for moist of the liquid to stop and place the rice back in the warm pot for a few minutes.

Since the shrimp take such a short amount of time to cook, we waited until the rice was finished before starting them. In a layer of shimmering olive oil, we tossed in the peeled shrimp, crisp fresh snow peas and a few matchstick-cut ginger root. After a couple minutes of being tossed around, the shrimp were just pink and the snow peas still crisp, yet becoming tender. The shrimp mixture is served on the bed of rice with a chopped avocado placed on top for bit of creamy richness. The sauce accompanying this dish is a citrusy combination of soy sauce, fresh lemon juice, rice vinegar and just a couple teaspoons of brown sugar to balance the flavor. A little puckery and a touch salty, we served this in small bowls on the side - this way you can control just how much you or your guests would like to add.


Thursday, February 21, 2008

Stomach-warming soup filled with chicken and gnocchi...

One kind of dinner we should have more often is soup - every time we make a pot, we keep saying we should prepare it a little more regularly. It is a very comforting way to warm up through all of these continuous cold snaps that have been swinging through Minnesota. I know, I know - what did you expect moving back here? We are not adjusting as we had hoped after being spoiled by the heat in Phoenix for two years - the short time we spent in Maryland helped, but obviously not enough!

If you have the extra time, you could go all out and prepare your own gnocchi for tonight's batch of Chicken and Gnocchi Soup with Spinach Gremolada, but we've found some decent already prepared ones at one of the markets close by. This soup starts off by sautéing cubed chicken breast, onions, carrots, celery, dried oregano and a bay leaf. Once the onions have softened, a couple cloves of garlic are added, followed by chicken stock and a bit of water. This combination simmers, covered, to let the flavors blend and to finish cooking the chicken. The potato dumplings are tossed in and allowed to cook just until they float to the top of the bubbling soup.

While we waited on the soup, we kept ourselves busy by tossing together the fresh spinach gremolada. Typically made with parsley, this version uses a healthy dose of tender chopped spinach. Mixed along with the greens are a combination of bright lemon juice, lemon zest, extra-virgin olive oil and a minced raw clove of garlic. The pillow-like bites of potatoes, steaming stock and meaty chunks of chicken transformed this into a hearty and stomach-warming dish, perfect for a cold winter's evening like tonight. The gremolada, sprinkled on the assembled soup bowls, added such a special fresh and bright note that stepped up this soup to another level without competing with base flavors.


Wednesday, February 20, 2008

Pasta with lots o' garlic!

You've heard me talk about how much of a picky eater I was growing up - I wouldn't even go near pasta for such a long time! For some reason, I had a bad textural reaction to pasta when I was young (I still remember that day...) and it stayed with me. I was also certain I didn't like garlic - why? Who knows, I just "knew" I didn't like it.

So, if you asked me 5 years ago if I would ever eat (let alone prepare) this Pasta with Three Kinds of Garlic for our dinner tonight, I would have probably done some odd gagging sound and said "I'll just have a bowl of cereal, thanks!". Thankfully, I finally pushed myself to just get over it as I knew I was missing out on such an abundance of new foods or ingredients and got tired of saying "Sorry, I don't eat that", even though I had probably never even tried it before!

Garlic is prepared in three different ways for this dish - first, we wrapped an entire head of garlic in foil and roasted it until the cloves were soft and golden. Once it was cool enough to handle, the garlic pulp was easily squeezed out, releasing a sweet mellow paste. A few raw cloves are then sliced thinly - these are added to a skillet with a thin layer of olive oil and gently toasted until they turn golden and crisp. Be watchful to not let these go too dark or they may end up being bitter. The third set are finely chopped and added to the same olive oil as the previous garlic, except these are only cooked until they begin to just turn translucent - a little color won't hurt, but try to not let these brown. The roasted garlic mash and a little less than a cup of dry white wine are tossed into the chopped garlic and oil - after a few minutes of simmering, cooked spaghetti (I tried out a whole-grain blend version), fresh parsley and for a nice kick, a few dashes of crushed red pepper rounded out this recipe. None of the garlic was in-your-face, but you could pick out the subtle differences between the three. We didn't think this dish needed any, but feel free to sprinkle on some fresh grated Parmesan or Asiago when serving for a salty edge.


Tuesday, February 19, 2008

Chunky cinnamon apple bars topped with a luscious cream cheese frosting...

We are back to our regular schedule and can talk about the weekly Wednesday Treat Day treat we made for Jeff to take into the office tomorrow. There really was not anything behind me choosing today's recipe, Frosted Cinnamon Apple Bars - it just sounded too good to pass up!

Jeff was quite excited as this recipe contains one of his most-favorite ingredients - cinnamon chips (which happens to be the key ingredient for his Cinnamon Fudge I am required to make each Christmas!). With a high proportion of oats and rich brown sugar, these bars are a little more dense and chewy than light and cake-y. Bringing moistness to the bars are chunks of fresh apples - I would suggest a more firm all-purpose baking apple - I used an unpeeled tart Granny Smith. Each forkful from these bars contained an intensely cinnamon-flavored bite from a generous amount of the cinnamon chips.

The bars naked look pretty homely, so we slathered the top with a combination of luscious cream cheese, softened butter, a shot of vanilla and sweet confectioners' sugar. I nibbled on a piece without the frosting and it was good, but this heavenly concoction brought these bars to a new height and I implore you not to skimp on this part. We sprinkled our favorite Vietnamese cinnamon over the stark white frosting to give a hint of what was to come inside these flavorful bars.

On the weekends, I like to roast or poach chicken and either use it right away in a salad or freeze some to use in recipes like tonight's Chicken and Orzo Frittata. While we waited for the orzo (rice-shaped pasta) to cook, we whisked up a combination of eggs, egg whites, ricotta and crème fraîche. I could easily see using cottage cheese and sour cream for those last two if you don't happen to have easy access to those ingredients. After the orzo was drained and slightly cooled, it was stirred into that egg-y mixture, along with chopped cooked chicken, a few green onions, fresh parsley and roasted red bell peppers.

I'm not sure if our baking dish was not exactly the right size or what, but we did have to bake ours a tad longer than the recipe stated (closer to 35 minutes) - not really a problem, but just pushed back the time we were ready to eat. Be sure to give it at least 5 (preferably 10) minutes to rest once it comes out of the oven so it has time to set up a bit before cutting into it. Firm, yet creamy, this thick version of a baked frittata was comforting and filling - I wouldn't call it "bland", but it wasn't exploding with flavor either. Maybe some Parmesan cheese to amp up the flavor a bit? Now, saying that, we both agreed it was still quite good and wouldn't hesitate to make it again!


Monday, February 18, 2008

Flounder with a side of slaw...

Max has been a little spastic these past couple of days... apparently a sneaky squirrel (who apparently is well fed!) has taken up residence in the screened-in area of our deck!

He pushed his way through one of the side screens and is running all sorts of brush and twigs up into the rafters, making himself at home. Max has been watching this whole scene and audibly lets us know when the little guy is back - we finally caught a picture of him (or her!) this past weekend...

We had a couple fairly light dishes for dinner - to serve with the main dish tonight, I made this Spicy Asian Slaw. While you can use a regular coleslaw-type mix for this, we enjoy the heartier texture of broccoli slaw and used that instead. Tangy rice vinegar, salty soy sauce, pungent toasted sesame oil and a few shakes of crushed red pepper are whisked together to form a sharp dressing. The slaw, with a handful of sliced green onions, is tossed with the dressing and all that was needed was a sprinkling of chopped parsley and toasted sesame seeds to round it out. Crunchy, and fresh with a zippy dressing, this was a breeze to make and a pleasure to eat.

We really enjoyed that flounder dish we had a couple weeks ago, so I thought we could try it again in a little different fashion with this Cornmeal-Crusted Flounder. The original called for catfish, which is just a bit more fatty than others, but any firm white fish should work well. Flounder is a bit more delicate, but we didn't have any problems working with it.

The slender fillets are coated in a coarse mixture of yellow cornmeal, Cajun seasoning and salt - if your seasoning is salt-free, or maybe quite salty already, you will want to adjust the amount of salt to taste. To boost the flavor and add a little naughtiness, we fried up a few slices of bacon and then proceeded to use those drippings to cook the fish rather than using another type of oil. Toss the cooked bacon in the freezer to pull out at a later date or just munch on it, like we did, until dinner was ready! The cornmeal gave the flounder a nice crunch on the outside, while the inside remained soft and moist - minimal effort for such a tasty reward!


Recipes

Sunday, February 17, 2008

Lasagna Soup for lunch and a Tofu and Broccoli dish for dinner...

8 new recipes for us this week - it was hard to narrow down the favorites, but we picked those Butterscotch Sundae Cookies, Triple-Berry French Toast, Spinach and Kale Turnovers, and of course we had to include those incredible Red Velvet Cupcakes.

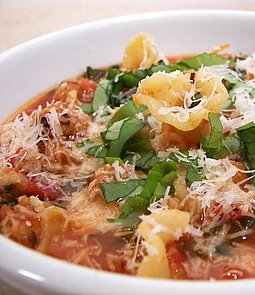
Normally we don't do anything special for lunch - typically leftovers or something that doesn't require a recipe. However, we had a guest come by today and I decided to warm us up with one of our favorite soups - the ever delicious Lasagna Soup! Now, it is pretty rare that we repeat recipes, but I make an exception for this soup quite often as it is probably one of Jeff's (and my) favorites out of all the other soups we've made.

There was no way I was going to sneak the tofu in this Tofu and Broccoli in Peanut Sauce dish I made for dinner tonight without someone knowing, but it didn't matter as Jeff didn't protest at all! I know... I can hear some of you gasping - I think he may be finally willing to admit that his taste buds have changed!

Anyway, let's move on to the recipe. Even though the recipe doesn't call for it, we decided to wrap the tofu in a few layers of paper towels and weigh it down to remove some of the excess water. This may be an extra step, but we just find the tofu holds together a little better in a stir-fry environment and browns a little easier. I've read that you can freeze tofu to improve the texture and make it more "meaty", but I haven't found the need to go that far yet.

The pressed tofu is cubed and tossed in a hot skillet, along with a couple green onions, until it turns golden. Garlic, follow by broccoli florets and crisp red bell pepper slices, are tossed in, with a couple shot of water being added to quickly steam the broccoli. Once the broccoli is bright green and crisp-tender, a nutty sauce composed of creamy natural peanut butter, hoisin sauce, cider vinegar and a couple dashes of cayenne pepper sauce is stirred in. The dark mixture thickened quickly as it hit the hot skillet and immediately started to cling to the veggies and tofu. To round out the dish, crisp bean sprouts, fresh cilantro and crunchy chopped peanuts are sprinkled on top to serve. Even though the tofu is not marinated before hand, the flavors from the distinctive peanut sauce had enough punch to overtake the blandness with an enticing flare.


Saturday, February 16, 2008

Butterscotch Sundae, no spoons required!

Occasionally we make packages of treats to send out, just because, so the other day I made a batch of these Butterscotch Sundae Cookies to drop off at the post office.

I wanted a cookie that was going to be sturdy enough to make it in one piece and still taste decent after the trip through the mail. So, in came these decadent gems - imagine the flavors of a butterscotch sundae, only in cookie form with toasted salted nuts strewn throughout. As we were waiting on the rest of the butter to soften for the dough, I melted a few tablespoons worth and added a couple cups of coarsely chopped pecans. Once they began to turn a light golden and the aroma of toasted nuts crept up from the skillet, we tossed in a bit of salt and scooped the nuts into a bowl to cool down.

While the nuts cooled, we prepared the cookie dough - nothing too out of the ordinary here, we did use dark brown sugar for a bit more richness and added a few drops of rum extract. Along with the dry ingredients, we tossed in the cooled nuts and a generous cup of butterscotch chips. After testing a couple cookies in the oven to check for spreading, we found that the dough did not need to be chilled and continued scooping and baking the dough. The finished cookies were thick and slightly soft in the center, yet still mostly firm and fantastically crunchy! Toasting the pecans in melted butter extracted and intensified such a nutty depth while tossing them with the salt helped to cut through the overall sweetness. Thankfully, I got them wrapped up and dropped off before we "quality controlled" the whole batch!


Friday, February 15, 2008

Get some use out of that frozen fruit!

So Jeff has this texture issue... anything that is mushy or too soft, he tends to not like all that well. If it has good flavor, he can usually get past that, but sometimes that is just not enough. I'm not bothered by those textures, so I happen to love recipes like bread puddings or different stratas. However, I do my best to pick out or modify recipes where the end result will be something he can completely enjoy.

When I was describing what tonight's dinner, Triple-Berry French Toast, was going to be, I got the famous half-cracked smile and heard "Oh... that sounds interesting!" as he walked away. I had a feeling the texture was going to be fine and just continued on with my own silly little grin.

This is a great way to clean out those frozen berries lounging out in your freezer - we used a combination of frozen blueberries (I used tiny wild), blackberries and those fantastic raspberries from Mom's garden we got last year. The berries are sweetened with sugar and tossed with cornstarch to help thicken the dark juices that will expel as they baked... a tip - save yourself a bowl to clean and mix the ingredients right in the baking dish! Adding an intoxicating aroma to this layer is a teaspoon of sweet cinnamon - we used our favorite pungent Extra Fancy Vietnamese from Penzeys.

To try and achieve a firmer texture, I used a French baguette that we let get a little stale - a loaf-style French bread would also work well. The original recipe called for slices of bread, but I cubed it up to make life a little easier. A couple eggs and egg whites, mixed with milk and vanilla, create the liquid used to soak and soften the cubes. Right before the dish goes into the oven, a sprinkling of granulated sugar is added to the top. As this bakes, the chunky berries release their juices and since the bread was not overloaded with that eggy mixture, the bread begins to drink in some of their sweet flavor. The top layer, with its cracks and crevices, achieved a lovely golden color and crisped up well - the side touching the berries was a little soft, yet was not mushy at all as someone feared (wink!). Since you don't need to let the bread soak for hours and hours, this would be a great brunch-type dish to effortlessly throw together on a lazy weekend morning. Finished with a shower of confectioners' sugar, I knew this was a hit when I caught Jeff licking his plate clean as he brought it to the sink - score!


Thursday, February 14, 2008

Goat-Cheese Ravioli with Parsley Sauce...

I prepared the majority of tonight's dinner, Goat-Cheese Ravioli with Parsley Sauce, a few days ago so I didn't have to spend a bunch of time in the kitchen tonight. Making fresh pasta is not too difficult, but can be a little intimidating - so this recipe calls for wonton wrappers instead and ends up making the whole process a bit less laborious.

The filling is a combination of tangy fresh goat cheese, ricotta, a smashed clove of garlic and just a sprinkling of fresh grated nutmeg. A dollop of this cheesy mixture is placed in the center of each wonton and the skins are folded together to form a tidy little triangle. At this point, you can line them up on a baking sheet, freeze them and pop each assembled ravioli into a zip-loc bag to store for around a month. To cook, they are dunked into gently boiling water for just a few minutes - fresh or frozen, they should take roughly the same amount of time. So they don't get soggy, be sure to set them on a paper towel for a second so some of the excess liquid is drained off while you finish getting things together.

While you could do a typical and tasty browned butter sauce to coat these ravioli, we opted to go a little lighter and made a dressing based from finely chopped fresh parsley, fruity olive oil and nutty Parmesan cheese. As is, this recipe serves two nicely - but, it would also double or triple easily if you would like to freeze the rest for a later date or if you have more mouths to feed.


Wednesday, February 13, 2008

Happy Valentine's Day 2008!

I mentioned that I was pretty busy yesterday and I think you will see just how much once I get done with today's lengthy post! We wanted to do something a little extra special for the Wednesday Treat Day this week as Valentine's Day is tomorrow!

The first thing I had to get going was the dough for some Cream Cheese Vanilla Shortbread Cut Outs. This dough has a couple special touches to make it a little more special - cream cheese and vanilla sugar. Once it had sufficiently chilled in the refrigerator, it easily rolled out and I cut out a mess of heart-shaped cookies. By the time I had re-rolled the dough once, I already had something crazy like 70 some cookies, so I stopped at that point - you might be able to re-roll the dough 1 more time without it going tough though.

You want to bake these cookies just until you see the slightly golden hint around the edges - the cookies will be sturdy enough at this point to work without them falling apart, but not too hard or crunchy. These buttery cookies were fantastic plain, but they looked a little naked as is. For some of the cookies, we decided to dip one-half into melted bittersweet chocolate. For others, we decided to sprinkle on some coarse red sugar in the center, before we baked them. For the rest, we thought it would be fun and a little different to pour over a White Chocolate Fondant Icing.

Fancy name maybe, but it is really quite easy to mix up and an excellent way to quickly add some pizazz to cookies. We added just a drop of red gel coloring to tint it a light pink - you could just leave it white, if desired, and add some fun sugars on top. We just lined up the cookies on a wire rack and poured the frosting on top of the cookies with a spoon. The best part about this type of icing is that you can re-use it - all you need to do is scrape up the excess and re-heat it (not too much though, it is at its best consistency around 100 degrees). If you find crumbs in the icing, you can just strain them out with a fine-mesh strainer! This type of icing will set with a glorious shine, but it will remain somewhat soft - you won't be able to stack the cookies as they will stick together.

I was multi-tasking at various points in the cookie making process, and got going on the cupcakes and frosting. So what kind did we make? Red Velvet Cupcakes of course! Lots of red velvet cakes and cupcakes use a cream cheese frosting, which we have done before and is decidedly delicious, but we wanted to make a more traditional frosting for these. While this is technically a buttercream frosting, it is not that exceedingly sweet kind that is based on shortening and confectioners' sugar.

This version gets its thick, silky body from a cooked mixture of milk and flour. I could tell what Jeff was thinking just by the look on his face when I was describing the process to him... "Umm... milk and flour? How is the world is that gonna taste good?". Well, it certainly doesn't taste like that once you add heaps of butter! You may look at the ingredients, see granulated sugar and think the result would be grainy. However, be assured that the sugar will completely blend into the butter and the frosting will be extremely luscious and smooth by the time it is ready. Just be sure that the cooked milk mixture has completely cooled before you begin to add it.

Now, back to these devilish cupcakes! Most recipes out there are quite similar - the differences come typically from the flour used, the amount of cocoa and how much red coloring is added. To give these the best soft and tender crumb, we used cake-flour in our cupcakes. With only 3 tablespoons of cocoa powder, you don't get an overwhelming chocolate bite when you sink your teeth into the cake, but the natural cocoa powder adds just enough subtle flavor so you know it's there. Buttermilk as the liquid keeps these incredibly moist and adds a slight tang to lure you to the next mouthful. We ended up garnishing the tops of the cupcakes with a few of the cookies and served the rest of the side for munching!


Tuesday, February 12, 2008

Stuffin' dough with lots of greens...

So it's Tuesday... you might be looking for the treat day post - but we've had to put it off a day. I've been quite busy getting the treats together and won't be finished with them until the morning. We'll grab some pictures bright and early before we send them into the office and talk about what we made tomorrow!

I probably should have planned a dish that was not so involved for dinner tonight, but I went ahead with these Spinach and Kale Turnovers anyway. Once I got into the groove, it didn't take as long as I feared! The original recipe called for a canned dinner roll dough, but I went ahead and whipped up a slightly smaller batch of our favorite Whole-Wheat Pizza Dough to use instead as it comes together in a snap.

While we waited on the dough to rise, I busied myself with the filling which is simply sautéed onions, garlic, chopped kale and tender baby spinach. The obligatory seasonings of salt and fresh ground black pepper are added, but an unusual pinch of fresh grated nutmeg brought just a subtle touch to heighten the fillings flavor. After a few minutes off-heat to cool slightly, a heaping mound of salty feta is added to round out the filling. The dough is equally divided and rolled out into small circles - the greens are then piled on and the dough is folded over to create the turnover. You could just crimp the edges with a fork if desired, but we gave them a thick ridge around the outside by folding the bottom piece of the dough over the top lip and sealing them together. The stuffed turnovers are finally spritzed with a bit of olive oil and showered with nutty Parmesan cheese before going into the oven. Now, these are fairly small, so we had a couple of them for a main dish - but you could also serve one of these as a side to another dish. I'm betting these will freeze quite well and should re-heat nicely for a quick weeknight meal or a light lunch!


Monday, February 11, 2008

Hoisin glazed pork chops...

I know it may seem like we don't eat meat all that often - we do have it at lunches or even at breakfast, but we just don't have it nearly as much for dinner any more. I don't think there is any reason behind it - we are just making whatever sounds good when I menu plan and it just happens to not be as heavy on the meat these days! Jeff asked if we could have some pork chops this week, so I pulled some from the freezer last night to make these Five-Spice Barbecued Pork Chops with Asian-Style Succotash for dinner tonight.

We seasoned a few boneless pork chops with five-spice powder and a grill seasoning blend - you can usually find a prepared blend in the market, but we make our own from a mixture of coarsely ground coriander seeds, salt, dill weed, paprika, crushed red pepper, garlic powder and fresh ground black pepper. Once they had fully cooked, we poured over thick and distinctly flavored hoisin sauce to coat the juicy pork.

While we were waiting on the pork, we started on the veggie succotash by heating a couple tablespoons of canola oil and adding some red bell pepper. After a couple minutes, garlic was added and once you could smell its sweet aroma, sliced snow peas, corn and a few green onions are tossed into the skillet. Cooked just until it was heated through, the flavors are freshened up by a jigger of fresh lime juice followed by an injection of heat from a few shots of cayenne pepper sauce. With a hearty piece of shiny glazed pork and a zesty colorful salad on the side, we were quite satisfied by the time our plates were cleaned. I had to remind Jeff that if he didn't stop picking at the leftovers, he wouldn't have any for lunch tomorrow!


Sunday, February 10, 2008

Chard and Feta Tart...

9 new recipes done in the kitchen this week - Jeff wanted to pick the favorites this week, so his list were those Girl Scout Cookie-like Coconut Caramel Candy Bars, Three-Cheese Polenta Pie and reluctantly those Spicy Mumbai Potatoes (go hidden tofu!).

While we can usually sneak in some lengthy recipes during the week, I'm glad I waited to do this Chard and Feta Tart on a weekend. It was not like this recipe had a ton of work to do, but there was plenty of time in between steps!

A couple hours before we were ready to eat, I started on the delicious fresh thyme-infused cracker-like crust. This is not a pastry that you need to be afraid of - it comes together in a jiffy and just needs to rest in the refrigerator to ease rolling it out. No butter or shortening here, just a few tablespoons of extra-virgin olive oil and some cold water for the liquid! Once we rolled the dough into a large circle, I rolled it up on the rolling pin and scooted it into one of those snazzy removable bottom tart pans.

After a few pricks with a fork to keep it from puffing up, the crust is baked off until golden and firm - it then needs to cool down before the filling goes in. The filling is a mixture of sautéed swiss chard (stems and leaves), a mess of garlic, a couple eggs and ricotta cheese. To add some pizazz, fresh lemon zest is added along with briny chopped kalamata olives and crumbled feta cheese to the filling. Baked until the center is set, make sure the tart has a few minutes to cool down before cutting and serving. I know the color is a little wonky, but we could only get a hold of red chard today and it ended up dyeing the white ricotta quite well! Pre-baking the crust ensures that it stays nice and crispy, which also makes this piquant tart sturdy enough to cut into smaller bites if you wanted to pass it around as an appetizer.


Saturday, February 09, 2008

Goin' nuts over cookies!

We always have some sort of homemade nut butter in the fridge - be it peanut, almond or Jeff's favorite cashew butter. I've had some macadamia nuts chillin' out in the freezer since we made those Blueberry-Coconut-Macadamia Muffins late last year - I plucked them out this morning to make yet another nut butter so we could prepare these Macadamia Butter Cookies with Dried Cranberries.

Since the macadamias are rich in fat, the heat from the whirling blade will help extract the oils and it will take just a few minutes to turn those buttery nuggets into a smooth butter. Once combined with your typical cookie ingredients (no additional butter or oil necessary!), I found the dough to hold together well, yet just slightly tacky to the touch. It only took a 10 minute rest in the refrigerator and we could easily roll the dough into balls.

The tops of the cookies are dipped in crunchy granulated sugar and then the balls of dough are give a criss-cross pattern (think peanut butter cookies) on top with a fork. Just a small amount of fresh grated nutmeg give the cookies a subtle, yet fragrant special note that keeps you asking "Mmmm, what is that?!". The fruity dried cranberries acted as a nice counterpoint to the crisp and slightly chewy-in-the-center cookies. Bake these sturdy cookies until the edges are golden and the cookies have puffed up, but take them out when the centers are still more tan to keep that chewy quality.


Friday, February 08, 2008

A dish of pork, soba noodles and sesame...

We keep lots of different oils on hand to use in cooking, but I have to admit that one of my favorites is toasted sesame oil. That dark, rich and pungent sesame flavor really perks up a lot of different dishes - even though tonight's dinner, Sesame-Ginger Pork with Soba Noodles, used just 2 teaspoons, it still packed a punch.

If you have easy access to soba (buckwheat) noodles, great - but if you don't and still want to make this, you can also use a whole-wheat spaghetti. While we waited for the noodles, we heated up the sesame oil and added some minced pickled ginger. When the sweet flavor of the ginger hit my nose, I raised the heat for the skillet and tossed in tender chunks of lean pork tenderloin. Once the meat had browned on all sides, it was lightly seasoned and we stirred in a few green onions and toasted sesame seeds.

Broth and some salty soy sauce were added to finish off the pork and begin creating a flavorful "sauce" for the noodles. Crisp slices of water chestnuts and the noodles are added off heat and the dish is freshened up with a sprinkling of chopped cilantro. At first it looked like it was going to be quite wet, but the noodles slowly drank up some of the excess liquid, without turning mushy, and turned out to be just saucy enough for us. With the generous pieces of tenderloin, this finished noodle dish with its poignant sesame depth from the oil and crunchy toasted seeds was a snap to prepare with minimal prep work and a pleasant way to bring a busy week to a close.